メインコンテンツにスキップ

Sony Ericsson Xperia Play Main Flex Cable Replacement

必要な工具と部品

ビデオの概要

  1. Sony Ericsson Xperia Play Main Flex Cable Replacement, Main Flex Ribbon Cable: 手順 1、 3の画像 1 Sony Ericsson Xperia Play Main Flex Cable Replacement, Main Flex Ribbon Cable: 手順 1、 3の画像 2 Sony Ericsson Xperia Play Main Flex Cable Replacement, Main Flex Ribbon Cable: 手順 1、 3の画像 3
    • Remove the battery cover and the battery.

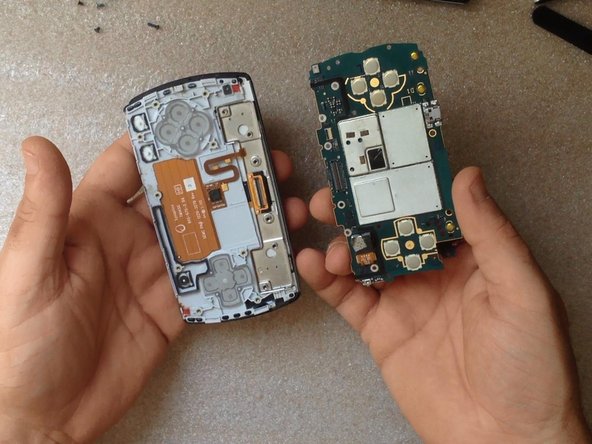
    • You have 6x silver screw and 7x black screw and remove the rear bezel.

  2. Sony Ericsson Xperia Play Main Flex Cable Replacement: 手順 2、 2の画像 1 Sony Ericsson Xperia Play Main Flex Cable Replacement: 手順 2、 2の画像 2
    • Now with a plastic tool disconnect the main flex cable. Be careful, near to the main flex cable connector there is many small elements.

    • Disconnect the gaming keyboard flex keyboard.

  3. Sony Ericsson Xperia Play Main Flex Cable Replacement: 手順 3、 2の画像 1 Sony Ericsson Xperia Play Main Flex Cable Replacement: 手順 3、 2の画像 2
    • Remove the mother board and the gaming keyboard.

  4. Sony Ericsson Xperia Play Main Flex Cable Replacement: 手順 4、 3の画像 1 Sony Ericsson Xperia Play Main Flex Cable Replacement: 手順 4、 3の画像 2 Sony Ericsson Xperia Play Main Flex Cable Replacement: 手順 4、 3の画像 3
    • Unscrew the 4x screws.

    • Remove the black sticker.

    • Disconnect the touchscreen flex cable connector.

    • Now you can disassemble the front bezel.

  5. Sony Ericsson Xperia Play Main Flex Cable Replacement: 手順 5、 2の画像 1 Sony Ericsson Xperia Play Main Flex Cable Replacement: 手順 5、 2の画像 2
    • Use the thin end of a plastic tool to remove LCD Display and disconnect the flex cable.

  6. Sony Ericsson Xperia Play Main Flex Cable Replacement: 手順 6、 3の画像 1 Sony Ericsson Xperia Play Main Flex Cable Replacement: 手順 6、 3の画像 2 Sony Ericsson Xperia Play Main Flex Cable Replacement: 手順 6、 3の画像 3
    • To release the ribbon cable peel off two patches.

  7. Sony Ericsson Xperia Play Main Flex Cable Replacement: 手順 7、 3の画像 1 Sony Ericsson Xperia Play Main Flex Cable Replacement: 手順 7、 3の画像 2 Sony Ericsson Xperia Play Main Flex Cable Replacement: 手順 7、 3の画像 3
    • Now remove the small metal plate taped to the flex cable.

    • Remove the plastic plate from the back side of the flex cable connector.

    • Bend the cable at an angle so you can push it down through the hole.

  8. Sony Ericsson Xperia Play Main Flex Cable Replacement: 手順 8、 3の画像 1 Sony Ericsson Xperia Play Main Flex Cable Replacement: 手順 8、 3の画像 2 Sony Ericsson Xperia Play Main Flex Cable Replacement: 手順 8、 3の画像 3
    • Use the same technique when you are installing the new Main Ribbon Cable.

    • I prefer to test the new spare part before the full assembly.

  9. Sony Ericsson Xperia Play Main Flex Cable Replacement: 手順 9、 1の画像 1
終わりに

To reassemble your device, follow these instructions in reverse order.

5 の人々がこのガイドを完成させました。

作成者

1人の作成者と共同作成されました。

ZFix

メンバー登録日: 12/09/13

191,882 ポイント

330のガイドは作成済み

チーム

Master Techs Master Techs人のメンバー

Community

321 メンバー

1,516のガイドは作成済み

3 件のコメント

Iv got a problem my phone won't turn on or charge but when i plug the charger in the power button just flashes red a couple of times then nothing do u know what this means is it the battery or the phone that is broke

paulfrost412 - 返信

Is "small metal plate" from Step 7 important? Forgot to put it inside and if there is no need to open it again (everything works) I won't do it :)

ch3mn3y - 返信

vreau sa cumpar sleif la xperia play, rog foarte muld daca aveti ceva informatii sunati sau scrieti pe mob; 060215747.

petrea - 返信

コメントを追加

統計データ:

過去 24時間: 0

過去 7 日: 5

過去 30 日: 36

今までの合計 7,503