メインコンテンツにスキップ

Sony DualSense コントローラー フロントケースの交換

必要な工具と部品

  1. Sony DualSense コントローラー フロントケースの交換, ミドルトリムの右端のクリップを外します: 手順 1、 2の画像 1 Sony DualSense コントローラー フロントケースの交換, ミドルトリムの右端のクリップを外します: 手順 1、 2の画像 2
    • 始める前に、コントローラーの接続を外して電源を切ってください。

    • コントローラーの右下にあるミドルトリムの下に開口ピックを差し込み、ケースを固定しているクリップを外します。

  2. Sony DualSense コントローラー フロントケースの交換, ミドルトリムの右下端のクリップを外します: 手順 2、 3の画像 1 Sony DualSense コントローラー フロントケースの交換, ミドルトリムの右下端のクリップを外します: 手順 2、 3の画像 2 Sony DualSense コントローラー フロントケースの交換, ミドルトリムの右下端のクリップを外します: 手順 2、 3の画像 3
    • 開口ピックをミドルトリム右下端のに沿ってスライドして、ケースを固定しているクリップを外します。

  3. Sony DualSense コントローラー フロントケースの交換, ミドルトリムの左端のクリップを外します: 手順 3、 2の画像 1 Sony DualSense コントローラー フロントケースの交換, ミドルトリムの左端のクリップを外します: 手順 3、 2の画像 2
    • コントローラー左下にあるミドルトリムの下に開口ピックを差し込み、ケースに固定されているクリップを外します。

  4. Sony DualSense コントローラー フロントケースの交換, ミドルトリムの左下端のクリップを外します: 手順 4、 3の画像 1 Sony DualSense コントローラー フロントケースの交換, ミドルトリムの左下端のクリップを外します: 手順 4、 3の画像 2 Sony DualSense コントローラー フロントケースの交換, ミドルトリムの左下端のクリップを外します: 手順 4、 3の画像 3
    • 開口ピックをミドルトリムの左下端に沿ってスライドさせ、ケースに固定されているクリップを外します。

  5. Sony DualSense コントローラー フロントケースの交換, ミドルトリムを外します: 手順 5、 3の画像 1 Sony DualSense コントローラー フロントケースの交換, ミドルトリムを外します: 手順 5、 3の画像 2 Sony DualSense コントローラー フロントケースの交換, ミドルトリムを外します: 手順 5、 3の画像 3
    • 指を使ってミドルトリム下端を持ち上げ、残りのクリップを外します。

    • ミドルトリムをジョイスティックから持ち上げて外します。

  6. Sony DualSense コントローラー フロントケースの交換, L1ボタンを外します: 手順 6、 3の画像 1 Sony DualSense コントローラー フロントケースの交換, L1ボタンを外します: 手順 6、 3の画像 2 Sony DualSense コントローラー フロントケースの交換, L1ボタンを外します: 手順 6、 3の画像 3
    • L1ボタン上の隙間にスパッジャーの先端を差し込みます。

    • ボタンが飛び出さないように、親指でボタンを覆います

    • L1ボタンを上にむけてこじ開けて、取り出します。

    Tried prying from the front of the buttons as pictured and my spudger broke off in the gap. A video I watched showed them being pried off from the back (between the R1/R2 and L1/L2 buttons) which seemed much easier.

    Lora Singleton - 返信

    Agree with Lora's comment above. I was able to use an old credit card to take L1/R1 out this way. I pressed down the L2/R2 button to create space to work in, then came in from between L1/L2 and R1/R2. It's easy to pop one of the outer corners first then you can work the credit card around the top and the rest falls out.

    darkstar448 - 返信

    Man, if I'd just read the thumb part...

    caldugen - 返信

  7. Sony DualSense コントローラー フロントケースの交換, R1ボタンを外します: 手順 7、 3の画像 1 Sony DualSense コントローラー フロントケースの交換, R1ボタンを外します: 手順 7、 3の画像 2 Sony DualSense コントローラー フロントケースの交換, R1ボタンを外します: 手順 7、 3の画像 3
    • R1ボタン上の隙間にスパッジャーの平面側先端を差し込みます。

    • ボタンが飛び出さないように、指でボタンを覆ってください。

    • R1ボタンを上にむけてこじあけて、取り出します。

    to save a few bucks, the L1 and R1 buttons can be removed without the use of the spudger tool by using any thin prying tool and just pry the buttons from the bottom instead of the top

    Alan Peng - 返信

    What I didn't see addressed anywhere (here or in other similar articles) is that replacement R1 / L1 buttons can be differ enough to be un-usable depending on which model your ps5 controller is. The ones I ordered don't fit and now I can't find a way to be sure I get the right ones because few know there's even a difference.

    Walt Mather - 返信

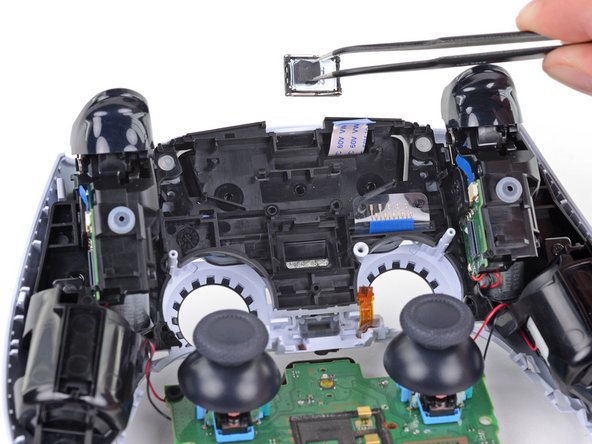
    Did you already figured it out? The version the we need yo use?, We are in the same situation here.

    Gerald Ross Rodriguez -

    Tried prying from the front of the buttons as pictured and my spudger broke off in the gap. A video I watched showed them being pried off from the back (between the R1/R2 and L1/L2 buttons) which seemed much easier.

    Lora Singleton - 返信

  8. Sony DualSense コントローラー フロントケースの交換, リアケースを外します: 手順 8、 2の画像 1 Sony DualSense コントローラー フロントケースの交換, リアケースを外します: 手順 8、 2の画像 2
    • プラスドライバーを使って、リアケースのの下側端を固定している6.4mmネジを2本外します。

  9. Sony DualSense コントローラー フロントケースの交換: 手順 9、 2の画像 1 Sony DualSense コントローラー フロントケースの交換: 手順 9、 2の画像 2
    • プラスドライバーを使って、L1とR1ボタン裏側に留められている6.4mmネジを2本外します。

  10. Sony DualSense コントローラー フロントケースの交換: 手順 10、 3の画像 1 Sony DualSense コントローラー フロントケースの交換: 手順 10、 3の画像 2 Sony DualSense コントローラー フロントケースの交換: 手順 10、 3の画像 3
    • スパッジャーの先端を使って、ハードセットジャックの両側に留められた2つのクリップを外します。

    If these are similar in nature to the DS4’s clips, don’t use too much force so you don’t end up breaking them

    Strings Cat - 返信

    there is a clip that holds the rear cover in place located in R1 and L1

    Zargruzski nakamura - 返信

    Is there a clip in R1 and there's another in L1? Any way to see where exactly? The part of the back cover near L1 and R2 is that one that's not coming off. I can't seem to pull it off easily the way it looks in Step 11.

    tofu - 返信

    For those wondering where the bumper clip is located, it's ~1cm inwards from the end of the back shell where the bumpers are. Take a spudger in that spot and lift it upwards carefully, it should disconnect the clips if they aren't already

    Franz Rolfsvaag - 返信

  11. Sony DualSense コントローラー フロントケースの交換: 手順 11、 2の画像 1 Sony DualSense コントローラー フロントケースの交換: 手順 11、 2の画像 2
    • リアケースを外します。

    • あるリビジョン版モデルによっては、リアケースは以前に取り外したバンパーの横に追加の2つのクリップで固定されています。リアケースが自然に開かない場合は、これらのクリップがあるかどうか確認してください。

    There are four more clips/hooks hidden in the seams along the outer sides of the handles. If you pull open the controller as shown in this step, then you will shear off the two tiny clips which are right next to the R1 and L1 buttons.

    Therefore, you should first release those clips by prying the seams open sideways.

    I noticed this with the updated design of the controller, not sure whether the hooks are present on the first version.

    The hooks are not critical for the integrity of the controller as the two halves are held together by the screws hidden under the buttons. The damage does show that the controller has been taken apart.

    Nick - 返信

    Thought I'd clarify: The clips next to the L1 and R1 are on the outer side from the L1 and R1 buttons, I'd suggest zooming in on the picture to see them. They're quite easy to break, but also easy to remove using the plastic spudger along the seam, bending the bottom cover outwards

    Franz Rolfsvaag -

    I am still strugling to find the clips. Could someone point them out in the image with a screen shot or something like that.

    aGingerThing - 返信

    I keep getting stuck at this step too with the new DualSense CFI-ZCT1WA revision. The top and bottom shells seem like they are fused together next to L1/R1 but I can't seem to be able to find where these hidden clips are located. My controller is still in warranty so I don't want to break them in case I can't fix my issue.

    but also easy to remove using the plastic spudger along the seam, bending the bottom cover outwards

    I tried this but it seems that the you need a lot of force and I ended up bending the tip of my spudger. Are you sure it's not the top cover that you need to pry away? The bottom cover has a ridge to make sure it's under the top cover so it's not easy to bend outwards.

    @samomio I think there needs to be a step added for these new clips.

    robplease - 返信

    Ok, not seeing a lot of motion on this request, so I've uploaded photos of the hooks to imgur.

    Here ya go: https://imgur.io/a/7NWmQi5

    Sean Murphy - 返信

    Life save Sean. Appreciate the image.

    Vili - 返信

    This guide really needs an update on this. I had a really hard time getting the forward clips to release even after referring to the comments above. Pretty sure I broke them in the end. No big deal but would be great if the iFixit experts could work out a good method for releasing them.

    Marcus Harvey - 返信

    I finally figure it out!!

    The hidden clip is very tricky but once you understand how it works it is easy to remove.

    Use Sean's picture: https://imgur.io/a/7NWmQi5

    What sean is showing, is actually the bottom shell of the seam.

    To disassemble

    1. Use the flat side of the spudger, pry the bottom seam OUTWARDS near the R1/L1 button hole.

    2. (most important) While prying the bottom shell seam outwards, push your thumb on the upper shell and push outward as well (you can do this by applying pressure from the removed R1/L1 button hole towards the seam. And then it will disassemble automatically

    And that's it!

    Penn - 返信

    updated instruction:

    I finally figure it out!!

    The hidden clip is very tricky but once you understand how it works it is easy to remove.

    Use Sean's picture: https://imgur.io/a/7NWmQi5

    What sean is showing, is actually the bottom shell of the seam.

    To disassemble

    1. Use the flat side of the spudger, pry the bottom seam OUTWARDS near the R1/L1 button hole.

    2. (most important) While prying the bottom shell seam outwards, hold your thumb on the upper shell as anchor and then use your other finger to pry the bottom edge of the controller up away from the shell. If you are doing the first step, then don't worry about breaking the clip, just force it open. And then it will disassemble automatically

    And that's it!

    Penn - 返信

    I managed to do it just by pulling harder than what I was already doing. And I don't think I broke anything. So, for me at least, the technique described in this guide worked.

    Riedweg Guillaume - 返信

  12. Sony DualSense コントローラー フロントケースの交換, バッテリーの接続を外します: 手順 12、 2の画像 1 Sony DualSense コントローラー フロントケースの交換, バッテリーの接続を外します: 手順 12、 2の画像 2
    • ピンセットもしくは指で、マザーボードからバッテリーの接続を外します。

    • ワイヤ自体ではなく、コネクタを摘んで接続を外してください。

    Tweezers aren't gonna grip that the way you need.

    Leif DeWolf - 返信

    For those having trouble using tweezers to pull out the connector, you can grab below the lip of the connector and use the controller as a lever to pull it up as seen here DualSense コントローラー v2 バッテリーの交換

    This little trick helped me so much and I believe it should be shown on this guide as well.

    Ezra Worthington - 返信

    Tweezers is too weak for this. I use my finger nails after removing the battery from the slot, straighten the cable lines and slowly wiggle it out.

    Penn - 返信

  13. Sony DualSense コントローラー フロントケースの交換, バッテリーを取り出します: 手順 13、 2の画像 1 Sony DualSense コントローラー フロントケースの交換, バッテリーを取り出します: 手順 13、 2の画像 2
    • バッテリーのブラケットからバッテリーをまっすぐ取り出します。

  14. Sony DualSense コントローラー フロントケースの交換, 下部マイクロフォンを取り出します: 手順 14、 2の画像 1 Sony DualSense コントローラー フロントケースの交換, 下部マイクロフォンを取り出します: 手順 14、 2の画像 2
    • 下部マイクのリボンケーブルのプルタブを指またはピンセットでつかみ、マザーボードから取り外します。

    These ribbon cables have small tabs on either side you can use to help pull out the cable. You can slightly pull up, alternating between the two sides, to slowly wiggle the connector out.

    Tran Anh Nguyen - 返信

    Might be a rookie mistake, but DO NOT REMOVE THE WHITE BRACKETS, only the ribbon! If you do, you’ll have an awful time putting it back and will most likely mess it up. Yes I did.

    Joris D - 返信

  15. Sony DualSense コントローラー フロントケースの交換, バッテリーブラケットを外します: 手順 15、 2の画像 1 Sony DualSense コントローラー フロントケースの交換, バッテリーブラケットを外します: 手順 15、 2の画像 2
    • プラスブラケットを使って、バッテリーブラケットを固定している6.4mmネジを外します。

  16. Sony DualSense コントローラー フロントケースの交換: 手順 16、 2の画像 1 Sony DualSense コントローラー フロントケースの交換: 手順 16、 2の画像 2
    • マザーボードからバッテリーのブラケットを持ち上げて取り出します。

    Black and red wires fit neatly under the lower left and lower right arms of the battery bracket, to avoid potential damage when reconnecting the rear case.

    Seomhnasaigh B - 返信

    This needs to be noted. Thanks!

    Nick Gatti -

  17. Sony DualSense コントローラー フロントケースの交換, 右側トリガーアセンブリの接続を外します: 手順 17、 2の画像 1 Sony DualSense コントローラー フロントケースの交換, 右側トリガーアセンブリの接続を外します: 手順 17、 2の画像 2
    • 右側のトリガーアセンブリのリボンケーブルのプルタブをピンセットまたは指で摘み、引き上げてマザーボードから外します。

    • リボンケーブルをまだ完全に外さないでください。

  18. Sony DualSense コントローラー フロントケースの交換: 手順 18、 2の画像 1 Sony DualSense コントローラー フロントケースの交換: 手順 18、 2の画像 2
    • 右側のトリガーアセンブリのリボンケーブルのプルタブをピンセットまたは指で摘み、引き上げてトリガーアセンブリから取り外します。

    • リボンケーブルを取り出します。

  19. Sony DualSense コントローラー フロントケースの交換, 左側トリガーアセンブリの接続を外します: 手順 19、 2の画像 1 Sony DualSense コントローラー フロントケースの交換, 左側トリガーアセンブリの接続を外します: 手順 19、 2の画像 2
    • 左側トリガーアセンブリのリボンケーブルのプルタブをピンセットや指で掴み、マザーボードから引き上げて取り出します。

    • リボンケーブルを完全に外さないでください。

  20. Sony DualSense コントローラー フロントケースの交換: 手順 20、 2の画像 1 Sony DualSense コントローラー フロントケースの交換: 手順 20、 2の画像 2
    • 左側トリガーアセンブリのリボンケーブルのプルタブをピンセットまたは指で摘み、引き上げてトリガーアセンブリから外します。

    • リボンケーブルを外します。

  21. Sony DualSense コントローラー フロントケースの交換, 上部マイクロフォンの接続を外します: 手順 21、 2の画像 1 Sony DualSense コントローラー フロントケースの交換, 上部マイクロフォンの接続を外します: 手順 21、 2の画像 2
    • ピンセットや指を使って上部マイクリボンケーブルのプルタブをつかみ、引き上げてマザーボードから外します。

    what is the white thing soldered to the motherboard called where the mic ribbon cable plugs and where can i find the part?

    Abhi K - 返信

    @abhik13943 did you ever find this part?

    DaMej2895 - 返信

    unfortunately, no. i'm just using my controller without a mic.

    Abhi K -

  22. Sony DualSense コントローラー フロントケースの交換, タッチパッドの接続を外します: 手順 22、 2の画像 1 Sony DualSense コントローラー フロントケースの交換, タッチパッドの接続を外します: 手順 22、 2の画像 2
    • ピンセットや指でタッチパッドリボンケーブルのプルタブを摘み、マザーボードのコネクタからまっすぐに引き抜きます。

  23. Sony DualSense コントローラー フロントケースの交換, マザーボードを持ち上げて外します: 手順 23、 3の画像 1 Sony DualSense コントローラー フロントケースの交換, マザーボードを持ち上げて外します: 手順 23、 3の画像 2 Sony DualSense コントローラー フロントケースの交換, マザーボードを持ち上げて外します: 手順 23、 3の画像 3
    • フロントケースからJoystickを慎重に通してひき抜き、マザーボードを持ち上げて取り出します。

    • マザーボードを完全に取り出さないでください。マザーボードとバイブレーターモーターを繋ぐ4本のハンダ線があります。

    Pushing on the joysticks makes this much easier.

    zidek22 - 返信

    My motherboard wouldn't just lift right out. So I noticed there's also a pair of barely visible small black clips, one on each side of the motherboard, holding it down. One is right beside the battery connector and the other's directly across on the opposite side of the motherboard right beside the ribbon cable connector.

    Jason Mulholland - 返信

    Such a good observation!

    zidek22 -

    Just push on the sticks. Pops out like a charm, zero effort.

    Italian Retro Guy - 返信

  24. Sony DualSense コントローラー フロントケースの交換, ライトガイドを取り出します: 手順 24、 2の画像 1 Sony DualSense コントローラー フロントケースの交換, ライトガイドを取り出します: 手順 24、 2の画像 2
    • プラスドライバーを使って、ライトガイドを固定している8.5mmのネジを2本外します。

    Mine didn't have this piece

    John - 返信

  25. Sony DualSense コントローラー フロントケースの交換: 手順 25、 2の画像 1 Sony DualSense コントローラー フロントケースの交換: 手順 25、 2の画像 2
    • ピンセットもしくは指先で、ライトガイドをブラケットを取り出します。

  26. Sony DualSense コントローラー フロントケースの交換: 手順 26、 2の画像 1 Sony DualSense コントローラー フロントケースの交換: 手順 26、 2の画像 2
    • ピンセットもしくは指先で、ライトガイドを取り出します。

    Where do i buy a new light guide?

    Jasper Nuyts - 返信

  27. Sony DualSense コントローラー フロントケースの交換, スピーカーを外します: 手順 27、 3の画像 1 Sony DualSense コントローラー フロントケースの交換, スピーカーを外します: 手順 27、 3の画像 2 Sony DualSense コントローラー フロントケースの交換, スピーカーを外します: 手順 27、 3の画像 3
    • ピンセットを使って、ミッドフレームからスピーカーを取り出します。

    • スピーカーは、フォームパッドが左側、メタル接点が右側になるように正しい向きで取り付けてください。

    Speaker may be attached to the motherboard via the foam pad.

    Daniel Geppert - 返信

  28. Sony DualSense コントローラー フロントケースの交換, ミッドフレームを外します: 手順 28、 2の画像 1 Sony DualSense コントローラー フロントケースの交換, ミッドフレームを外します: 手順 28、 2の画像 2
    • プラスドライバーを使って、ミッドフレームをフロントケースに固定している6.4mmネジを2本外します。

  29. Sony DualSense コントローラー フロントケースの交換: 手順 29、 3の画像 1 Sony DualSense コントローラー フロントケースの交換: 手順 29、 3の画像 2 Sony DualSense コントローラー フロントケースの交換: 手順 29、 3の画像 3
    • ミッドフレームとマザーボードを慎重に持ち上げて、フロントケースから取り出します。

    • 振動モーターワイヤを引っ張らないよう、ご注意ください。

    • 再組み立ての際、 タッチパッドのリボンケーブルを、ミッドフレームの長方形の開口部に通して戻します。

    Feed the ribbon cable back through the rectangular slot in the midframe during reassembly.

    Seomhnasaigh B - 返信

    Thank you for catching this!

    Sam Omiotek -

  30. Sony DualSense コントローラー フロントケースの交換, タッチパッドを外します: 手順 30、 2の画像 1 Sony DualSense コントローラー フロントケースの交換, タッチパッドを外します: 手順 30、 2の画像 2
    • プラスドライバーを使って、タッチパッドにタッチパッドブラケットを固定している6.4mmネジを2本外します。

    On my early 2022 controller it only had one screw, the other side was a hook, i was able to separate them but pulling the touch pad up slightly away from the top of the controller and pushing towards the side the one screw was on.

    Ryan Hynes - 返信

    Question where can a buy a brand New touch pad replacement. I ripped mijn ribbon cable from the touch pad and cant seem to fix it please help

    patrick yard - 返信

  31. Sony DualSense コントローラー フロントケースの交換: 手順 31、 3の画像 1 Sony DualSense コントローラー フロントケースの交換: 手順 31、 3の画像 2 Sony DualSense コントローラー フロントケースの交換: 手順 31、 3の画像 3
    • タッチパッドブラケットをフロントケースから持ち上げて外します。

    • 再組み立ての際は、ブラケットの長方形のスロットにリボンケーブルを通してください。

  32. Sony DualSense コントローラー フロントケースの交換: 手順 32、 1の画像 1
    • タッチパネルからフロントケースを持ち上げて外します。

    Has anyone found a replacement logic board for trackpads?

    Bob - 返信

    not sure, but i’m currently trying to take the logic board off of my track pad, idk how to

    weston kijewski -

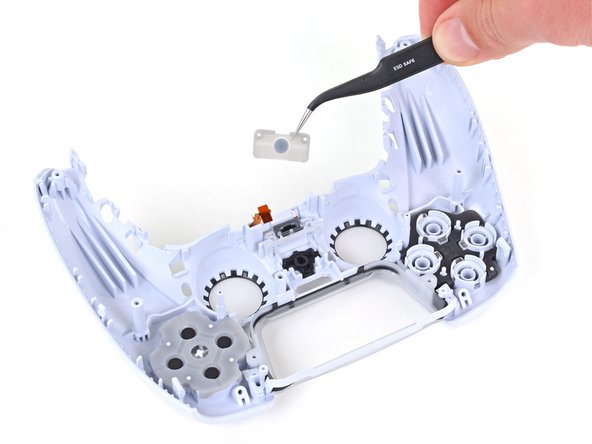
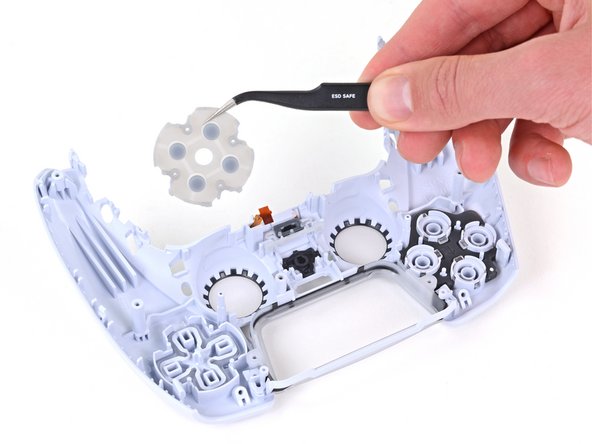
  33. Sony DualSense コントローラー フロントケースの交換, 導電性シリコンラバーを外します: 手順 33、 3の画像 1 Sony DualSense コントローラー フロントケースの交換, 導電性シリコンラバーを外します: 手順 33、 3の画像 2 Sony DualSense コントローラー フロントケースの交換, 導電性シリコンラバーを外します: 手順 33、 3の画像 3
    • ピンセットまたは指を使って、フロントケースの内側にある3つの導電性シリコーンゴムパッドを外します。

    • ボタンはフロントケースから緩くなっています。ご注意ください。

  34. Sony DualSense コントローラー フロントケースの交換, ボタンを外します: 手順 34、 1の画像 1
    • テーブルの表面近くまでフロントケースを近づけて、フロントケースをゆっくりと裏返してボタンを落とします。

  35. Sony DualSense コントローラー フロントケースの交換, タッチパッドベゼルを外します: 手順 35、 2の画像 1 Sony DualSense コントローラー フロントケースの交換, タッチパッドベゼルを外します: 手順 35、 2の画像 2
    • 指でタッチパッドベゼルをフロントケースから取り出します。

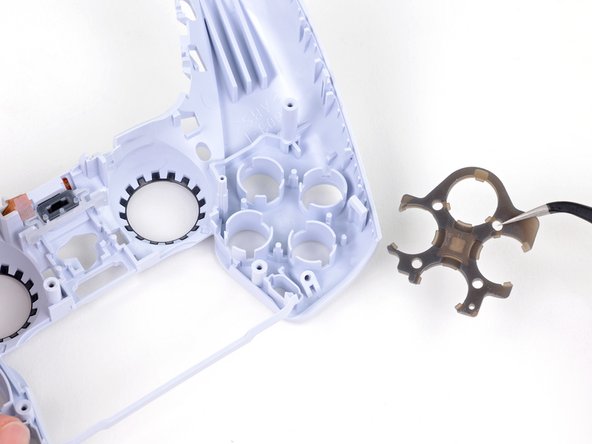
  36. Sony DualSense コントローラー フロントケースの交換: 手順 36、 2の画像 1 Sony DualSense コントローラー フロントケースの交換: 手順 36、 2の画像 2
    • ピンセットもしくは指を使って、ゴム製導電性パッドをフロントケースから外します。

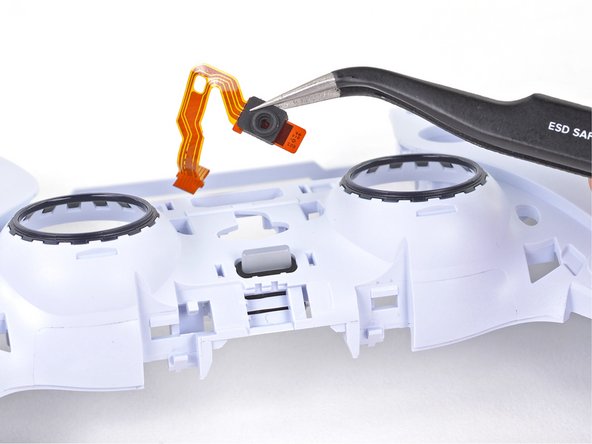
  37. Sony DualSense コントローラー フロントケースの交換, 上部マイクロフォンを外します: 手順 37、 2の画像 1 Sony DualSense コントローラー フロントケースの交換, 上部マイクロフォンを外します: 手順 37、 2の画像 2
    • ピンセットや指を使って、上部マイクロフォンをフロントケースから外します。

    • マイクロフォンのリボンケーブルを取り出す際には、プルタブがフロントケースに引っかかる可能性があるので注意してください。

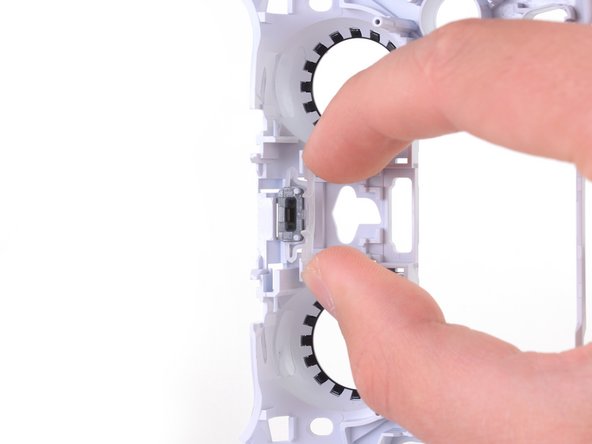
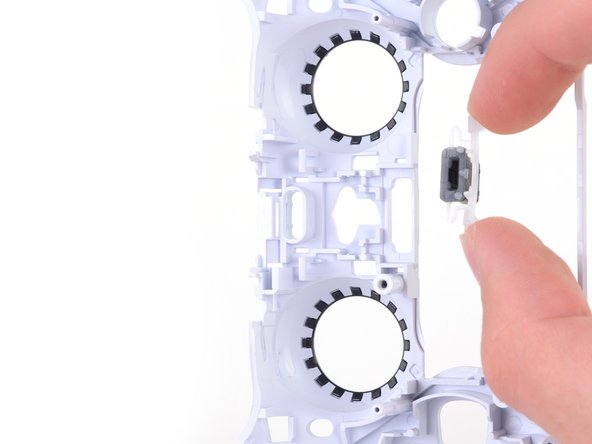
  38. Sony DualSense コントローラー フロントケースの交換, マイクロフォンの消音ボタンを外します: 手順 38、 3の画像 1 Sony DualSense コントローラー フロントケースの交換, マイクロフォンの消音ボタンを外します: 手順 38、 3の画像 2 Sony DualSense コントローラー フロントケースの交換, マイクロフォンの消音ボタンを外します: 手順 38、 3の画像 3
    • マイクロフォンの消音ボタンをフロントケースに固定しているプラスチックのクリップを指で軽くつまんで外します。

  39. Sony DualSense コントローラー フロントケースの交換: 手順 39、 1の画像 1
    • フロントケースのみが残ります。

終わりに

このデバイスを再組み立てするには、インストラクションを逆の順番に従って作業を進めてください。

e-wasteを処理する場合は、認可済みリサイクルセンターR2を通じて廃棄してください。

修理が上手く進みませんか?ベーシックなトラブルシューティングを試してみるか、DualSenseのアンサーコミュニティを参照してください。

13 の人々がこのガイドを完成させました。

以下の翻訳者の皆さんにお礼を申し上げます:

en jp

100%

Midori Doiさんは世界中で修理する私たちを助けてくれています! あなたも貢献してみませんか?
翻訳を始める ›

作成者

1人の作成者と共同作成されました。

Sam Omiotek

メンバー登録日: 02/25/19

72,866 ポイント

288のガイドは作成済み

2 件のコメント

need an update for the “a” variant (cfi-zct1w a)

this guide works for it up until a point (the touchpad), the a variant only has 1 screw instead of two and i couldn’t get the touchpad itself removed from it’s bracket (steps 30/31)

also the “a” variant is missing the light guide bracket (step 25)

name nameson - 返信

Two broken controllers became a working one. I had a small discrepancy with touchpad but figured it out. Thanks for the guide.

Dmytro Y. - 返信

コメントを追加

統計データ:

過去 24時間: 23

過去 7 日: 134

過去 30 日: 554

今までの合計 15,129