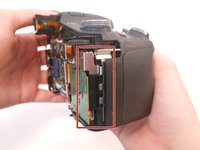
メインコンテンツにスキップ

Sony Cybershot DSC-HX100V Control Button Sensory Panel Replacement

必要な工具と部品

  1. Sony Cybershot DSC-HX100V Control Button Sensory Panel  Replacement, Control Button Sensory Panel: 手順 1、 1の画像 1
    • Make sure the camera is turned off.

    • Press the ON/OFF button to turn off the camera.

    • WARNING: Data may be lost if the camera remains on.

  2. Sony Cybershot DSC-HX100V Control Button Sensory Panel  Replacement: 手順 2、 3の画像 1 Sony Cybershot DSC-HX100V Control Button Sensory Panel  Replacement: 手順 2、 3の画像 2 Sony Cybershot DSC-HX100V Control Button Sensory Panel  Replacement: 手順 2、 3の画像 3
    • Use the Phillips screwdriver size #00 to remove the 1.9mm #00 screws.

    • Remove 2 screws on the side of the camera.

    • Remove 4 screws on the bottom of the camera.

    • Remove 1 screw next to the eyepiece.

  3. Sony Cybershot DSC-HX100V Control Button Sensory Panel  Replacement: 手順 3、 1の画像 1
    • Tilt the screen forward.

    • Remove the two 1.9mm #00 screws on the left with the Phillips #00 screwdriver.

  4. Sony Cybershot DSC-HX100V Control Button Sensory Panel  Replacement: 手順 4、 1の画像 1
    • Pull the back part of the camera upward.

    • Use the spudger to help pry open the back panel.

  5. Sony Cybershot DSC-HX100V Control Button Sensory Panel  Replacement: 手順 5、 1の画像 1
    • Open the back panel to view the inside of the camera.

    • Gently pull the orange ribbon cable to separate the two parts of the camera.

    • Set the back part of the camera aside.

  6. Sony Cybershot DSC-HX100V Control Button Sensory Panel  Replacement: 手順 6、 2の画像 1 Sony Cybershot DSC-HX100V Control Button Sensory Panel  Replacement: 手順 6、 2の画像 2
    • Turn the front part of the camera clockwise, so the lens is facing the right.

    • Gently remove the silver piece from the side of the camera. It should come out easily using your fingers.

  7. Sony Cybershot DSC-HX100V Control Button Sensory Panel  Replacement: 手順 7、 1の画像 1
    • Remove two 3.38mm #00 screws from the sensory panel with a Phillips screwdriver size #00.

    • The first screw is located on the left side of the panel and the second screw is located near the top of the panel.

  8. Sony Cybershot DSC-HX100V Control Button Sensory Panel  Replacement: 手順 8、 1の画像 1
    • Gently lift the orange ribbon cable with your finger to disconnect it.

    • Remove the sensory panel and replace it.

終わりに

To reassemble your device, follow these instructions in reverse order.

5 の人々がこのガイドを完成させました。

作成者

3人の作成者と共同で作成されました。

Sydney Counts

メンバー登録日: 03/17/15

307 ポイント

1ガイドが承認済み

チーム

Sam Houston State, Team 11-3, Blackburne Winter 2015 Sam Houston State, Team 11-3, Blackburne Winter 2015人のメンバー

SHSU-BLACKBURNE-W15S11G3

3 メンバー

8のガイドは作成済み

5 件のコメント

Where can you purchase this panel/

board?

Dana - 返信

yes please. i need to fix my camera. thanks.

ploter64 - 返信

I have issues when I turn the wheel to change the settings on manual mode. Would this be the same part?

Also, where can I find it? I tried to have it professionally repair and was told it needed the whole board and that it was not available any more. Thanks!

Ariel Donayo - 返信

The exact same thing has happened with mine. This happened before but the camera was in warranty so Sony repaired it. It is longer in warranty now but has happened again.

Sam - 返信

Sam, where did you find parts?

Ariel Donayo - 返信

コメントを追加

統計データ:

過去 24時間: 0

過去 7 日: 0

過去 30 日: 8

今までの合計 1,688