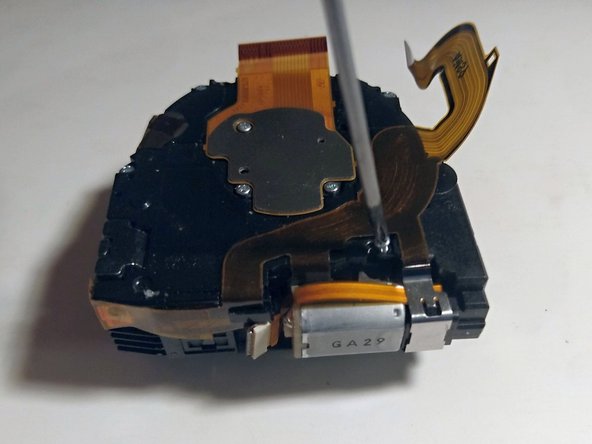
メインコンテンツにスキップ

Sony Cyber-shot DSC-WX350 Lens Assembly Replacement

必要な工具と部品

  1. Sony Cyber-shot DSC-WX350 Lens Assembly Replacement, Lens Assembly: 手順 1、 3の画像 1 Sony Cyber-shot DSC-WX350 Lens Assembly Replacement, Lens Assembly: 手順 1、 3の画像 2 Sony Cyber-shot DSC-WX350 Lens Assembly Replacement, Lens Assembly: 手順 1、 3の画像 3
    • Use the J00 screwdriver to take out the four 3mm black screws on the bottom and both sides of the camera.

  2. Sony Cyber-shot DSC-WX350 Lens Assembly Replacement: 手順 2、 1の画像 1
    • On the bottom of the camera slide the button over to open the battery case. Inside the battery opening use the J00 screwdriver to take out the single 3mm black screw.

  3. Sony Cyber-shot DSC-WX350 Lens Assembly Replacement: 手順 3、 1の画像 1
    • Use the J00 screwdriver to take out the single 3mm black screw on the left side of the camera .

  4. Sony Cyber-shot DSC-WX350 Lens Assembly Replacement: 手順 4、 2の画像 1 Sony Cyber-shot DSC-WX350 Lens Assembly Replacement: 手順 4、 2の画像 2
    • Use the plastic opening tool to pry open the back cover off.

  5. Sony Cyber-shot DSC-WX350 Lens Assembly Replacement: 手順 5、 1の画像 1
    • Use your fingers to slide out the controller wheel board 's lower end, then unhook the other end.

  6. Sony Cyber-shot DSC-WX350 Lens Assembly Replacement: 手順 6、 1の画像 1
    • Take the LCD off by undoing the zif and sliding it out.

  7. Sony Cyber-shot DSC-WX350 Lens Assembly Replacement: 手順 7、 2の画像 1 Sony Cyber-shot DSC-WX350 Lens Assembly Replacement: 手順 7、 2の画像 2
    • Once the LCD is off use the J00 screwdriver to take out the two 3mm silver screws. Once the screws are taken out pull off the piece with your fingers.

  8. Sony Cyber-shot DSC-WX350 Lens Assembly Replacement: 手順 8、 3の画像 1 Sony Cyber-shot DSC-WX350 Lens Assembly Replacement: 手順 8、 3の画像 2 Sony Cyber-shot DSC-WX350 Lens Assembly Replacement: 手順 8、 3の画像 3
    • Now take out the 3 zifs by first opening the zif latch with your fingers and then sliding it out.

  9. Sony Cyber-shot DSC-WX350 Lens Assembly Replacement: 手順 9、 1の画像 1
    • Carefully remove the lens assembly from the camera.

  10. Sony Cyber-shot DSC-WX350 Lens Assembly Replacement: 手順 10、 2の画像 1 Sony Cyber-shot DSC-WX350 Lens Assembly Replacement: 手順 10、 2の画像 2
    • In order to access the CCD, loosen the 3 screws holding its metal lid.

    • In order to access the lens mechanics, take out the 4 3mm screws on the edge of the lid, then the single 3 mm screw next to the motor.

  11. Sony Cyber-shot DSC-WX350 Lens Assembly Replacement: 手順 11、 1の画像 1
    • Carefully tear off the ribbon glued to the plastic.

  12. Sony Cyber-shot DSC-WX350 Lens Assembly Replacement: 手順 12、 2の画像 1 Sony Cyber-shot DSC-WX350 Lens Assembly Replacement: 手順 12、 2の画像 2
    • Pull out the cogwheel with the drive unit.

    • Now you can access the lens inner mechanics. You might wanna cover the CCD and the inner lens opening with tape to prevent dust from entering before you try to clean anything.

終わりに

To reassemble your device, follow these instructions in reverse order.

3 の人々がこのガイドを完成させました。

作成者

5人の作成者と共同で作成されました。

Joshua R Hammel

メンバー登録日: 05/22/17

255 ポイント

1ガイドが承認済み

チーム

IUPUI, Team S1-G1, Wilson Summer 2017 IUPUI, Team S1-G1, Wilson Summer 2017人のメンバー

IUPUI-WILSON-SU17S1G1

4 メンバー

3のガイドは作成済み

2 件のコメント

Hi, I think on my sensor chip is some dust. Is it possible to clean that or is it one unit with lens? There is no picture about this detail….

Arno - 返信

Hi there, does anyone know who I could go to to fix the lens (replace them) on my Sony wx-350 camera Thank you!

Joshua O'Brien - 返信

コメントを追加

統計データ:

過去 24時間: 0

過去 7 日: 10

過去 30 日: 51

今までの合計 4,686