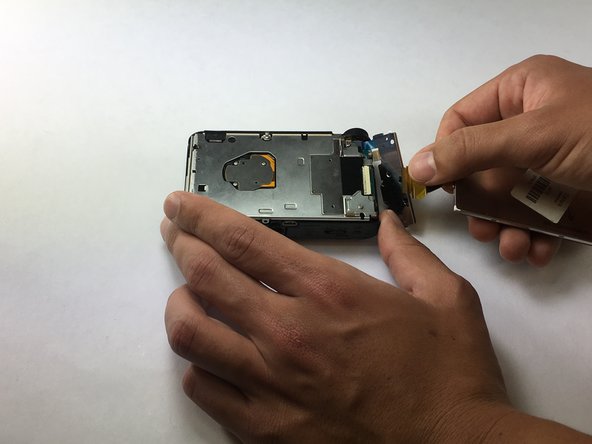
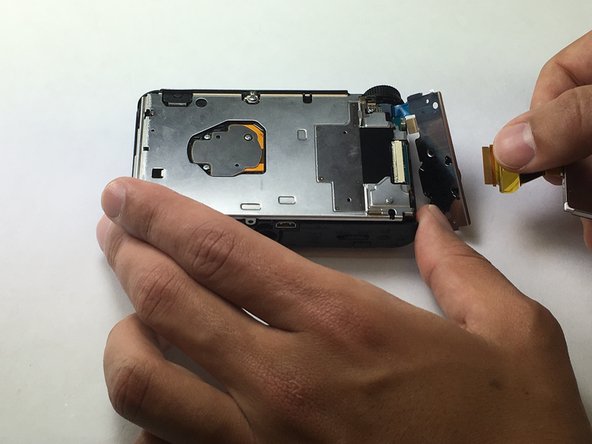
メインコンテンツにスキップ

Sony Cyber-shot DSC-WX350 LCD Screen Replacement

必要な工具と部品

  1. Sony Cyber-shot DSC-WX350 LCD Screen Replacement, LCD Screen: 手順 1、 3の画像 1 Sony Cyber-shot DSC-WX350 LCD Screen Replacement, LCD Screen: 手順 1、 3の画像 2 Sony Cyber-shot DSC-WX350 LCD Screen Replacement, LCD Screen: 手順 1、 3の画像 3
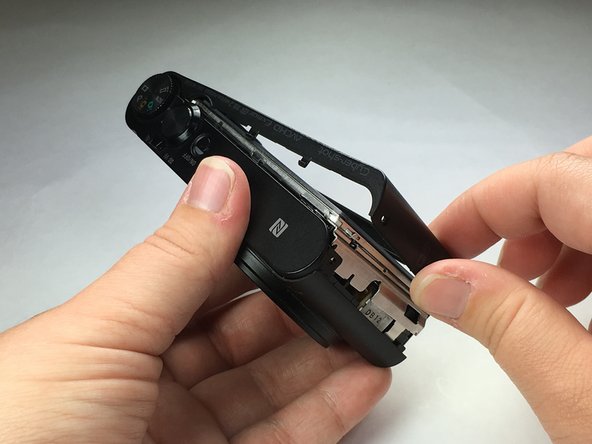
    • Begin with the battery cover closed.

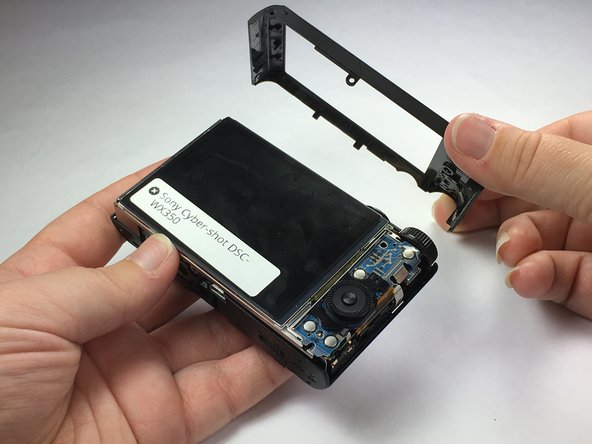
    • Remove 6 black Phillips 4 mm screws using the Ph000 head screwdriver tip from the bottom covering.

  2. Sony Cyber-shot DSC-WX350 LCD Screen Replacement: 手順 2、 2の画像 1 Sony Cyber-shot DSC-WX350 LCD Screen Replacement: 手順 2、 2の画像 2
    • Using a plastic opening tool, carefully insert it between the camera cover and the bottom cover. Pull it apart.

    • Using a plastic tool will prevent the device from being permanently damaged. Avoid using metal tools for this device.

    • The bottom covering is attached by a hinge. Removing this part will also require a small amount of force to separate.

  3. Sony Cyber-shot DSC-WX350 LCD Screen Replacement: 手順 3、 1の画像 1
    • Remove 1 black Phillps 4 mm screw using a Ph000 screwdriver tip from under battery cover.

  4. Sony Cyber-shot DSC-WX350 LCD Screen Replacement: 手順 4、 2の画像 1 Sony Cyber-shot DSC-WX350 LCD Screen Replacement: 手順 4、 2の画像 2
    • Once the part is separated, move it toward the battery slot.

    • Push the piece towards the camera to separate it from the hinge.

    • Do not pull up otherwise you will break the piece off.

  5. Sony Cyber-shot DSC-WX350 LCD Screen Replacement: 手順 5、 3の画像 1 Sony Cyber-shot DSC-WX350 LCD Screen Replacement: 手順 5、 3の画像 2 Sony Cyber-shot DSC-WX350 LCD Screen Replacement: 手順 5、 3の画像 3
    • Separate the back of the camera frame from the body by taking apart the bottom and the sides of the camera.

    • This will require a little force. You will feel tension and hear clicking noises. That is normal.

  6. Sony Cyber-shot DSC-WX350 LCD Screen Replacement: 手順 6、 2の画像 1 Sony Cyber-shot DSC-WX350 LCD Screen Replacement: 手順 6、 2の画像 2
    • To remove the control wheel from its position, grab the bottom of the part and pivot to the side and away from the camera.

    • After the part is fully away from the camera, move the part downward and out. It should now be fully extended and able to bend at the band that is attached to the body.

    • DO NOT remove the control wheel panel from the camera. Simply move to the side in order to access the orange band holding the LCD screen to the motherboard.

  7. Sony Cyber-shot DSC-WX350 LCD Screen Replacement: 手順 7、 3の画像 1 Sony Cyber-shot DSC-WX350 LCD Screen Replacement: 手順 7、 3の画像 2 Sony Cyber-shot DSC-WX350 LCD Screen Replacement: 手順 7、 3の画像 3
    • With a plastic opening tool, lift the LCD screen from the camera body.

  8. Sony Cyber-shot DSC-WX350 LCD Screen Replacement: 手順 8、 3の画像 1 Sony Cyber-shot DSC-WX350 LCD Screen Replacement: 手順 8、 3の画像 2 Sony Cyber-shot DSC-WX350 LCD Screen Replacement: 手順 8、 3の画像 3
    • Set the LCD screen to the side

    • Grab the orange band holding the LCD screen and gently pull to detach from the camera body.

    • Do not pull the white strip on top of the orange band. This is part of the circuit inside the camera and detaching this piece could permanently damage your camera.

終わりに

To reassemble your device, follow these instructions in reverse order.

5 の人々がこのガイドを完成させました。

作成者

2人の作成者と共同で作成されました。

Jit Banerjee

メンバー登録日: 10/05/16

113 ポイント

2のガイドは作成済み

チーム

USF Tampa, Team 1-2, Lacy Fall 2016 USF Tampa, Team 1-2, Lacy Fall 2016人のメンバー

USFT-LACY-F16S1G2

5 メンバー

3のガイドは作成済み

7 件のコメント

This worked a treat! Thank you!! Getting the new connector is in very fiddly and also watch where the extra strip goes when you remove it and try for the same on the new one. It sort of tucks back on itself.

Great step by step, thanks!

ifixed1 - 返信

Question and I apologize if it sounds ignorant. The instructions are great, but don’t I need to purchase a new one and put it in?

mich.justice - 返信

I apologize for sounding ignorant, but don’t I have to purchase a new LCD screen and put it in?

mich.justice - 返信

Great Guide! Opened up the Father-in-laws camera the other day using your guide with zero issues, giving me a chance to remove the faulty part.

This was a double help, first it allowed me to try reassembling the camera before ordering anything for him; as it wouldn't be much use getting a part if I can't put the camera back to together at this point (and stop me from losing the tiny screws while the part ships from china), and secondly, having the faulty part in hand was useful for visual comparison when ordering a replacement part through ebay.

TankJr - 返信

Thanks so much for this guide!

My husband was quoted £250 to repair his camera…..that we thought was under sony warranty. sony also said if he didnt want it repaired they wouls post it back or put it in the bin for just £56!!

We are feeling triumphant that he refused to pay either and i have now fixed it.

allocate lots of time and a clean work space……and i needed to be bold when handling the yellow strip……i didnt get it slotted far enough in the first try, and had the ‘folding in on itself’ to the side, rather than back underneeth the screen. I handled it more firmly on the second try.

Thanks

Julian Barnard - 返信

コメントを追加

統計データ:

過去 24時間: 6

過去 7 日: 16

過去 30 日: 41

今までの合計 4,239