メインコンテンツにスキップ

Sony Alpha NEX-C3 LCD Screen Replacement

必要な工具と部品

  1. Sony Alpha NEX-C3 LCD Screen Replacement, LCD Screen: 手順 1、 1の画像 1
    • Turn off the camera by sliding the power switch.

  2. Sony Alpha NEX-C3 LCD Screen Replacement: 手順 2、 1の画像 1
    • Tilt up the LCD screen.

  3. Sony Alpha NEX-C3 LCD Screen Replacement: 手順 3、 1の画像 1
    • Use a Phillips head 000 screwdriver to remove the two 2.0mm screws on the bottom of the LCD screen.

  4. Sony Alpha NEX-C3 LCD Screen Replacement: 手順 4、 3の画像 1 Sony Alpha NEX-C3 LCD Screen Replacement: 手順 4、 3の画像 2 Sony Alpha NEX-C3 LCD Screen Replacement: 手順 4、 3の画像 3
    • Use a Phillips head 000 screwdriver to remove the two 1.0mm screws on the smaller backplate of the LCD screen that covers the ribbon cable.

    • The smaller backplate should easily come off. Put it to the side.

  5. Sony Alpha NEX-C3 LCD Screen Replacement: 手順 5、 2の画像 1 Sony Alpha NEX-C3 LCD Screen Replacement: 手順 5、 2の画像 2
    • Use a Phillips head 000 screwdriver to remove the two 1.0mm screws on the bigger backplate of the LCD.

  6. Sony Alpha NEX-C3 LCD Screen Replacement: 手順 6、 2の画像 1 Sony Alpha NEX-C3 LCD Screen Replacement: 手順 6、 2の画像 2
    • Using the plastic opening tool, remove the larger backplate from the LCD screen.

  7. Sony Alpha NEX-C3 LCD Screen Replacement: 手順 7、 1の画像 1
    • With your hands, gently remove the black plastic piece on the backside of the LCD screen.

  8. Sony Alpha NEX-C3 LCD Screen Replacement: 手順 8、 2の画像 1 Sony Alpha NEX-C3 LCD Screen Replacement: 手順 8、 2の画像 2
    この手順で使用する道具:
    Tweezers
    $4.99
    購入する
    • Using tweezers, gently pull up and away on the ribbon cable connected to the motherboard, after which, the LCD screen should come off.

    • The motherboard ribbon cable has a specific connector.

終わりに

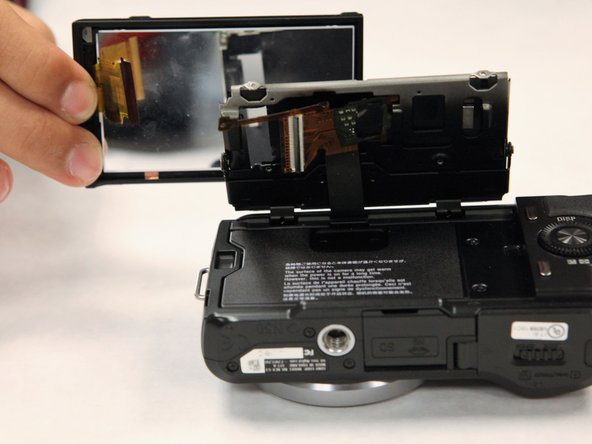
To reassemble your device, follow these instructions in reverse order. However, when installing the ribbon cable, the connector has a specific step. The connector has a tiny flap that clamps down onto the ribbon cable in order to make it secure.

ある他の人がこのガイドを完成しました。

作成者

4人の作成者と共同で作成されました。

Jonathan Chen

メンバー登録日: 10/17/17

690 ポイント

6のガイドは作成済み

チーム

UC Santa Barbara, Team S1-G1, Weedon Fall 2017 UC Santa Barbara, Team S1-G1, Weedon Fall 2017人のメンバー

UCSB-WEEDON-F17S1G1

3 メンバー

13のガイドは作成済み

コメント 1 件

Sir, my unit has many lines that appear on the screen. However, the lcd glass is pristine & has no cracks. Which part is defective? Is the lcd mother board the culprit? Thank you.

Stevie B - 返信

コメントを追加

統計データ:

過去 24時間: 1

過去 7 日: 6

過去 30 日: 21

今までの合計 2,460