メインコンテンツにスキップ

Sony Alpha 6000 Setting Wheel Replacement

アーカイブされたガイド
このガイドは将来的な使用のためにのみ保存されてます。ご自身の修理作業には更新バージョンをご利用ください。

必要な工具と部品

  1. Sony Alpha 6000 Setting Wheel Replacement, Battery: 手順 1、 1の画像 1
    • Make sure the camera is turned off by turning the switch to OFF.

  2. Sony Alpha 6000 Setting Wheel Replacement: 手順 2、 1の画像 1
    • Flip the camera around to access the battery compartment.

    • Slide the battery compartment lock to the left to unlock it.

  3. Sony Alpha 6000 Setting Wheel Replacement: 手順 3、 1の画像 1
    • Locate the blue latch that holds the battery in.

  4. Sony Alpha 6000 Setting Wheel Replacement: 手順 4、 1の画像 1
    • Push the latch back to release battery.

  5. Sony Alpha 6000 Setting Wheel Replacement: 手順 5、 1の画像 1
    • The battery can now be taken out of its compartment.

  6. Sony Alpha 6000 Setting Wheel Replacement, Back Cover: 手順 6、 1の画像 1
    • Turn the camera upside down and unscrew these two bottom 6 mm screws located on either side of the body by using the J00 head screw.

  7. Sony Alpha 6000 Setting Wheel Replacement: 手順 7、 1の画像 1
    • Turn the camera sideways.

    • Open the mini HDMI compartment and locate the two 6 mm screw underneath and another to the right of the compartment.

    • Unscrew using the J00 head screw.

  8. Sony Alpha 6000 Setting Wheel Replacement: 手順 8、 1の画像 1
    • Locate the two 4 mm screws within the battery compartment and unscrew them using the J00 screw head.

  9. Sony Alpha 6000 Setting Wheel Replacement: 手順 9、 1の画像 1
    • Bend the camera's screen forward to uncover two 3 mm screws below the eyepiece.

    • Locate them and unscrew them.

  10. Sony Alpha 6000 Setting Wheel Replacement: 手順 10、 2の画像 1 Sony Alpha 6000 Setting Wheel Replacement: 手順 10、 2の画像 2
    • Use a plastic opening tool around the body of the camera to wedge the back cover off. Start from the bottom next to the battery compartment.

    • If necessary, lightly use your hand to pull the the back cover down to completely remove it.

  11. Sony Alpha 6000 Setting Wheel Replacement, Setting Wheel: 手順 11、 3の画像 1 Sony Alpha 6000 Setting Wheel Replacement, Setting Wheel: 手順 11、 3の画像 2 Sony Alpha 6000 Setting Wheel Replacement, Setting Wheel: 手順 11、 3の画像 3
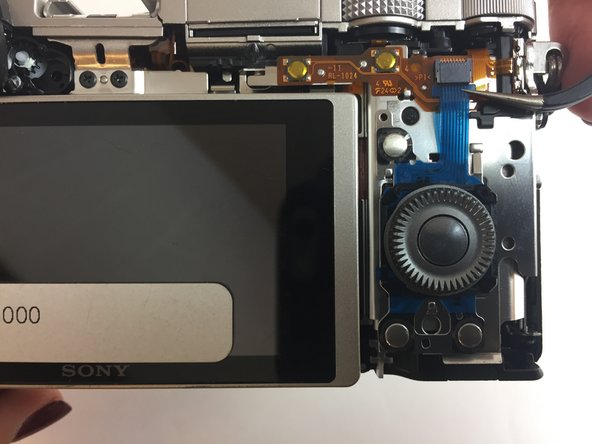
    • Once the back cover is removed, using tweezers, pull to remove the ribbon cable that is holding the settings wheel.

    • Now you can pull the settings wheel out of the camera.

終わりに

To put the camera back together, follow these steps in reverse order.

5 の人々がこのガイドを完成させました。

作成者

3人の作成者と共同で作成されました。

Fernando Sierra

メンバー登録日: 09/30/16

376 ポイント

2のガイドは作成済み

チーム

USF Tampa, Team 4-5, Passmore Fall 2016 USF Tampa, Team 4-5, Passmore Fall 2016人のメンバー

USFT-PASSMORE-F16S4G5

3 メンバー

12のガイドは作成済み

2 件のコメント

I am trying to remove the back so I can remove the USB cover and hing as the cover is broke. If I fallow these instructions will I get to that pin?

Nate - 返信

Quiet nice instructions… but you are missing a few important steps which are necessary to avoid damage:

1) You forget to mention the 3rd screw at the entry of the battery compartment.. in your picture of step 8 it is allready loose. It is not possible to remove the back panel without loosening of that screw.

2) It is much easier to remove the back panel, if you lift up the top panel, therefor you should loosen the two J00 screws under the internal flash.

3) You forget to mention that there needs to be a screw removed at the “dioptre correction wheel”, therefor the central small rubber patch needs to be removed with tweezers, then the underlying J00 can be unscrewed and the “dioptre correction wheel” removed.

4) Once the back panel has then carefully be loosened with a plastic opening tool you should be able to remove an additional screw of the eyepiece (right side), so that the eyepiece cover can be lift off, and then the backpanel is much easier to be removed.

Look for youtube “Dissasembly A6000”!

Torsten S. - 返信

コメントを追加

統計データ:

過去 24時間: 0

過去 7 日: 20

過去 30 日: 103

今までの合計 10,208