メインコンテンツにスキップ

Sony Action Cam HDR-AS15 Speaker Replacement

必要な工具と部品

  1. Sony Action Cam HDR-AS15 Speaker Replacement, Battery: 手順 1、 1の画像 1
    • To access the battery, gently pry open the rear cover of the action cam.

  2. Sony Action Cam HDR-AS15 Speaker Replacement: 手順 2、 2の画像 1 Sony Action Cam HDR-AS15 Speaker Replacement: 手順 2、 2の画像 2
    • Using a pair of tweezers, firmly grip the protrusion where the PULL signifies and remove the tray and battery.

  3. Sony Action Cam HDR-AS15 Speaker Replacement, Disassembling Sony Action Cam HDR-AS15 Circuit Board: 手順 3、 3の画像 1 Sony Action Cam HDR-AS15 Speaker Replacement, Disassembling Sony Action Cam HDR-AS15 Circuit Board: 手順 3、 3の画像 2 Sony Action Cam HDR-AS15 Speaker Replacement, Disassembling Sony Action Cam HDR-AS15 Circuit Board: 手順 3、 3の画像 3
    • Open the bottom tab with your finger or a plastic opening tool.

    • Pull the tab out, not up, to remove it completely.

    • Remove the two screws from the device.

    • Use your fingers to remove the plastic plate.

  4. Sony Action Cam HDR-AS15 Speaker Replacement: 手順 4、 1の画像 1
    • Separate the outer casing from the electronics by pushing on one of the ports toward the back end of the case. The electronics should slide right out.

  5. Sony Action Cam HDR-AS15 Speaker Replacement: 手順 5、 2の画像 1 Sony Action Cam HDR-AS15 Speaker Replacement: 手順 5、 2の画像 2
    • Remove the two 6.4 mm screws on the LCD side of the device using a Phillips #00 screwdriver.

    • Flip the LCD display downward to reveal the circuit board.

  6. Sony Action Cam HDR-AS15 Speaker Replacement, Removing the tape: 手順 6、 2の画像 1 Sony Action Cam HDR-AS15 Speaker Replacement, Removing the tape: 手順 6、 2の画像 2
    • Remove the tape holding the speaker down.

  7. Sony Action Cam HDR-AS15 Speaker Replacement, Removing the speaker: 手順 7、 1の画像 1
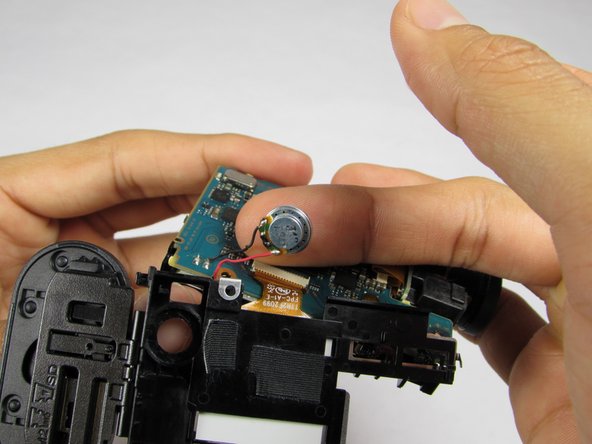
    • Desolder the speaker wires from the circuit board

    • To desolder, turn the soldering iron on and let it heat up

    • Touch the tip of the soldering iron to one of the solder joints until it melts. This will happen very quickly.

    • Pull the wire out of the solder and remove the soldering iron.

    • Repeat the last 3 steps for the second wire

終わりに

To reassemble your device, follow these instructions in reverse order.

ある他の人がこのガイドを完成しました。

作成者

3人の作成者と共同で作成されました。

Justin Calean

メンバー登録日: 01/09/15

421 ポイント

4のガイドは作成済み

チーム

USF Tampa, Team 1-2, Sullivan Winter 2015 USF Tampa, Team 1-2, Sullivan Winter 2015人のメンバー

USFT-SULLIVAN-W15S1G2

4 メンバー

12のガイドは作成済み

0 件のコメント

コメントを追加

統計データ:

過去 24時間: 0

過去 7 日: 0

過去 30 日: 3

今までの合計 440