メインコンテンツにスキップ

Sonos Play 5 Antenna Replacement

必要な工具と部品

  1. Sonos Play 5 Antenna Replacement, Front Panel Assembly: 手順 1、 1の画像 1
    • Disconnect any power to the speaker and wait a few minutes for the capacitors to fully discharge.

    • Flip the speaker upside down.

    • There may be a rubber foot covering the bottom screws (not included in picture). Remove this by pulling up from one of the corners using a spudger.

  2. Sonos Play 5 Antenna Replacement: 手順 2、 2の画像 1 Sonos Play 5 Antenna Replacement: 手順 2、 2の画像 2
    • Remove eight 10mm Phillips #2 screws

    • Remove the bottom panel by pulling upwards.

    • Be very gentle with the ends of the three antennas. They are very fragile.

  3. Sonos Play 5 Antenna Replacement: 手順 3、 3の画像 1 Sonos Play 5 Antenna Replacement: 手順 3、 3の画像 2 Sonos Play 5 Antenna Replacement: 手順 3、 3の画像 3
    • Flip the device so that the grille is facing up.

    • Locate the line on the right side of the speaker where the grill and the plastic meet, and place your plastic opening tool in the gap.

    • Run the spudger along the gap, loosening the grille from the plastic. Repeat this process on the left side as well.

    • Gently pull up on the grille, removing it from the front panel.

  4. Sonos Play 5 Antenna Replacement: 手順 4、 1の画像 1
    • Remove the six 8mm Phillips #2 screws.

    • Remove the two 10mm Phillips #2 screws.

  5. Sonos Play 5 Antenna Replacement: 手順 5、 2の画像 1 Sonos Play 5 Antenna Replacement: 手順 5、 2の画像 2
    • Locate the line on the right side where the front panel and back panel meet. Place a plastic opening tool in the gap, and run it along the gap. Repeat this on the left side.

    • Use the opening tool to lift the front plate. If a plastic tool is not providing enough leverage, use a metal opening tool.

    • Gently pull up on the face plate to ensure it has been detached from the enclosure.

    • When pulling on the face plate be cautious because it is still connected by wires on the back of the plate.

  6. Sonos Play 5 Antenna Replacement: 手順 6、 3の画像 1 Sonos Play 5 Antenna Replacement: 手順 6、 3の画像 2 Sonos Play 5 Antenna Replacement: 手順 6、 3の画像 3
    • Lift up the front panel, forming a 90 degree angle with the back panel. Locate the locate ten pin connector shown. This is the wire that connects the front panel to back panel.

    • Press down on the small tab located on the connector. With the tab firmly pressed down, pull the connector out from its socket.

    • The faceplate assembly is now fully detached from the rest of the speaker.

  7. Sonos Play 5 Antenna Replacement, Motherboard: 手順 7、 3の画像 1 Sonos Play 5 Antenna Replacement, Motherboard: 手順 7、 3の画像 2 Sonos Play 5 Antenna Replacement, Motherboard: 手順 7、 3の画像 3
    • Remove the ten pin connector.

  8. Sonos Play 5 Antenna Replacement: 手順 8、 1の画像 1
    • Flip the device over on its front side.

  9. Sonos Play 5 Antenna Replacement: 手順 9、 1の画像 1
    • Remove six 5mm Phillips #0 screws.

    • Remove two 7mm Phillips #2 screws.

  10. Sonos Play 5 Antenna Replacement: 手順 10、 1の画像 1
    • Flip the device on its back.

  11. Sonos Play 5 Antenna Replacement: 手順 11、 3の画像 1 Sonos Play 5 Antenna Replacement: 手順 11、 3の画像 2 Sonos Play 5 Antenna Replacement: 手順 11、 3の画像 3
    • Remove the grey and red antenna connectors by lifting them away from the board.

    • Pull cords away from the board.

  12. Sonos Play 5 Antenna Replacement: 手順 12、 2の画像 1 Sonos Play 5 Antenna Replacement: 手順 12、 2の画像 2
    • Remove the yellow antenna connector by lifting it away from the board.

    • Pull cord away from the board.

  13. Sonos Play 5 Antenna Replacement: 手順 13、 3の画像 1 Sonos Play 5 Antenna Replacement: 手順 13、 3の画像 2 Sonos Play 5 Antenna Replacement: 手順 13、 3の画像 3
    • Remove circuit board by lifting it straight away from the rear plate.

  14. Sonos Play 5 Antenna Replacement, Antenna: 手順 14、 1の画像 1
    • Flip device so that the bottom is facing upwards.

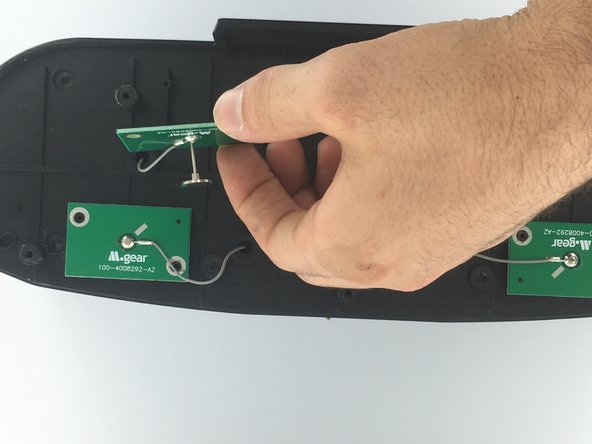
    • Identify the 3 antennas to be replaced.

  15. Sonos Play 5 Antenna Replacement: 手順 15、 3の画像 1 Sonos Play 5 Antenna Replacement: 手順 15、 3の画像 2 Sonos Play 5 Antenna Replacement: 手順 15、 3の画像 3
    • Remove six 5mm Phillips #0 screws.

  16. Sonos Play 5 Antenna Replacement: 手順 16、 3の画像 1 Sonos Play 5 Antenna Replacement: 手順 16、 3の画像 2 Sonos Play 5 Antenna Replacement: 手順 16、 3の画像 3
    • Lift each board and hang over the side.

  17. Sonos Play 5 Antenna Replacement: 手順 17、 3の画像 1 Sonos Play 5 Antenna Replacement: 手順 17、 3の画像 2 Sonos Play 5 Antenna Replacement: 手順 17、 3の画像 3
    • Remove first rubber strain relief by pinching the rubber then lifting up and away.

  18. Sonos Play 5 Antenna Replacement: 手順 18、 3の画像 1 Sonos Play 5 Antenna Replacement: 手順 18、 3の画像 2 Sonos Play 5 Antenna Replacement: 手順 18、 3の画像 3
    • Remove second rubber strain relief by pinching the rubber then lifting up and away.

  19. Sonos Play 5 Antenna Replacement: 手順 19、 3の画像 1 Sonos Play 5 Antenna Replacement: 手順 19、 3の画像 2 Sonos Play 5 Antenna Replacement: 手順 19、 3の画像 3
    • Remove third rubber strain relief by pinching the rubber then lifting up and away.

終わりに

To reassemble your device, follow these instructions in reverse order.

ある他の人がこのガイドを完成しました。

作成者

1人の作成者と共同作成されました。

Warren Willingham

メンバー登録日: 02/20/17

994 ポイント

3のガイドは作成済み

チーム

USF Tampa, Team S3-G6, Sullivan Spring 2017 USF Tampa, Team S3-G6, Sullivan Spring 2017人のメンバー

USFT-SULLIVAN-S17S3G6

4 メンバー

16のガイドは作成済み

コメント 1 件

Where do you buy the replacement antennas?

thomaspmunster - 返信

コメントを追加

統計データ:

過去 24時間: 1

過去 7 日: 3

過去 30 日: 27

今までの合計 4,409