メインコンテンツにスキップ

Sonos Connect Top Motherboard Replacement

必要な工具と部品

  1. Sonos Connect Top Motherboard Replacement, WIFI Card: 手順 1、 3の画像 1 Sonos Connect Top Motherboard Replacement, WIFI Card: 手順 1、 3の画像 2 Sonos Connect Top Motherboard Replacement, WIFI Card: 手順 1、 3の画像 3
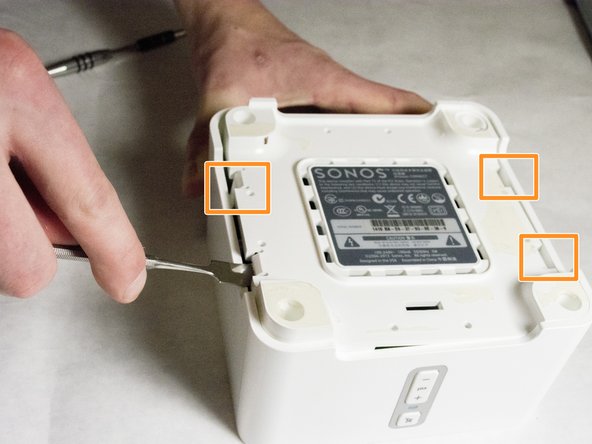
    • Start by using a spudger or plastic opening tool to remove the bottom cover.

    • When working with electronics, it's important to choose a tool that's ESD-safe to avoid accidental damage to the device. The regular black nylon spudger or a plastic opening tool should be used whenever possible.

    • Once enough of the glue is removed, peel the cover off by hand,

  2. Sonos Connect Top Motherboard Replacement: 手順 2、 3の画像 1 Sonos Connect Top Motherboard Replacement: 手順 2、 3の画像 2 Sonos Connect Top Motherboard Replacement: 手順 2、 3の画像 3
    • Remove the four 7.5mm length Philips head screws under the rubber cover.

  3. Sonos Connect Top Motherboard Replacement: 手順 3、 3の画像 1 Sonos Connect Top Motherboard Replacement: 手順 3、 3の画像 2 Sonos Connect Top Motherboard Replacement: 手順 3、 3の画像 3
    • Use a nylon spudger to unsnap the bottom from the sides.

    • Pry until the remaining three points are unsnapped.

    • Once unsnapped, lift the cover.

  4. Sonos Connect Top Motherboard Replacement: 手順 4、 2の画像 1 Sonos Connect Top Motherboard Replacement: 手順 4、 2の画像 2
    • Remove the connection for the front buttons to fully remove the cover.

  5. Sonos Connect Top Motherboard Replacement: 手順 5、 2の画像 1 Sonos Connect Top Motherboard Replacement: 手順 5、 2の画像 2
    • Use a plastic opening tool or spudger to remove the adhesive covering the the WIFI connectors.

    • Gently pull the wires at the connection point to disconnect them from the motherboard.

  6. Sonos Connect Top Motherboard Replacement: 手順 6、 2の画像 1 Sonos Connect Top Motherboard Replacement: 手順 6、 2の画像 2
    • Remove the two pieces of glue holding the WIFI card in place.

  7. Sonos Connect Top Motherboard Replacement: 手順 7、 3の画像 1 Sonos Connect Top Motherboard Replacement: 手順 7、 3の画像 2 Sonos Connect Top Motherboard Replacement: 手順 7、 3の画像 3
    • Scrape the glued pad underneath the WIFI card to seperate the card from the board.

    • Push apart the two clips holding the WIFI card in the connection.

    • Pull the WIFI card out of the connection.

    • When putting the new WIFI card in, put the card in the connector first, then push downward until it clicks.

  8. Sonos Connect Top Motherboard Replacement, Top Motherboard: 手順 8、 1の画像 1
    • Remove the 7mm length Phillips screw holding the board in place.

  9. Sonos Connect Top Motherboard Replacement: 手順 9、 2の画像 1 Sonos Connect Top Motherboard Replacement: 手順 9、 2の画像 2
    • Flip the board over to access the Molex Cable.

  10. Sonos Connect Top Motherboard Replacement: 手順 10、 1の画像 1
    • Disconnect the Molex Cable from the top motherboard.

終わりに

To reassemble your device, follow these instructions in reverse order.

2 の人々がこのガイドを完成させました。

作成者

3人の作成者と共同で作成されました。

Clark Snyder

メンバー登録日: 01/21/16

483 ポイント

4のガイドは作成済み

チーム

IUPUI, Team 3-2, Baechle Spring 2016 IUPUI, Team 3-2, Baechle Spring 2016人のメンバー

IUPUI-BAECHLE-S16S3G2

4 メンバー

4のガイドは作成済み

0 件のコメント

コメントを追加

統計データ:

過去 24時間: 0

過去 7 日: 1

過去 30 日: 10

今までの合計 1,867