メインコンテンツにスキップ
リペアコミュニティに参加 - アカウントの作成

Skullcandy Air Raid Back Panel Replacement

必要条件のみ
これは前提条件のみのガイドです!このガイドは別の手順の一部であり、単独で使用されません。

必要な工具と部品

  1. Skullcandy Air Raid Back Panel Replacement, Rubber Cover: 手順 1、 1の画像 1
    • Starting with the corners, gently pull the rubber cover off of the device.

  2. Skullcandy Air Raid Back Panel Replacement, Handle: 手順 2、 1の画像 1
    • Using the T-6 hexagonal screwdriver, unscrew the four 10mm #6 hex screws on the right side of the device.

    • Remove the handle from the device.

  3. Skullcandy Air Raid Back Panel Replacement, Front Plate: 手順 3、 1の画像 1
    • Unscrew the two screws on the left side of the device using the phillips #00 screwdriver.

    • One 5mm Phillips screw.

    • One 8mm Phillips screw.

  4. Skullcandy Air Raid Back Panel Replacement: 手順 4、 1の画像 1
    • Gently pull the sides of the front plate outwards from the device.

    • Pull up on the front plate to remove it from the device.

  5. Skullcandy Air Raid Back Panel Replacement, Speakers: 手順 5、 1の画像 1
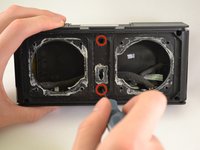
    • Using a #000 Philips Screwdriver, unscrew the four 8 mm Philips screws from each corner of both speakers (eight 8 mm Philips screws total).

  6. Skullcandy Air Raid Back Panel Replacement: 手順 6、 1の画像 1
    • Using the plastic opening tool, pry around edges of the speaker to loosen glue contact with front plate.

    • If you are unable to loosen glue contact using the plastic opening tool, use a heat gun to assist in removal.

  7. Skullcandy Air Raid Back Panel Replacement: 手順 7、 1の画像 1
    • Lift the speaker out of the device.

    • Be aware of the connection with the ribbon cable.

    • For reassembly, ensure proper orientation of the cable plug.

  8. Skullcandy Air Raid Back Panel Replacement: 手順 8、 1の画像 1
    • Firmly pull on the end of ribbon cable to disconnect the speaker from the motherboard.

  9. Skullcandy Air Raid Back Panel Replacement, Control Buttons: 手順 9、 1の画像 1
    • Using a Phillips #00 Precision Screwdriver, unscrew two 6 mm screws from the middle of the panel, above and below volume buttons.

  10. Skullcandy Air Raid Back Panel Replacement: 手順 10、 1の画像 1
    • Lift the button panel.

  11. Skullcandy Air Raid Back Panel Replacement, Button Motherboard: 手順 11、 1の画像 1
    • Using a Phillips #00 Precision Screwdriver, unscrew two 6 mm screws from the button motherboard.

  12. Skullcandy Air Raid Back Panel Replacement: 手順 12、 1の画像 1
    • Using a plastic opening tool, pry the button motherboard to detach it from the device.

    • The button motherboard is connected to a ribbon cable inside the device.

  13. Skullcandy Air Raid Back Panel Replacement, Ribbon Cable: 手順 13、 1の画像 1
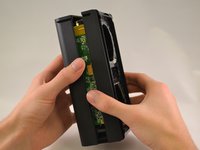
    • Pull the black ribbon cord attachment away from the motherboard.

    • Pull on the cable until it releases from the back of the motherboard.

    • The black attachment is part of the connector, not the blue ribbon cable, so it will not disconnect from the motherboard.

  14. Skullcandy Air Raid Back Panel Replacement, Back panel: 手順 14、 2の画像 1 Skullcandy Air Raid Back Panel Replacement, Back panel: 手順 14、 2の画像 2
    • Using a Phillips #00 Precision Screwdriver, unscrew two 8 mm screws.

    • Lift off the back panel.

終わりに

To reassemble your device, follow these instructions in reverse order.

作成者

4人の作成者と共同で作成されました。

Kristin

メンバー登録日: 01/13/15

495 ポイント

3のガイドは作成済み

チーム

0件のガイドコメント

コメントを追加

統計データ:

過去 24時間: 0

過去 7 日: 1

過去 30 日: 2

今までの合計 111