メインコンテンツにスキップ

Skil X-Drive 18V Cordless Drill Model No. 2887 Directional Switch Replacement

必要な工具と部品

  1. Skil X-Drive 18V Cordless Drill Model No. 2887 Directional Switch Replacement, Un-clip Battery: 手順 1、 1の画像 1
    • Grip the drill. Locate the red locking switch on the back of the battery. Hold the switch down.

  2. Skil X-Drive 18V Cordless Drill Model No. 2887 Directional Switch Replacement, Remove Battery: 手順 2、 3の画像 1 Skil X-Drive 18V Cordless Drill Model No. 2887 Directional Switch Replacement, Remove Battery: 手順 2、 3の画像 2 Skil X-Drive 18V Cordless Drill Model No. 2887 Directional Switch Replacement, Remove Battery: 手順 2、 3の画像 3
    • While holding down the red locking switch, slide the battery towards the back of the drill until the battery is fully removed from the drill.

  3. Skil X-Drive 18V Cordless Drill Model No. 2887 Directional Switch Replacement, Remove Handle: 手順 3、 3の画像 1 Skil X-Drive 18V Cordless Drill Model No. 2887 Directional Switch Replacement, Remove Handle: 手順 3、 3の画像 2 Skil X-Drive 18V Cordless Drill Model No. 2887 Directional Switch Replacement, Remove Handle: 手順 3、 3の画像 3
    • Grip cordless drill firmly with left hand. Grip the cordless drill handle firmly with the right hand. Rotate the handle counterclockwise in order to remove the handle from the drill.

  4. Skil X-Drive 18V Cordless Drill Model No. 2887 Directional Switch Replacement, Remove Gauge: 手順 4、 1の画像 1
    • Hold drill upright with one hand and slide the gauge backwards to remove it with the other.

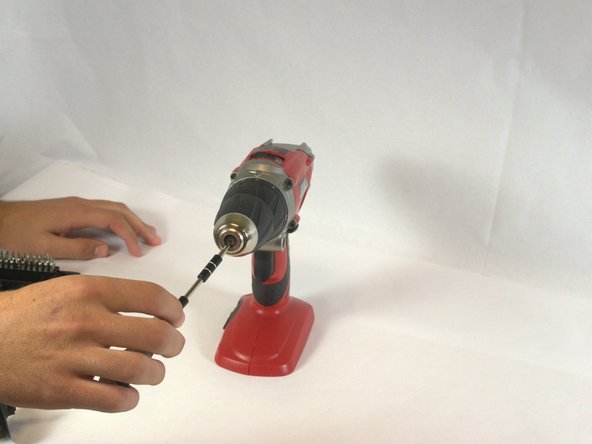
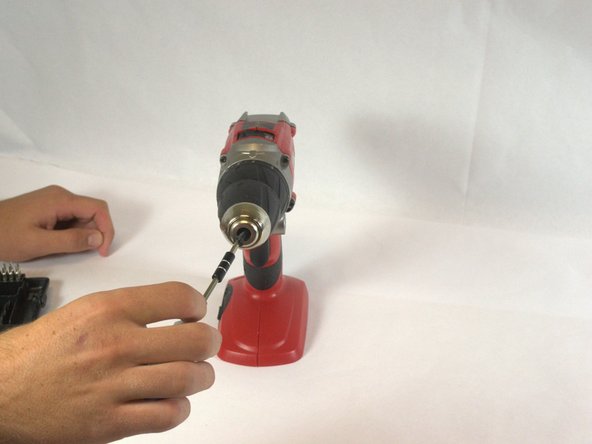
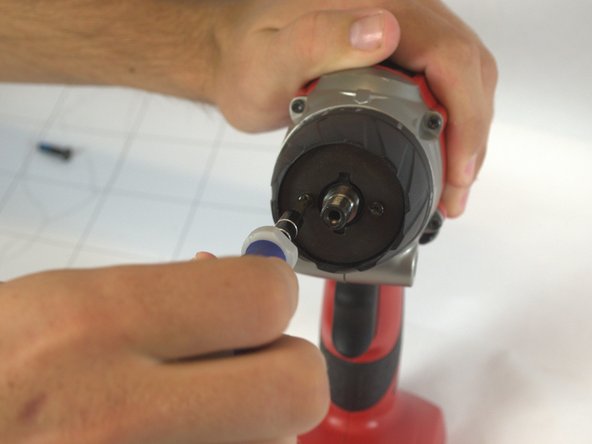
  5. Skil X-Drive 18V Cordless Drill Model No. 2887 Directional Switch Replacement, Remove the screw from the chuck sleeve: 手順 5、 3の画像 1 Skil X-Drive 18V Cordless Drill Model No. 2887 Directional Switch Replacement, Remove the screw from the chuck sleeve: 手順 5、 3の画像 2 Skil X-Drive 18V Cordless Drill Model No. 2887 Directional Switch Replacement, Remove the screw from the chuck sleeve: 手順 5、 3の画像 3
    • The chuck sleeve is held on by a 20mm Phillips #2 screw in the center.This screw is reverse threaded. Insert a Phillips #2 screwdriver and rotate it clockwise to loosen and remove it.

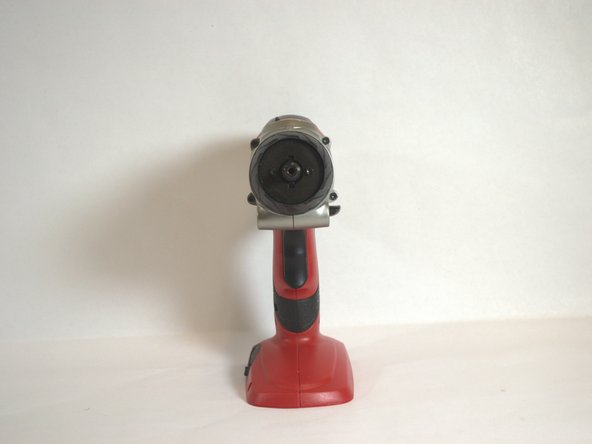
  6. Skil X-Drive 18V Cordless Drill Model No. 2887 Directional Switch Replacement, Remove the chuck sleeve: 手順 6、 2の画像 1 Skil X-Drive 18V Cordless Drill Model No. 2887 Directional Switch Replacement, Remove the chuck sleeve: 手順 6、 2の画像 2
    • The threaded hole the screw was in is in the shape of a 6-point star. Insert a T40 Torx Key and rotate it clockwise to loosen and remove the chuck sleeve.

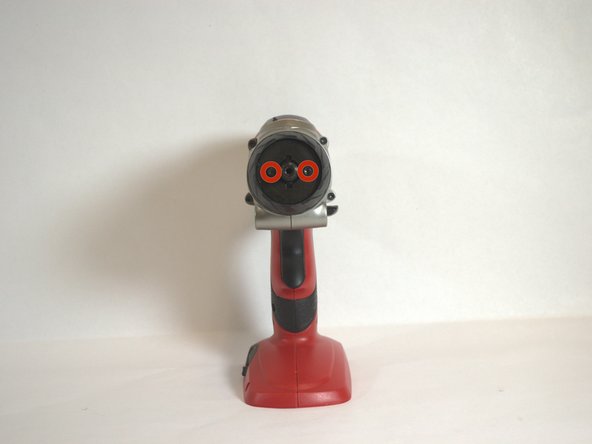
  7. Skil X-Drive 18V Cordless Drill Model No. 2887 Directional Switch Replacement, Remove the screws from the adjustable clutch: 手順 7、 2の画像 1 Skil X-Drive 18V Cordless Drill Model No. 2887 Directional Switch Replacement, Remove the screws from the adjustable clutch: 手順 7、 2の画像 2
    • Set the adjustable clutch to the "1" setting before beginning. This will make it easier to remove.

    • The adjustable clutch is held on by 2 20mm T10 Torx screws. Insert a T10 Torx screwdriver and rotate it counterclockwise to loosen and remove each screw.

  8. Skil X-Drive 18V Cordless Drill Model No. 2887 Directional Switch Replacement, Remove the adjustable clutch: 手順 8、 2の画像 1 Skil X-Drive 18V Cordless Drill Model No. 2887 Directional Switch Replacement, Remove the adjustable clutch: 手順 8、 2の画像 2
    • Firmly grip the outside of the adjustable clutch and pull it off.

    • There is a metal washer behind the adjustable clutch that holds in 12 small ball bearings. Hold the drill so it is pointing up slightly so the washer and bearings do not fall out.

  9. Skil X-Drive 18V Cordless Drill Model No. 2887 Directional Switch Replacement, Reversing Switch Lever: 手順 9、 1の画像 1
    • Remove the 4 20mm T10 Torx screws. Insert a T10 Torx screwdriver and turn counterclockwise.

  10. Skil X-Drive 18V Cordless Drill Model No. 2887 Directional Switch Replacement: 手順 10、 1の画像 1
    • Once screws have been taken out, remove the grey cover.

  11. Skil X-Drive 18V Cordless Drill Model No. 2887 Directional Switch Replacement: 手順 11、 2の画像 1 Skil X-Drive 18V Cordless Drill Model No. 2887 Directional Switch Replacement: 手順 11、 2の画像 2
    • Remove the 4 20mm T10 Torx screws. Insert a T10 Torx screwdriver and turn counterclockwise.

    • Grab the grey rear of the drill and slide it off.

  12. Skil X-Drive 18V Cordless Drill Model No. 2887 Directional Switch Replacement: 手順 12、 3の画像 1 Skil X-Drive 18V Cordless Drill Model No. 2887 Directional Switch Replacement: 手順 12、 3の画像 2 Skil X-Drive 18V Cordless Drill Model No. 2887 Directional Switch Replacement: 手順 12、 3の画像 3
    • Continue by removing the 420mm T10 Torx screws that are left on the handle.

    • This screw is too deep for the screw driver to reach so use the Torx Key to unscrew this screw.

  13. Skil X-Drive 18V Cordless Drill Model No. 2887 Directional Switch Replacement: 手順 13、 2の画像 1 Skil X-Drive 18V Cordless Drill Model No. 2887 Directional Switch Replacement: 手順 13、 2の画像 2
    • Start to pull the casing apart at the bottom of the drill.

    • Continue to move up the drill until you have separated the two sides of the drill

    • Take out the old directional switch and replace it with the new one.

終わりに

To reassemble your device, follow these instructions in reverse order.

作成者

3人の作成者と共同で作成されました。

Michael

メンバー登録日: 09/23/14

201 ポイント

2のガイドは作成済み

チーム

USF Tampa, Team 2-3, Blackwell Fall 2014 USF Tampa, Team 2-3, Blackwell Fall 2014人のメンバー

USFT-BLACKWELL-F14S2G3

5 メンバー

9のガイドは作成済み

0 件のコメント

コメントを追加

統計データ:

過去 24時間: 0

過去 7 日: 3

過去 30 日: 8

今までの合計 526