メインコンテンツにスキップ

Shimano Zee Gearshift group cable replacement

必要な工具と部品

  1. Shimano Zee Gearshift group cable replacement, Gear cable: 手順 1、 2の画像 1 Shimano Zee Gearshift group cable replacement, Gear cable: 手順 1、 2の画像 2
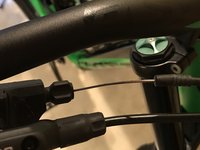
    • First we shift to the smallest sprocket, otherwise the gear cable in the shift lever is wrapped around a "pulley" and cannot be pulled out later. Then the screw that covers the opening for the shift cable on the shift lever (trigger) is loosened. For this we use a Phillips bit from the Macro Bit Set.

  2. Shimano Zee Gearshift group cable replacement: 手順 2、 1の画像 1
    • In the second step, we loosen the screw that clamps the shift cable in the rear derailleur. The cable should now be loose and without tension.

  3. Shimano Zee Gearshift group cable replacement: 手順 3、 2の画像 1 Shimano Zee Gearshift group cable replacement: 手順 3、 2の画像 2
    • Next, we pull the black outer casing out of the shift lever (trigger) and push the shift cable through the opening screwed on in the first step.

  4. Shimano Zee Gearshift group cable replacement: 手順 4、 2の画像 1 Shimano Zee Gearshift group cable replacement: 手順 4、 2の画像 2
    • Now the gear cable can be completely pulled out of the outer casing and removed.

  5. Shimano Zee Gearshift group cable replacement: 手順 5、 1の画像 1
    • Now the shift cable is pushed through the opening in the shift lever (trigger) and threaded through. Finally, the cover screw that closes the opening is screwed back on. This makes assembly easier, as the shift cable can no longer slip out of the shift lever.

  6. Shimano Zee Gearshift group cable replacement: 手順 6、 1の画像 1
    • Now we can thread the shifter cable back through its outer casing. Note: make sure that the end caps sit on the outer shell! These tend to fall off during disassembly and are forgotten.

  7. Shimano Zee Gearshift group cable replacement: 手順 7、 1の画像 1
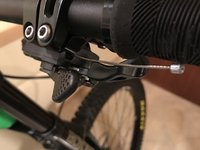
    • After threading the shifter cable back through its outer casing, we place the shifter cable under the plate of the clamping screw on the rear derailleur. In this step, the clamping screw is not yet tightened, since we are still taking care of the basic setting of the rear derailleur.

    • Then tighten the screw with the torque wrench and 6 Nm.

ゴール

2 の人々がこのガイドを完成させました。

以下の翻訳者の皆さんにお礼を申し上げます:

de en

100%

これらの翻訳者の方々は世界を修理する私たちのサポートをしてくれています。 あなたも貢献してみませんか?
翻訳を始める ›

作成者

2人の作成者と共同で作成されました。

Dennis

メンバー登録日: 07/27/15

372 ポイント

1ガイドが承認済み

チーム

iFixit iFixit人のメンバー

Staff

119 メンバー

19,476のガイドは作成済み

0 件のコメント

コメントを追加

統計データ:

過去 24時間: 2

過去 7 日: 25

過去 30 日: 48

今までの合計 1,195