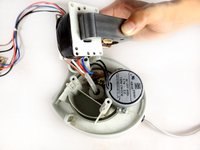
メインコンテンツにスキップ

Seville Classics MSC10166 Disassembly

必要な工具と部品

  1. Seville Classics MSC10166 Disassembly, PCB (Printed Circuit Board): 手順 1、 1の画像 1
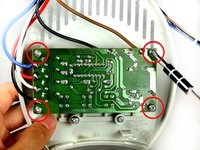
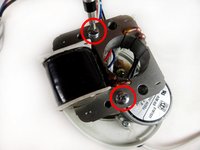
    • Use the Phillips #2 screwdriver to remove the four 6 mm screws by unscrewing counterclockwise.
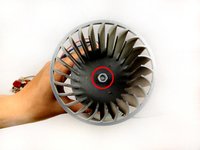
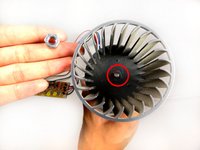
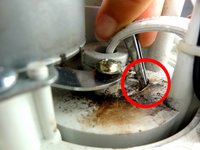
  2. Seville Classics MSC10166 Disassembly: 手順 2、 1の画像 1
    • Pull the front and back cover apart.

    • Be careful not to pull the front cover off completely. It holds the wires.

  3. Seville Classics MSC10166 Disassembly: 手順 3、 1の画像 1
    • Remove the Phillips 6 mm screw that holds the circuit board to the outer shell of the fan.

    • Shock warning: Make sure the fan is unplugged before removing the circuit board.

  4. Seville Classics MSC10166 Disassembly: 手順 4、 1の画像 1
    • Remove the top cover containing the circuit board and the wires by pulling it away from the outer shell of the fan.

  5. Seville Classics MSC10166 Disassembly: 手順 5、 2の画像 1 Seville Classics MSC10166 Disassembly: 手順 5、 2の画像 2
    • Remove the screws from the four corners of the circuit board.

    • Remove the circuit board from the top cover.

    • Do not touch the other side of the circuit board to avoid damaging the circuit elements.

  6. Seville Classics MSC10166 Disassembly, Rotating Blade and Transformer: 手順 6、 2の画像 1 Seville Classics MSC10166 Disassembly, Rotating Blade and Transformer: 手順 6、 2の画像 2
    • In order to remove the fan blade pliers were used to remove the holding nut.

    • After the holding nut is loose, use the pliers to pull up to remove the nut.

  7. Seville Classics MSC10166 Disassembly: 手順 7、 1の画像 1
    • Remove the two bronze Phillips 29-mm bolts that hold the fan blade to the transformer.

    • Use a pair of pliers to hold the nut at the bottom of the transformer, as you unscrew from left-to-right at the top of the transformer. After, pull up and remove both the screw and nut.

  8. Seville Classics MSC10166 Disassembly: 手順 8、 2の画像 1 Seville Classics MSC10166 Disassembly: 手順 8、 2の画像 2
    • Next, remove the two silver Phillips (8-mm head) 40-mm screws from the transformer.

    • Remove screws by pulling them away from the base.

    • The transformer should be free after this step.

  9. Seville Classics MSC10166 Disassembly, Seville Classics MSC10166 Disassembly: 手順 9、 2の画像 1 Seville Classics MSC10166 Disassembly, Seville Classics MSC10166 Disassembly: 手順 9、 2の画像 2
    • Clean the track, removing any obstructions.

    • Lubricate the track with grease.

終わりに

To reassemble your device, follow these instructions in reverse order.

2 の人々がこのガイドを完成させました。

作成者

8人の作成者と共同で作成されました。

Queena Phung

メンバー登録日: 09/26/12

114 ポイント

3のガイドは作成済み

チーム

Cal Poly, Team 15-46, Forte Fall 2012 Cal Poly, Team 15-46, Forte Fall 2012人のメンバー

CPSU-FORTE-F12S15G46

5 メンバー

6のガイドは作成済み

0 件のコメント

コメントを追加

統計データ:

過去 24時間: 1

過去 7 日: 14

過去 30 日: 30

今までの合計 10,282