メインコンテンツにスキップ

このバージョンは誤った内容を含んでいる可能性があります。最新の承認済みスナップショットに切り替えてください。

必要な工具と部品

ビデオの概要

  1. この手順は未翻訳です。 翻訳を手伝う。

    : 手順 1、 2の画像 1 : 手順 1、 2の画像 2
    • On this Note 20 the OLED is clearly broken and has a crack on the side.

    • The back has no damage to it so apply heat.

    • Apply Heat to back glass

    • I do not have a picture of my heating process I hope you have a heat gun I use a crock pot with rubber in it.

  2. この手順は未翻訳です。 翻訳を手伝う。

    : 手順 2、 3の画像 1 : 手順 2、 3の画像 2 : 手順 2、 3の画像 3
    • BE SURE THE BACK GLASS IS TO HOT TO TOUCH!

    • I prep my ifixit splicer with 99% alcohol to help losen adhesive.

    • Start from the buttom straight up and down push tool in until you hit the frame you while hear a sound

    • Slide tool at angle stop at the curve

  3. この手順は未翻訳です。 翻訳を手伝う。

    : 手順 3、 3の画像 1 : 手順 3、 3の画像 2 : 手順 3、 3の画像 3
    • After loosening the buttom pull tool out.

    • Heat is Applied

    • Now pry with your fingers and pull up with suction cup.

    • While sticking splicer on curved edge side slowly working wiggling down the curve edge

    • Lift and wiggle the back glass off

  4. この手順は未翻訳です。 翻訳を手伝う。

    : 手順 4、 3の画像 1 : 手順 4、 3の画像 2 : 手順 4、 3の画像 3
    • We did it no cracks! High Five Youself

    • Remove Sim Card

    • Remove stylus

  5. この手順は未翻訳です。 翻訳を手伝う。

    : 手順 5、 3の画像 1 : 手順 5、 3の画像 2 : 手順 5、 3の画像 3
    • Remove 6 PH000 Screws from the wireless charging pad covering the battery connection.

    • Disconnect wireless coil from connections with plastic spudger

    • Use spudger at top on the metal squeezing it under the top of the wireless charging pad bracket.

    • Lift and wiggle slowly the charging pad off while locating the battery connection

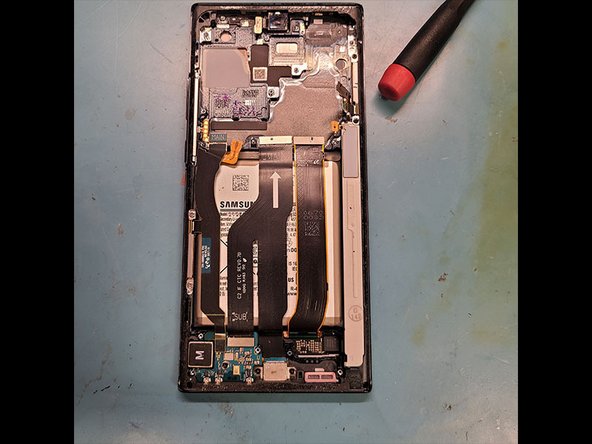
    • Battery Connection!!

  6. この手順は未翻訳です。 翻訳を手伝う。

    : 手順 6、 1の画像 1
    • Disconnect the battery with spudger!

  7. この手順は未翻訳です。 翻訳を手伝う。

    : 手順 7、 1の画像 1
    • Remove 4 PH000 Screws to the ear speaker bracket.

    • Also disconnect this connection!

    • Please comment is this a proximity senor?

  8. この手順は未翻訳です。 翻訳を手伝う。

    : 手順 8、 3の画像 1 : 手順 8、 3の画像 2 : 手順 8、 3の画像 3
    • The battery should already be disconnected!

    • Use a spudger

    • Make sure its disconnected

    • Disconnect all yellow boxed connections!

    • Remove the 2 PH000 Screws holding the camera

    • Lift mainboard with spudger from ear speaker goin down using the frame as a leveler

    • With all the connection the board may snag on the connections be slow and observer feel for tension.

  9. この手順は未翻訳です。 翻訳を手伝う。

    : 手順 9、 3の画像 1 : 手順 9、 3の画像 2 : 手順 9、 3の画像 3
    • Front Camera do not break it is serialized to the phone! Can't be repaired if is broken!

    • Front Camera Location

    • Use heat or 99% alcohol to get it removed

    • Use straight edge blade at bottom of camera to break it loose. You can actually pull the glue/adhesive out it will come out in one chunk.

    • Lift camera out slowly

  10. この手順は未翻訳です。 翻訳を手伝う。

    : 手順 10、 3の画像 1 : 手順 10、 3の画像 2 : 手順 10、 3の画像 3
    • Remove 5 PH000 Screws for the Loudspeaker bracket

    • Use spudger to lift out bracket

    • Disconnect flex cables

    • Remove 3 Black PH000 Screws to microphoned board and charger port

  11. この手順は未翻訳です。 翻訳を手伝う。

    : 手順 11、 2の画像 1 : 手順 11、 2の画像 2
    • Lift out Microphone board 1st

    • Then lift out charge port wiggling it loose

    • Good lift spot with point end of spudger at arrow location

    • Loosen Adhesive

  12. この手順は未翻訳です。 翻訳を手伝う。

    : 手順 12、 2の画像 1 : 手順 12、 2の画像 2
    • Remove 2 black PH000 Screws on top right lifting flex out.

    • Remove 2 PH000 Screws on Bottom right lift flex out.

    • Use heat it has adhesive holding it down.

    • The top right flex can disconnect from connection not sure 100% what all these parts do yet.

  13. この手順は未翻訳です。 翻訳を手伝う。

    : 手順 13、 3の画像 1 : 手順 13、 3の画像 2 : 手順 13、 3の画像 3
    • Suction Cup, Green Plastic Spudger, and Alcohol to get it out.

    • Spray with alcohol start a little pry to get alcohol under battery

    • Lift with suction cup on battery

    • Bam its out not damaged

  14. この手順は未翻訳です。 翻訳を手伝う。

    : 手順 14、 3の画像 1 : 手順 14、 3の画像 2 : 手順 14、 3の画像 3
    • Move back all small parts into new frame screen assembly

    • Vibator

    • Frame Flex Cables

    • Charge Port goes in 1st

    • Then microphone board goes on top of charge port. Connect the flex cables

    • 3 Black PH000 Screws

  15. この手順は未翻訳です。 翻訳を手伝う。

    : 手順 15、 3の画像 1 : 手順 15、 3の画像 2 : 手順 15、 3の画像 3
    • Lay the main board down in new frame

    • Insert the front camera after laying the board down

  16. この手順は未翻訳です。 翻訳を手伝う。

    : 手順 16、 2の画像 1 : 手順 16、 2の画像 2
    • Lay out adhesive for under the battery

    • Connect the battery 1st then lay it on adhesive

    • Disconnect battery

    • Connect al loose flex cables to there connections

  17. この手順は未翻訳です。 翻訳を手伝う。

    : 手順 17、 3の画像 1 : 手順 17、 3の画像 2 : 手順 17、 3の画像 3
    • Screw brackets down and wireless charge pad to test phone before putting it fully together

    • Apply adhesive to back of phone lay back glass back down

    • If you have to replace back glass you have to move microphone from old back glass rear camera lens to the new back glass.

  18. この手順は未翻訳です。 翻訳を手伝う。

    : 手順 18、 2の画像 1 : 手順 18、 2の画像 2
    • I use liquid adhesive to hold the back glass down

    • Clamp the back down for a couple hours

  19. この手順は未翻訳です。 翻訳を手伝う。

    • We are done!

    • Did not have to replace back glass on this one :)

  20. この手順は未翻訳です。 翻訳を手伝う。

    • Replaced back glass on this one and added a fun twist of my face.

    • To remove back glass paint use acetone and blade to pull paint off.

ゴール

10 の人々がこのガイドを完成させました。

作成者

3人の作成者と共同で作成されました。

Mark D Schlossman

メンバー登録日: 09/25/19

5,537 ポイント

8のガイドは作成済み

8 件のコメント

I did the repair and ran into issues with the REAR camera. I retraced all my hardware. its all connected. the selfie cam works. nothing got disconnected when I removed the mother board. i’ve tried to reset app cache

help plz

Abe Arslan - 返信

Do you have all the screws back in with the speakers and wireless charger coil on the phone?

Stow -

Rear camera hmm did you try repeating the connection did the cameras work before repair?

Mark D Schlossman -

Thanks for the effort here with the guide. Unless I am missing something (lol) where is the part of the screen replacement (by screen = the display screen, right?) I see the back replacement here. You do mention the OLED screen being broken at the beginning but the guide is for the back replacement, right? (not as title suggests ‘screen replacement) Sorry maybe am wrong here.

s ner - 返信

He transfered anything from the original phone to the new sreen/frame assembly.

Daniele Carminati -

コメントを追加

統計データ:

過去 24時間: 5

過去 7 日: 35

過去 30 日: 144

今までの合計 19,361