メインコンテンツにスキップ

この修理ガイドは変更されています。最新の未承認バージョンに切り替えます。

Samsung Series 5 3G Chromebook 16 GB SanDisk Replacement

必要な工具と部品

  1. Samsung Series 5 3G Chromebook 16 GB SanDisk Replacement, Back Cover: 手順 1、 2の画像 1 Samsung Series 5 3G Chromebook 16 GB SanDisk Replacement, Back Cover: 手順 1、 2の画像 2
    • Place the laptop on a flat surface with the bottom side facing up.

    • Remove the rubber feet from the bottom of the panel using your fingernails.

    • Remove all the seven screws from the bottom panel.

  2. Samsung Series 5 3G Chromebook 16 GB SanDisk Replacement: 手順 2、 2の画像 1 Samsung Series 5 3G Chromebook 16 GB SanDisk Replacement: 手順 2、 2の画像 2
    • Loosen the back cover panel using a spudger.

  3. Samsung Series 5 3G Chromebook 16 GB SanDisk Replacement: 手順 3、 2の画像 1 Samsung Series 5 3G Chromebook 16 GB SanDisk Replacement: 手順 3、 2の画像 2
    • Once you work your way around, you can remove the panel.

  4. Samsung Series 5 3G Chromebook 16 GB SanDisk Replacement, 16 GB SanDisk: 手順 4、 3の画像 1 Samsung Series 5 3G Chromebook 16 GB SanDisk Replacement, 16 GB SanDisk: 手順 4、 3の画像 2 Samsung Series 5 3G Chromebook 16 GB SanDisk Replacement, 16 GB SanDisk: 手順 4、 3の画像 3
    • Remove the single screw.

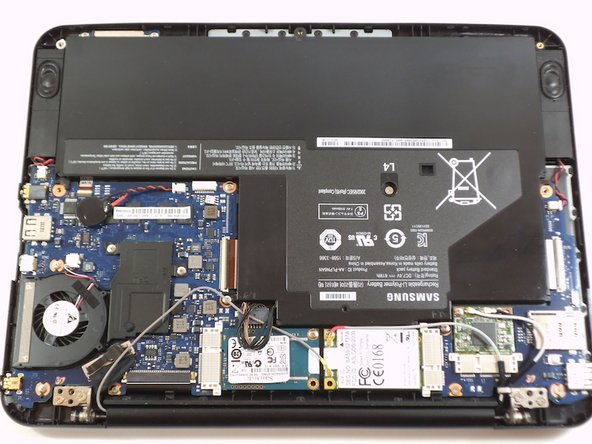
    • use the plastic tool to disconnect the WWAN antennas from the board.

    • After removing its mounting screw, the 16 GB SanDisk can be removed from the motherboard.

終わりに

To reassemble your device, follow these instructions in reverse order.

2 の人々がこのガイドを完成させました。

作成者

3人の作成者と共同で作成されました。

Helder Avelino

メンバー登録日: 10/22/13

938 ポイント

5のガイドは作成済み

チーム

University of Maryland, Team 1-7, Shastany Fall 2013 University of Maryland, Team 1-7, Shastany Fall 2013人のメンバー

UMD-SHASTANY-F13S1G7

2 メンバー

9のガイドは作成済み

0 件のコメント

コメントを追加

統計データ:

過去 24時間: 0

過去 7 日: 1

過去 30 日: 1

今までの合計 1,143