メインコンテンツにスキップ

Samsung SCV-VLUUST50 Flash Capacitor Replacement

必要な工具と部品

  1. Samsung SCV-VLUUST50 Flash Capacitor Replacement, Cover: 手順 1、 3の画像 1 Samsung SCV-VLUUST50 Flash Capacitor Replacement, Cover: 手順 1、 3の画像 2 Samsung SCV-VLUUST50 Flash Capacitor Replacement, Cover: 手順 1、 3の画像 3
    • Unscrew all visible screws indicated by red circles with a #00 Phillips driver.

    • Slide memory card cover and unscrew hidden screw underneath with a #00 Phillips driver.

  2. Samsung SCV-VLUUST50 Flash Capacitor Replacement: 手順 2、 3の画像 1 Samsung SCV-VLUUST50 Flash Capacitor Replacement: 手順 2、 3の画像 2 Samsung SCV-VLUUST50 Flash Capacitor Replacement: 手順 2、 3の画像 3
    • Remove the flat side panel by applying gentle pressure toward the bottom of the camera.

    • Remove the corner panel by applying pressure away from the shutter button.

    • The memory card cover will come off with the corner panel.

    • Remove the top panel by applying gentle pressure away from the shutter button.

  3. Samsung SCV-VLUUST50 Flash Capacitor Replacement: 手順 3、 1の画像 1
    • Remove screws beneath the top panel indicated by red circles with a #00 Phillips driver.

  4. Samsung SCV-VLUUST50 Flash Capacitor Replacement: 手順 4、 2の画像 1 Samsung SCV-VLUUST50 Flash Capacitor Replacement: 手順 4、 2の画像 2
    • Remove the front and back covers by pulling them straight apart.

  5. Samsung SCV-VLUUST50 Flash Capacitor Replacement, Flash Capacitor: 手順 5、 2の画像 1 Samsung SCV-VLUUST50 Flash Capacitor Replacement, Flash Capacitor: 手順 5、 2の画像 2
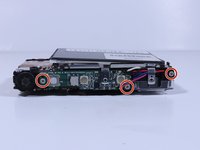
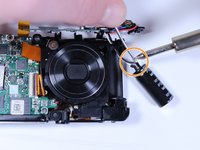
    • Remove the screw securing the shutter button.

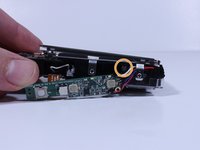
    • Lift the shutter button to remove it.

  6. Samsung SCV-VLUUST50 Flash Capacitor Replacement: 手順 6、 2の画像 1 Samsung SCV-VLUUST50 Flash Capacitor Replacement: 手順 6、 2の画像 2
    • Remove the 3 visible screws with a Phillips #000 Driver

    • Move the circuitry and wires out of the way to expose another screw, and remove it with the same driver.

  7. Samsung SCV-VLUUST50 Flash Capacitor Replacement: 手順 7、 3の画像 1 Samsung SCV-VLUUST50 Flash Capacitor Replacement: 手順 7、 3の画像 2 Samsung SCV-VLUUST50 Flash Capacitor Replacement: 手順 7、 3の画像 3
    • Pull the flash capacitor out of its compartment to expose the wires connected to it.

    • Cut the connecting wires with wire cutters.

    • Solder the wires to the new power source with a soldering iron and electrical solder.

終わりに

To reassemble your device, follow these instructions in reverse order.

作成者

1人の作成者と共同作成されました。

Evert Jordan

メンバー登録日: 02/08/18

287 ポイント

2のガイドは作成済み

チーム

University of North Texas, Team S6-G2, Thomas Spring 2018 University of North Texas, Team S6-G2, Thomas Spring 2018人のメンバー

UNT-THOMAS-S18S6G2

4 メンバー

12のガイドは作成済み

0 件のコメント

コメントを追加

統計データ:

過去 24時間: 0

過去 7 日: 0

過去 30 日: 0

今までの合計 154