メインコンテンツにスキップ

Samsung S85 Rubber Door Replacement

必要な工具と部品

  1. Samsung S85 Rubber Door Replacement, Rubber Door: 手順 1、 3の画像 1 Samsung S85 Rubber Door Replacement, Rubber Door: 手順 1、 3の画像 2 Samsung S85 Rubber Door Replacement, Rubber Door: 手順 1、 3の画像 3
    • Remove 4 screws from bottom of camera

    • Remove 2 screws from side of camera

    • Remove 2 screws from side of camera

    • Place Screws on magnetic surface or location where they will not roll away

  2. Samsung S85 Rubber Door Replacement: 手順 2、 1の画像 1
    • Squeeze area noted by blue square and pull outside shell apart from remaining camera.

  3. Samsung S85 Rubber Door Replacement: 手順 3、 2の画像 1 Samsung S85 Rubber Door Replacement: 手順 3、 2の画像 2
    • Remove 6 screws identified by red circles

    • Remove 3 screws identified by orange circles

  4. Samsung S85 Rubber Door Replacement: 手順 4、 2の画像 1 Samsung S85 Rubber Door Replacement: 手順 4、 2の画像 2
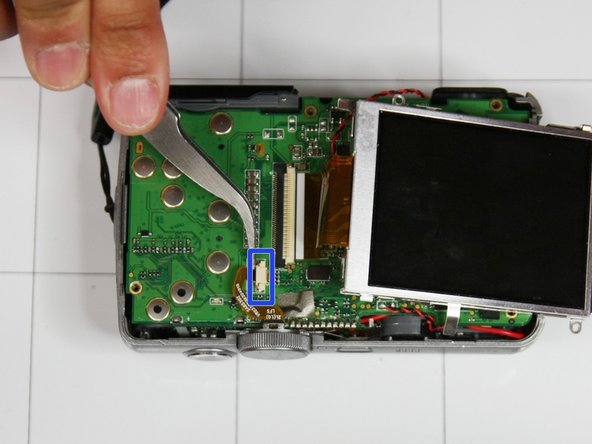
    • Gently remove orange circuit ribbon identified by red square

    • Gently remove narrow orange circuit ribbon identified by blue square

  5. Samsung S85 Rubber Door Replacement: 手順 5、 3の画像 1 Samsung S85 Rubber Door Replacement: 手順 5、 3の画像 2 Samsung S85 Rubber Door Replacement: 手順 5、 3の画像 3
    • Be very cautious when using a soldering iron (they are on average 300 F)

    • Using a soldering iron, remove solder from wire identified by red circle

    • Using a soldering iron, remove solder from black and red wire identified by orange circle

    • Using a soldering iron, remove solder from wire identified by yellow circle

  6. Samsung S85 Rubber Door Replacement: 手順 6、 3の画像 1 Samsung S85 Rubber Door Replacement: 手順 6、 3の画像 2 Samsung S85 Rubber Door Replacement: 手順 6、 3の画像 3
    • Using soldering iron, melt away solder and warm up metal located at top of circuit board as shown in picture

    • Repeat step two to three times until board feels flexible to bend

    • Slowly bend circuit board upwards (towards power button) until at 90 degree angle with remaining part of camera.

  7. Samsung S85 Rubber Door Replacement: 手順 7、 1の画像 1
    • Remove black rubber door located on side of camera closest to lens using tweezers.

    • Be careful not to bend or tear the rubber when pulling out with tweezers as it may become difficult to put back in

終わりに

To reassemble your device, follow these instructions in reverse order.

ある他の人がこのガイドを完成しました。

作成者

2人の作成者と共同で作成されました。

Avinash Salgam

メンバー登録日: 02/16/14

597 ポイント

5のガイドは作成済み

0 件のコメント

コメントを追加

統計データ:

過去 24時間: 0

過去 7 日: 0

過去 30 日: 2

今までの合計 262