メインコンテンツにスキップ

Samsung NP350E5C-A02US Optical Drive Replacement

必要な工具と部品

  1. Samsung NP350E5C-A02US Optical Drive Replacement, Battery: 手順 1、 1の画像 1
    • Lay the laptop down so that the bottom is facing up.

    • There is no battery in the picture.

  2. Samsung NP350E5C-A02US Optical Drive Replacement: 手順 2、 1の画像 1
    • Slide the two plastic tabs to the opposing sides.

    • There is no battery in the picture.

  3. Samsung NP350E5C-A02US Optical Drive Replacement: 手順 3、 1の画像 1
    • While both are in the unlocked position, slide the battery out.

    • There is no battery in the picture.

  4. Samsung NP350E5C-A02US Optical Drive Replacement, Hard drive and memory stick cover: 手順 4、 1の画像 1
    • Remove the M2.5x5 mm screw with a Phillips #0 screwdriver.

  5. Samsung NP350E5C-A02US Optical Drive Replacement: 手順 5、 1の画像 1
    • Slide the cover 1/4" towards the front of the laptop.

  6. Samsung NP350E5C-A02US Optical Drive Replacement: 手順 6、 1の画像 1
    • Then, lift the cover off.

  7. Samsung NP350E5C-A02US Optical Drive Replacement, Optical Drive: 手順 7、 1の画像 1
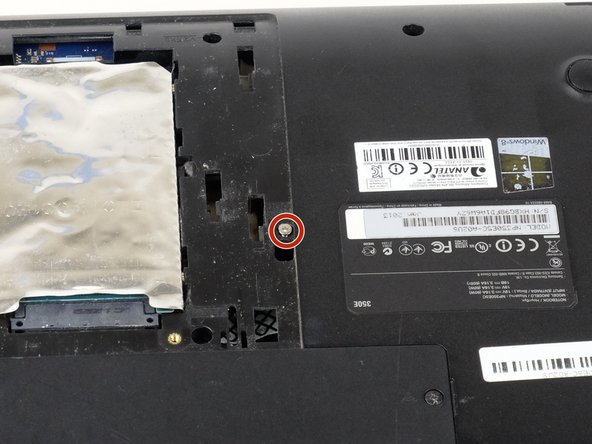
    • Find the screw between the hard drive and the model label. Then remove the M2.5X5 screw with a Phillips #0 screwdriver.

  8. Samsung NP350E5C-A02US Optical Drive Replacement: 手順 8、 1の画像 1
    • Pull the optical drive straight out.

終わりに

To reassemble your device, follow these instructions in reverse order.

作成者

3人の作成者と共同で作成されました。

James Kingrey

メンバー登録日: 10/04/18

775 ポイント

6のガイドは作成済み

チーム

Linn Benton Community College, Team S2-G4, Karnes Fall 2018 Linn Benton Community College, Team S2-G4, Karnes Fall 2018人のメンバー

LBCC-KARNES-F18S2G4

4 メンバー

6のガイドは作成済み

0 件のコメント

コメントを追加

統計データ:

過去 24時間: 1

過去 7 日: 1

過去 30 日: 2

今までの合計 214