メインコンテンツにスキップ

Samsung N150 Plus Keyboard Replacement

必要な工具と部品

  1. Samsung N150 Plus Keyboard Replacement, Battery: 手順 1、 1の画像 1
    • Turn off the computer.

    • Disconnect the charging cable from the laptop.

    • Failure to unplug the cable could result in electric shock.

    • Flip the laptop upside down with the front face down on a flat surface.

  2. Samsung N150 Plus Keyboard Replacement: 手順 2、 2の画像 1 Samsung N150 Plus Keyboard Replacement: 手順 2、 2の画像 2
    • Slide the left and right switch to the "unlocked" position.

  3. Samsung N150 Plus Keyboard Replacement: 手順 3、 2の画像 1 Samsung N150 Plus Keyboard Replacement: 手順 3、 2の画像 2
    • While holding the left and right hand switches in the "unlocked" position, push the battery away from the computer.

  4. Samsung N150 Plus Keyboard Replacement, Back Panel: 手順 4、 1の画像 1
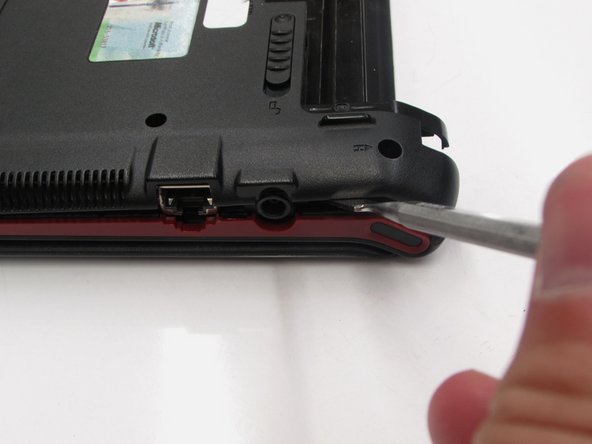
    • Using the Phillip's 00 screwdriver, unscrew the fourteen 7mm screws until the back panel comes loose.

  5. Samsung N150 Plus Keyboard Replacement: 手順 5、 1の画像 1
    • Using either the blue plastic opening tools or spudger tool, wedge one in between the back panel and the laptop.

    • Apply pressure upwards till the back panel pops off.

    • If the back panel is difficult to remove and feels like it is going to break, DO NOT force it. Check to confirm that all the screws are removed before attempting again.

  6. Samsung N150 Plus Keyboard Replacement: 手順 6、 2の画像 1 Samsung N150 Plus Keyboard Replacement: 手順 6、 2の画像 2
    • The computer should be open with the motherboard exposed and internal components exposed. You should now be able to access the Fan and RAM. There are more necessary steps to follow before accessing the screen and keyboard.

  7. Samsung N150 Plus Keyboard Replacement, Keyboard: 手順 7、 1の画像 1
    • Double check that you removed the three 7mm screws for the keyboard in the process of removing the back panel

  8. Samsung N150 Plus Keyboard Replacement: 手順 8、 1の画像 1
    • Flip the computer over. Then, use the plastic opening tools or spudger tool to push in the four, plastic tabs located at the top of the keyboard.

  9. Samsung N150 Plus Keyboard Replacement: 手順 9、 1の画像 1
    • Remove the keyboard by gently pulling the top loose, and lifting the keyboard out.

    • This step can be accomplished using your hands. However, if you are having trouble try using the plastic opening tools.

  10. Samsung N150 Plus Keyboard Replacement: 手順 10、 1の画像 1
    • Remove the keyboard completely from the bezel and locate the ribbon cable that connects the keyboard to the motherboard.

  11. Samsung N150 Plus Keyboard Replacement: 手順 11、 3の画像 1 Samsung N150 Plus Keyboard Replacement: 手順 11、 3の画像 2 Samsung N150 Plus Keyboard Replacement: 手順 11、 3の画像 3
    • Gently lift up the grey latch on the ribbon cable that connects it to the motherboard. Finish, by removing the keyboard from the motherboard.

    • Be extremly careful when unlatching the grey latch from the ribbon cable. It is very delicate and can easily be broken.

終わりに

To reassemble your device, follow these instructions in reverse order.

ある他の人がこのガイドを完成しました。

作成者

3人の作成者と共同で作成されました。

patrick Russell

メンバー登録日: 04/03/16

788 ポイント

6のガイドは作成済み

チーム

0 件のコメント

コメントを追加

統計データ:

過去 24時間: 0

過去 7 日: 0

過去 30 日: 11

今までの合計 3,087