メインコンテンツにスキップ

Samsung Instinct LCD screen Replacement

必要な工具と部品

  1. Samsung Instinct LCD screen Replacement, Battery: 手順 1、 1の画像 1
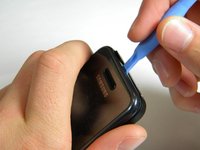
    • Apply pressure to the back cover and slide it forward towards the camera.

    • Lift the back cover off the phone.

  2. Samsung Instinct LCD screen Replacement: 手順 2、 1の画像 1
    • Holding the phone firmly, use the notches to grip and lift up the battery.

  3. Samsung Instinct LCD screen Replacement, Back Case: 手順 3、 1の画像 1
    • Remove the four 4.45mm screws at the corners of the phone.

  4. Samsung Instinct LCD screen Replacement: 手順 4、 2の画像 1 Samsung Instinct LCD screen Replacement: 手順 4、 2の画像 2
    • Use the plastic opening tool to unhinge the locks around the edges of the phone.

    • Do not worry about the inner components of the phone; they are not connected to this case.

  5. Samsung Instinct LCD screen Replacement: 手順 5、 1の画像 1
    • Lift the casing off of the phone.

  6. Samsung Instinct LCD screen Replacement, Antenna: 手順 6、 1の画像 1
    • With the screws removed, locate the antenna.

  7. Samsung Instinct LCD screen Replacement: 手順 7、 1の画像 1
    • Using a Phillips head screwdriver, remove the 4.50mm screw holding the antenna in place.

  8. Samsung Instinct LCD screen Replacement: 手順 8、 1の画像 1
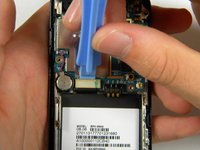
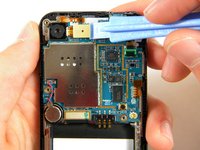
    • Using the plastic opener tool, squeeze gently on the antenna cable connector and lift to remove the connector from its position.

  9. Samsung Instinct LCD screen Replacement: 手順 9、 1の画像 1
    • Gently lift up on the antenna and remove it from the back of the device.

  10. Samsung Instinct LCD screen Replacement, Front Case: 手順 10、 1の画像 1
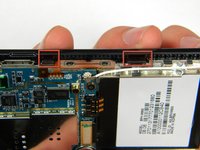
    • Remove the two 3.50mm screws connecting the motherboard to the case.

  11. Samsung Instinct LCD screen Replacement: 手順 11、 3の画像 1 Samsung Instinct LCD screen Replacement: 手順 11、 3の画像 2 Samsung Instinct LCD screen Replacement: 手順 11、 3の画像 3
    • Use the plastic opener tool to detach the three ribbons on the motherboard.

  12. Samsung Instinct LCD screen Replacement: 手順 12、 1の画像 1
    • Lift out the top right ribbon from its slot on the motherboard.

  13. Samsung Instinct LCD screen Replacement: 手順 13、 2の画像 1 Samsung Instinct LCD screen Replacement: 手順 13、 2の画像 2
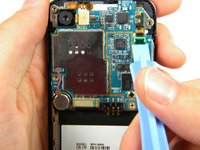
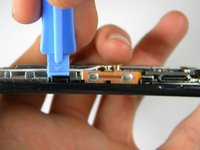
    • Use the plastic opener tool to unhinge the the locks on the side of the motherboard connecting it to the front casing.

  14. Samsung Instinct LCD screen Replacement: 手順 14、 1の画像 1
    • Lift the motherboard away from the front casing.

  15. Samsung Instinct LCD screen Replacement: 手順 15、 1の画像 1
    • After removing lifting up on the motherboard, the front casing and center frame should be separated as shown.

  16. Samsung Instinct LCD screen Replacement, LCD screen: 手順 16、 1の画像 1
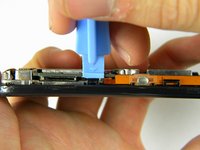
    • Using the plastic opener tool, detach the ribbon located on the bottom of the phone below the battery compartment.

  17. Samsung Instinct LCD screen Replacement: 手順 17、 1の画像 1
    • Lift the microchip (located at the bottom of the phone) and insert the plastic opener tool under the screen.

    • Lift up the screen. The microchip is attached to the screen and will be lifted out with the screen.

  18. Samsung Instinct LCD screen Replacement: 手順 18、 1の画像 1
    • After lifting out the LCD screen, the screen and its housing should be separated as shown.

終わりに

To reassemble your device, follow these instructions in reverse order.

ある他の人がこのガイドを完成しました。

作成者

5人の作成者と共同で作成されました。

Patrick

メンバー登録日: 10/11/11

75 ポイント

2のガイドは作成済み

チーム

Cal Poly, Team 3-13, Regan Fall 2011 Cal Poly, Team 3-13, Regan Fall 2011人のメンバー

CPSU-REGAN-F11S3G13

4 メンバー

16のガイドは作成済み

0 件のコメント

コメントを追加

統計データ:

過去 24時間: 0

過去 7 日: 0

過去 30 日: 2

今までの合計 1,522