メインコンテンツにスキップ

Samsung HMX-F90 Lens Replacement

必要な工具と部品

  1. Samsung HMX-F90 Lens Replacement, Battery: 手順 1、 3の画像 1 Samsung HMX-F90 Lens Replacement, Battery: 手順 1、 3の画像 2 Samsung HMX-F90 Lens Replacement, Battery: 手順 1、 3の画像 3
    • Pull the release tab away from the battery.

    • Slide the battery towards the release tab and then pull the battery away from the camcorder.

  2. Samsung HMX-F90 Lens Replacement, Strap Side Outer Casing: 手順 2、 2の画像 1 Samsung HMX-F90 Lens Replacement, Strap Side Outer Casing: 手順 2、 2の画像 2
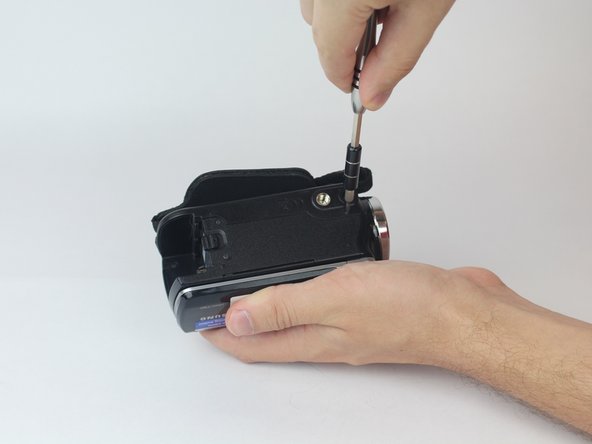
    • Rotate the camcorder so that the strap side is facing you.

    • Locate and remove the three 4.5mm Phillips #00 screws around the hand strap.

  3. Samsung HMX-F90 Lens Replacement: 手順 3、 2の画像 1 Samsung HMX-F90 Lens Replacement: 手順 3、 2の画像 2
    • Rotate the camcorder so that the battery slot is facing you.

    • Located in the top left corner of the battery slot, remove the 4.5mm Phillips #00 screw.

  4. Samsung HMX-F90 Lens Replacement: 手順 4、 2の画像 1 Samsung HMX-F90 Lens Replacement: 手順 4、 2の画像 2
    • Rotate the camcorder so you are looking at the bottom of the camcorder.

    • Locate and remove the last three 4.5mm Phillips #00 screws.

  5. Samsung HMX-F90 Lens Replacement: 手順 5、 3の画像 1 Samsung HMX-F90 Lens Replacement: 手順 5、 3の画像 2 Samsung HMX-F90 Lens Replacement: 手順 5、 3の画像 3
    • With both hands, pull the side strap apart from the rest of the camcorder.

  6. Samsung HMX-F90 Lens Replacement, Lens: 手順 6、 2の画像 1 Samsung HMX-F90 Lens Replacement, Lens: 手順 6、 2の画像 2
    • Rotate the camcorder so that back is facing you. Then flip open the LCD screen.

    • Locate and remove the 4.5mm Phillips #00 screws in the LCD screen base.

  7. Samsung HMX-F90 Lens Replacement: 手順 7、 2の画像 1 Samsung HMX-F90 Lens Replacement: 手順 7、 2の画像 2
    • Close the LCD screen. Then lift the silver base away from the camcorder.

  8. Samsung HMX-F90 Lens Replacement: 手順 8、 2の画像 1 Samsung HMX-F90 Lens Replacement: 手順 8、 2の画像 2
    • Locate and remove the two 3.5mm Phillips #00 screws from the side of the camcorder.

  9. Samsung HMX-F90 Lens Replacement: 手順 9、 3の画像 1 Samsung HMX-F90 Lens Replacement: 手順 9、 3の画像 2 Samsung HMX-F90 Lens Replacement: 手順 9、 3の画像 3
    • Gradually pry off the outer casing using a prying tool.

  10. Samsung HMX-F90 Lens Replacement: 手順 10、 3の画像 1 Samsung HMX-F90 Lens Replacement: 手順 10、 3の画像 2 Samsung HMX-F90 Lens Replacement: 手順 10、 3の画像 3
    • Locate and remove the three 4mm Phillips #00 screws around the lens.

    • Gently remove the lens.

終わりに

To reassemble your device, follow these instructions in reverse order.

3 の人々がこのガイドを完成させました。

作成者

1人の作成者と共同作成されました。

Amir Harb

メンバー登録日: 09/26/17

705 ポイント

6のガイドは作成済み

チーム

USF Tampa, Team S13-G1, Boczar Fall 2017 USF Tampa, Team S13-G1, Boczar Fall 2017人のメンバー

USFT-BOCZAR-F17S13G1

4 メンバー

12のガイドは作成済み

0 件のコメント

コメントを追加

統計データ:

過去 24時間: 0

過去 7 日: 5

過去 30 日: 25

今までの合計 1,176