メインコンテンツにスキップ

Samsung Gear S Home Button Assembly Replacement

必要な工具と部品

  1. Samsung Gear S Home Button Assembly Replacement, Display Assembly: 手順 1、 3の画像 1 Samsung Gear S Home Button Assembly Replacement, Display Assembly: 手順 1、 3の画像 2 Samsung Gear S Home Button Assembly Replacement, Display Assembly: 手順 1、 3の画像 3
    • Remove the wrist strap by peeling back the rubber starting from one corner of the watch face. Continue peeling the rubber away from the watch face until the strap is completely off.

  2. Samsung Gear S Home Button Assembly Replacement: 手順 2、 2の画像 1 Samsung Gear S Home Button Assembly Replacement: 手順 2、 2の画像 2
    • Starting from an edge, wedge a metal spudger in between the screen and the chrome trim ring and pry, lifting the screen outwards.

    • Some force is needed due to adhesive seal.

  3. Samsung Gear S Home Button Assembly Replacement: 手順 3、 1の画像 1
    • Use a plastic opening tool to gently pry upwards on the plastic motherboard assembly.

  4. Samsung Gear S Home Button Assembly Replacement: 手順 4、 1の画像 1
    • Locate the ribbon assembly attaching the display to the motherboard.

  5. Samsung Gear S Home Button Assembly Replacement: 手順 5、 1の画像 1
    • Use a plastic opening tool to detach the glass screen/ LED Display ribbon connector from the motherboard.

  6. Samsung Gear S Home Button Assembly Replacement: 手順 6、 1の画像 1
    • Now the watch should be in three separate pieces.

  7. Samsung Gear S Home Button Assembly Replacement, Home Button Assembly: 手順 7、 2の画像 1 Samsung Gear S Home Button Assembly Replacement, Home Button Assembly: 手順 7、 2の画像 2
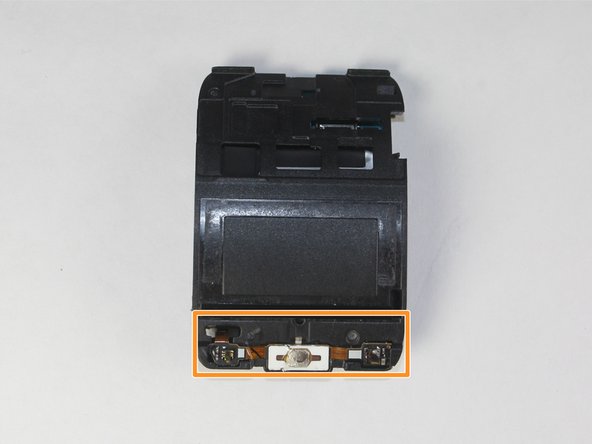
    • Locate the home ribbon connector attached to the wrist side (side that faces the user when wearing it) of the motherboard assembly.

    • Locate the home ribbon assembly attached to the screen side of the motherboard assembly.

  8. Samsung Gear S Home Button Assembly Replacement: 手順 8、 1の画像 1
    • Use a plastic opening tool to gently pry up on the home ribbon connector.

  9. Samsung Gear S Home Button Assembly Replacement: 手順 9、 1の画像 1
    • Use the spudger to pry up the home ribbon assembly.

終わりに

To reassemble your device, follow these instructions in reverse order.

2 の人々がこのガイドを完成させました。

作成者

5人の作成者と共同で作成されました。

Luis Franco

メンバー登録日: 09/03/15

1,076 ポイント

4のガイドは作成済み

チーム

USF Tampa, Team 12-1, Blackwell Fall 2015 USF Tampa, Team 12-1, Blackwell Fall 2015人のメンバー

USFT-BLACKWELL-F15S12G1

4 メンバー

5のガイドは作成済み

2 件のコメント

where can i buy the home buton?

Hanna Iskandar - 返信

I am in search of the SM-R750v Housing Back Cover, any suggestions

Rita Arnold - 返信

コメントを追加

統計データ:

過去 24時間: 1

過去 7 日: 8

過去 30 日: 12

今までの合計 5,137