メインコンテンツにスキップ

この修理ガイドは変更されています。最新の未承認バージョンに切り替えます。

Samsung Galaxy Tab E 8.0 Battery Replacement

必要な工具と部品

  1. Samsung Galaxy Tab E 8.0 Battery Replacement, Back Panel: 手順 1、 2の画像 1 Samsung Galaxy Tab E 8.0 Battery Replacement, Back Panel: 手順 1、 2の画像 2
    • Use the iFixit Opening Tool to pry off the back case, moving the tool around the screen.

    • Make sure the device is off and the SD card is removed before taking off the back casing.

    deffently got to apply heat to that front screen due to the adessive bewhind or mostlikly crack the screen

    Trent Weaver - 返信

  2. Samsung Galaxy Tab E 8.0 Battery Replacement, Back Camera: 手順 2、 2の画像 1 Samsung Galaxy Tab E 8.0 Battery Replacement, Back Camera: 手順 2、 2の画像 2
    • Use the tweezers to lift the switch connecting the back camera to the motherboard.

    • Use your hand to remove the back camera from the motherboard.

  3. Samsung Galaxy Tab E 8.0 Battery Replacement, Front Camera: 手順 3、 3の画像 1 Samsung Galaxy Tab E 8.0 Battery Replacement, Front Camera: 手順 3、 3の画像 2 Samsung Galaxy Tab E 8.0 Battery Replacement, Front Camera: 手順 3、 3の画像 3
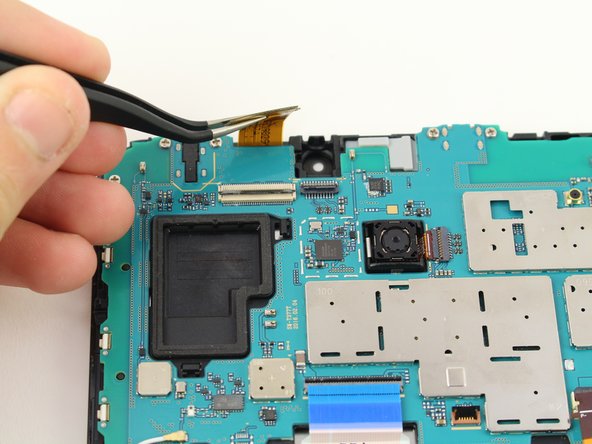
    • Use the tweezers to lift the switch connecting the front camera to the motherboard.

    • Remove the front camera from the motherboard by lifting with the tweezers.

  4. Samsung Galaxy Tab E 8.0 Battery Replacement, Motherboard: 手順 4、 2の画像 1 Samsung Galaxy Tab E 8.0 Battery Replacement, Motherboard: 手順 4、 2の画像 2
    • Use the tweezers to flip the switch on the bottom of the strap that goes over the battery.

    • Release the strap from the switch by lifting the strap with your hand.

  5. Samsung Galaxy Tab E 8.0 Battery Replacement: 手順 5、 2の画像 1 Samsung Galaxy Tab E 8.0 Battery Replacement: 手順 5、 2の画像 2
    • Use the tweezers to flip the switch that connects the top of the strap to the motherboard.

    • Lift the top end of the strap with your hand and remove the strap completely from the device.

  6. Samsung Galaxy Tab E 8.0 Battery Replacement: 手順 6、 2の画像 1 Samsung Galaxy Tab E 8.0 Battery Replacement: 手順 6、 2の画像 2
    • Use the tweezers to flip the switch of the connector.

    • Lift the connector from the motherboard.

    • This connector does not come completely off, but disconnects from the motherboard.

  7. Samsung Galaxy Tab E 8.0 Battery Replacement: 手順 7、 2の画像 1 Samsung Galaxy Tab E 8.0 Battery Replacement: 手順 7、 2の画像 2
    • Use the tweezers to flip the switch of the blue connector on the motherboard.

    • Lift the connector from the motherboard.

    • This switch can detach from the device, but just needs to disconnect from the motherboard.

    • Ensure the blue ribbon cable is not under the motherboard upon reassembly.

  8. Samsung Galaxy Tab E 8.0 Battery Replacement: 手順 8、 2の画像 1 Samsung Galaxy Tab E 8.0 Battery Replacement: 手順 8、 2の画像 2
    • Use the tweezers to flip the switch of the connector that runs from the battery to the motherboard.

    • Lift the connector from the motherboard.

    • This switch can detach from the device, but just needs to disconnect from the motherboard.

  9. Samsung Galaxy Tab E 8.0 Battery Replacement: 手順 9、 2の画像 1 Samsung Galaxy Tab E 8.0 Battery Replacement: 手順 9、 2の画像 2
    • Use a JIS #00 screwdriver to remove the six 4.5mm screws at the top of the motherboard.

    • Lift the motherboard with your hand to detach the motherboard from the device.

    Before you pull teh motherboard out, yo need to detache the grey wire that acts as antenna.

    steve k - 返信

  10. Samsung Galaxy Tab E 8.0 Battery Replacement, Battery: 手順 10、 3の画像 1 Samsung Galaxy Tab E 8.0 Battery Replacement, Battery: 手順 10、 3の画像 2 Samsung Galaxy Tab E 8.0 Battery Replacement, Battery: 手順 10、 3の画像 3
    • Use the tweezers to lift the flap on the left end of the battery and pull up with your hand to remove the battery.

    • The battery is held by an adhesive on the back, so it will take some force to remove.

終わりに

To reassemble your device, follow these instructions in reverse order.

4 の人々がこのガイドを完成させました。

作成者

3人の作成者と共同で作成されました。

Christian Bloemhof

メンバー登録日: 10/08/18

1,102 ポイント

7のガイドは作成済み

チーム

Cal Poly, Team S13-G4, White Fall 2018 Cal Poly, Team S13-G4, White Fall 2018人のメンバー

CPSU-WHITE-F18S13G4

4 メンバー

8のガイドは作成済み

5 件のコメント

Any chance that the tablet will not charge even with a new battery?

Marcellus Walden - 返信

Check to see if the ZIF connector is all the way in.

Carl Geist -

All you really need to do is take out the cable that runs over the battery. After that just disconnect the battery from the logic board and you can remove the battery with the tabs. A lot less steps and less steps that could go wrong.

Carl Geist - 返信

Can confirm, completed the guide and skipped a total of four steps.

Pospesel -

Note the T378 version has adhesive around the frame. It will need to be softened with some heat, first, but otherwise opens the same exact way. I wasn’t aware of this an accidentally cracked the digitizer lol. Thankfully, I had a spare.

Menelik Seth - 返信

コメントを追加

統計データ:

過去 24時間: 1

過去 7 日: 8

過去 30 日: 41

今までの合計 4,951