メインコンテンツにスキップ

Samsung Galaxy Tab 2 10.1 Speaker Replacement

必要な工具と部品

  1. Samsung Galaxy Tab 2 10.1 Speaker Replacement, Back Cover: 手順 1、 2の画像 1 Samsung Galaxy Tab 2 10.1 Speaker Replacement, Back Cover: 手順 1、 2の画像 2
    • The plastic opening tool may break during this step. You may need to use the heavy duty spudger instead.

    • Insert the plastic opening tool between the glass screen and the back cover so the curved end of the plastic opening tool is under the glass. Gently pry the back cover away from the glass screen.

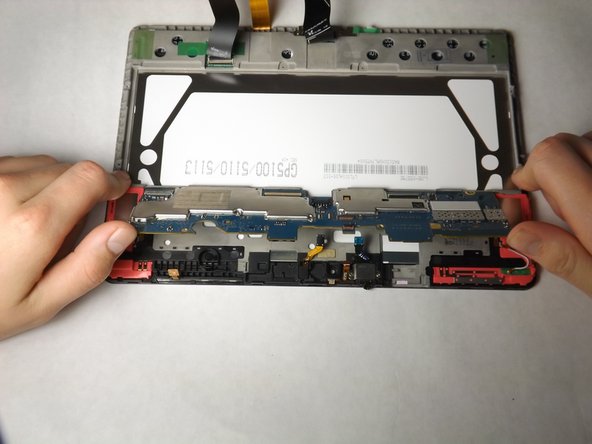
    • Be sure to lift the entire display from the body and that you are not are lifting the glass from the display. You will need to reach down a little further for the correct removal.

    • Continue inserting the plastic opening tool around the whole device screen to completely separate the back cover from the glass screen.

  2. Samsung Galaxy Tab 2 10.1 Speaker Replacement: 手順 2、 2の画像 1 Samsung Galaxy Tab 2 10.1 Speaker Replacement: 手順 2、 2の画像 2
    • Gently lift the screen up with your finger.

    • If the screen will not separate from the back cover, try repeating step 1.

  3. Samsung Galaxy Tab 2 10.1 Speaker Replacement, Battery Disconnect: 手順 3、 1の画像 1
    • Using your fingers, remove the green tape covering the battery connector.

  4. Samsung Galaxy Tab 2 10.1 Speaker Replacement: 手順 4、 3の画像 1 Samsung Galaxy Tab 2 10.1 Speaker Replacement: 手順 4、 3の画像 2 Samsung Galaxy Tab 2 10.1 Speaker Replacement: 手順 4、 3の画像 3
    • Insert the flat end of the heavy-duty spudger between the wires and underneath the battery connector. Carefully lift the black battery connector up to disconnect it from the motherboard.

    • The metal spudger shown in the photo is not recommended due to the possibility of an electrical short. Use an ESD-safe tool, such as a heavy-duty (nylon) spudger.

  5. Samsung Galaxy Tab 2 10.1 Speaker Replacement, Front Camera: 手順 5、 2の画像 1 Samsung Galaxy Tab 2 10.1 Speaker Replacement, Front Camera: 手順 5、 2の画像 2
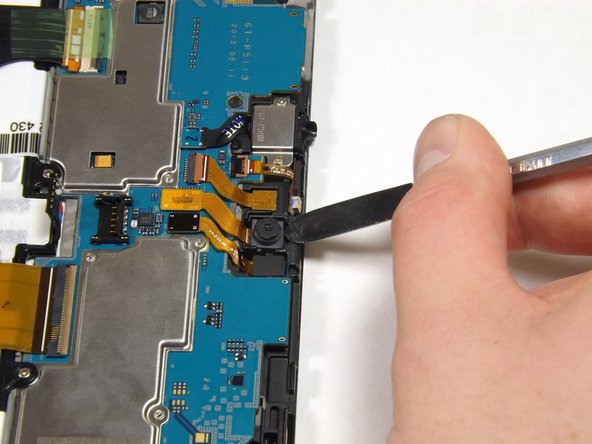
    • Gently lift the camera from its socket with the flat end of the heavy-duty spudger.

  6. Samsung Galaxy Tab 2 10.1 Speaker Replacement: 手順 6、 1の画像 1
    • Gently lift the gold cable connector with the flat end of the heavy-duty spudger to disconnect it from the device.

  7. Samsung Galaxy Tab 2 10.1 Speaker Replacement, Battery: 手順 7、 3の画像 1 Samsung Galaxy Tab 2 10.1 Speaker Replacement, Battery: 手順 7、 3の画像 2 Samsung Galaxy Tab 2 10.1 Speaker Replacement, Battery: 手順 7、 3の画像 3
    • Using your fingers, remove the green tape holding the three ribbon cables down.

    • Using the flat end of the heavy-duty spudger, carefully lift the black tab that holds the leftmost, black ribbon cable in place. Repeat this step for the gold ribbon cable and the black ribbon cable.

    • Using your fingers, gently slide each of the three cables straight out of the connectors.

  8. Samsung Galaxy Tab 2 10.1 Speaker Replacement: 手順 8、 1の画像 1
    • Using a Phillips #000 screwdriver, remove the ten 3mm screws that hold the battery down.

  9. Samsung Galaxy Tab 2 10.1 Speaker Replacement: 手順 9、 2の画像 1 Samsung Galaxy Tab 2 10.1 Speaker Replacement: 手順 9、 2の画像 2
    • Lift the battery with your hands and remove it from the device.

  10. Samsung Galaxy Tab 2 10.1 Speaker Replacement, Motherboard: 手順 10、 2の画像 1 Samsung Galaxy Tab 2 10.1 Speaker Replacement, Motherboard: 手順 10、 2の画像 2
    • Using the flat end of the heavy-duty spudger, lift up the black ribbon lock directly left of the headphone jack from the black side.

    • After lifting up the lock, insert the heavy-duty spudger underneath the gold ribbon and slide to disconnect the gold ribbon.

  11. Samsung Galaxy Tab 2 10.1 Speaker Replacement: 手順 11、 1の画像 1
    • The rear camera may pop out.

    • Using the flat end of the heavy-duty spudger, gently lift up the ribbon lock directly above the one in the previous step from the brown side.

    • After lifting up the lock, remove the gold ribbon with the heavy-duty spudger as you did in the previous step.

  12. Samsung Galaxy Tab 2 10.1 Speaker Replacement: 手順 12、 1の画像 1
    • Use the flat end of the heavy-duty spudger to pop off and disconnect all the marked connectors attached to the motherboard.

  13. Samsung Galaxy Tab 2 10.1 Speaker Replacement: 手順 13、 2の画像 1 Samsung Galaxy Tab 2 10.1 Speaker Replacement: 手順 13、 2の画像 2
    • After disconnecting all of the connectors, push up on the motherboard with your thumbs to dislodge it from the tabs fastening the bottom of the motherboard. Then lift up the motherboard to carefully remove it from the device.

    • You may need to repeat this step a few times. The motherboard can be difficult to remove.

  14. Samsung Galaxy Tab 2 10.1 Speaker Replacement, Speaker: 手順 14、 2の画像 1 Samsung Galaxy Tab 2 10.1 Speaker Replacement, Speaker: 手順 14、 2の画像 2
    • Using the plastic opening tool, gently pry the left speaker out of the slot and remove it

  15. Samsung Galaxy Tab 2 10.1 Speaker Replacement: 手順 15、 2の画像 1 Samsung Galaxy Tab 2 10.1 Speaker Replacement: 手順 15、 2の画像 2
    • Using the plastic opening tool, gently pry the right speaker out of the slot and remove it

終わりに

To reassemble your device, follow these instructions in reverse order.

5 の人々がこのガイドを完成させました。

作成者

5人の作成者と共同で作成されました。

Matthew Weeman

メンバー登録日: 02/02/15

927 ポイント

1ガイドが承認済み

チーム

Cal Poly, Team 6-26, Amido Winter 2015 Cal Poly, Team 6-26, Amido Winter 2015人のメンバー

CPSU-AMIDO-W15S6G26

5 メンバー

14のガイドは作成済み

コメント 1 件

I have a little grey rubber unit which has fallen out of somewhere. Can you say where this goes please. Someone said it was to do with the speaker. Its only about a centimetre wider.

Bernard Kane - 返信

コメントを追加

統計データ:

過去 24時間: 0

過去 7 日: 0

過去 30 日: 5

今までの合計 2,608