メインコンテンツにスキップ
リペアコミュニティに参加 - アカウントの作成

Samsung Galaxy Tab 2 10.1 Charger Port Replacement

必要な工具と部品

    1. Samsung Galaxy Tab 2 10.1 Charger Port Replacement, Back Cover: 手順 1、 2の画像 1 Samsung Galaxy Tab 2 10.1 Charger Port Replacement, Back Cover: 手順 1、 2の画像 2
      この手順で使用する道具:
      Heavy-Duty Spudger
      $4.99
      • The plastic opening tool may break during this step. You may need to use the heavy duty spudger instead.

      • Insert the plastic opening tool between the glass screen and the back cover so the curved end of the plastic opening tool is under the glass. Gently pry the back cover away from the glass screen.

      • Be sure to lift the entire display from the body and that you are not are lifting the glass from the display. You will need to reach down a little further for the correct removal.

      • Continue inserting the plastic opening tool around the whole device screen to completely separate the back cover from the glass screen.

      FixBotに聞いてみる

      コメントを追加

    2. Samsung Galaxy Tab 2 10.1 Charger Port Replacement: 手順 2、 2の画像 1 Samsung Galaxy Tab 2 10.1 Charger Port Replacement: 手順 2、 2の画像 2
      • Gently lift the screen up with your finger.

      • If the screen will not separate from the back cover, try repeating step 1.

      FixBotに聞いてみる

      コメントを追加

    1. Samsung Galaxy Tab 2 10.1 Charger Port Replacement, Battery Disconnect: 手順 3、 1の画像 1
      • Using your fingers, remove the green tape covering the battery connector.

      FixBotに聞いてみる

      コメントを追加

    2. Samsung Galaxy Tab 2 10.1 Charger Port Replacement: 手順 4、 3の画像 1 Samsung Galaxy Tab 2 10.1 Charger Port Replacement: 手順 4、 3の画像 2 Samsung Galaxy Tab 2 10.1 Charger Port Replacement: 手順 4、 3の画像 3
      この手順で使用する道具:
      Heavy-Duty Spudger
      $4.99
      • Insert the flat end of the heavy-duty spudger between the wires and underneath the battery connector. Carefully lift the black battery connector up to disconnect it from the motherboard.

      • The metal spudger shown in the photo is not recommended due to the possibility of an electrical short. Use an ESD-safe tool, such as a heavy-duty (nylon) spudger.

      FixBotに聞いてみる

      コメントを追加

    1. Samsung Galaxy Tab 2 10.1 Charger Port Replacement, Charger Port: 手順 5、 2の画像 1 Samsung Galaxy Tab 2 10.1 Charger Port Replacement, Charger Port: 手順 5、 2の画像 2
      • The charging port cable is the black cable connected to the charger port. Using your fingers, peel the green tape off of the charging port cable connector.

      FixBotに聞いてみる

      コメントを追加

    2. Samsung Galaxy Tab 2 10.1 Charger Port Replacement: 手順 6、 2の画像 1 Samsung Galaxy Tab 2 10.1 Charger Port Replacement: 手順 6、 2の画像 2
      この手順で使用する道具:
      Heavy-Duty Spudger
      $4.99
      • Using the flat end of heavy-duty spudger, carefully lift the black tab that holds the charger port cable in place.

      • Slide the cable out.

      • There is a small strip of adhesive holding the charger port cable to the battery. You may need to slide the heavy-duty spudger between the cable and the battery to slide the cable out.

      FixBotに聞いてみる

      コメントを追加

    3. Samsung Galaxy Tab 2 10.1 Charger Port Replacement: 手順 7、 3の画像 1 Samsung Galaxy Tab 2 10.1 Charger Port Replacement: 手順 7、 3の画像 2 Samsung Galaxy Tab 2 10.1 Charger Port Replacement: 手順 7、 3の画像 3
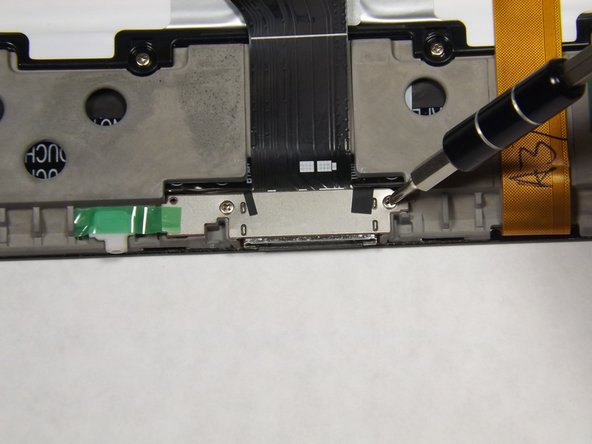
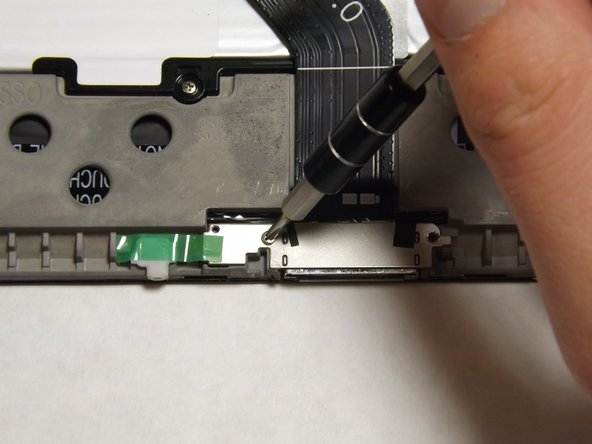
      • Use the Phillips 000 screwdriver to unscrew the two 3mm screws holding the charger port in place.

      FixBotに聞いてみる

      コメントを追加

    4. Samsung Galaxy Tab 2 10.1 Charger Port Replacement: 手順 8、 1の画像 1
      • Use the flat end of the heavy-duty spudger to lift the white microphone piece until it is removed from its socket.

      FixBotに聞いてみる

      コメントを追加

    5. Samsung Galaxy Tab 2 10.1 Charger Port Replacement: 手順 9、 3の画像 1 Samsung Galaxy Tab 2 10.1 Charger Port Replacement: 手順 9、 3の画像 2 Samsung Galaxy Tab 2 10.1 Charger Port Replacement: 手順 9、 3の画像 3
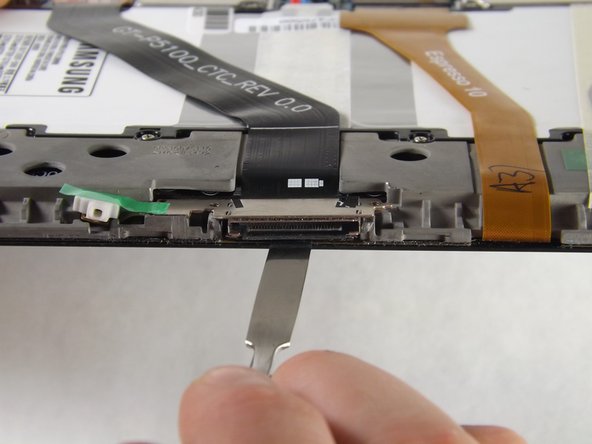
      • Be sure to insert the spudger underneath the charger port and not inside the charger port to avoid damaging the component

      • Slide the flat end of the heavy-duty spudger under the charger port.

      • Make sure the spudger is all the way to the back of the cavity and slide horizontally across the bottom to break the adhesive.

      FixBotに聞いてみる

      コメントを追加

    6. Samsung Galaxy Tab 2 10.1 Charger Port Replacement: 手順 10、 1の画像 1
      • Lift the charger port with the flat end of the heavy-duty spudger and remove it from the device.

      FixBotに聞いてみる

      コメントを追加

終わりに

To reassemble your device, follow these instructions in reverse order.

キャンセル: このガイドを終了できませんでした。

22 の人々がこのガイドを完成させました。

作成者

5人の作成者と共同で作成されました。

John

メンバー登録日: 02/02/15

416 ポイント

1ガイドが承認済み

チーム

Cal Poly, Team 6-26, Amido Winter 2015 Cal Poly, Team 6-26, Amido Winter 2015人のメンバー

CPSU-AMIDO-W15S6G26

5 メンバー

72のガイドは作成済み

7件のガイドコメント

Dear John,

Why must one disconnet the battery in step 3 and 4, whilst that does not seem necessary to replace the cable & port for the charger only (steps 5-10), and NOT the battery....?

Regards, Frank

Frank du Mee - 返信 共有

Always disconnect battery and press power button a few times to rid of any power left on device while doing repairs. especially if you are using metal tools.

Oscar C - 返信 共有

My Tab 2 10.1 does not come apart this way. If you try it this way, it will damage the touch screen connector. Plus the cable is different. This looks more like a Tab 1.

K Meeker - 返信 共有

Does the P5100 have the same charging port as the P7500?

julia yapkew - 返信 共有

I always open the tablet and order the cable by part and rev number. you may order a part for a tablet and will most like be sent for a diff version.

Oscar C - 返信 共有

コメントを追加

統計データ:

過去 24時間: 5

過去 7 日: 32

過去 30 日: 109

今までの合計 41,694