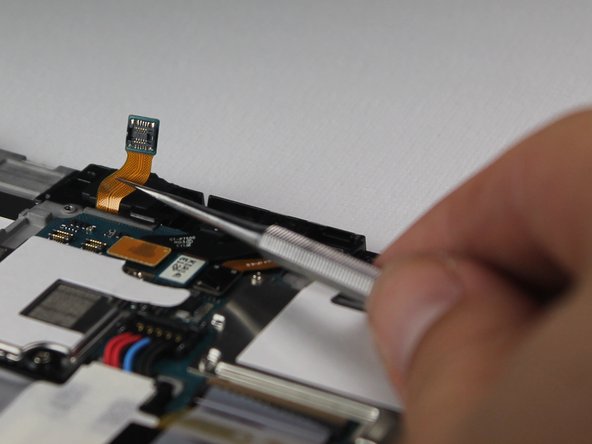
メインコンテンツにスキップ

Samsung Galaxy Tab 10.1 4G Headphone Jack Replacement

必要な工具と部品

  1. Samsung Galaxy Tab 10.1 4G Headphone Jack Replacement, Back Panel: 手順 1、 1の画像 1
    • Power off your tablet before you begin disassembly.

    • Screen side facing you, rotate device 180 degrees so the "SAMSUNG" logo is upside down.

  2. Samsung Galaxy Tab 10.1 4G Headphone Jack Replacement: 手順 2、 2の画像 1 Samsung Galaxy Tab 10.1 4G Headphone Jack Replacement: 手順 2、 2の画像 2
    • Using the plastic opening tool, start in the center near the charge port and wedge the angled tip between the plastic back and the glass screen.

    • Create a wedge and apply pressure. Use the tool to separate the screen from the back until you hear an audible “pop."

    • Continue to wedge the tool about every inch along the current edge.

  3. Samsung Galaxy Tab 10.1 4G Headphone Jack Replacement: 手順 3、 2の画像 1 Samsung Galaxy Tab 10.1 4G Headphone Jack Replacement: 手順 3、 2の画像 2
    • Once the bottom edge has been loosened, work towards a bottom corner from the other edge and continue to wedge gently until you can “pop” the corner out.

    • Continue this process on the other bottom corner until it can be popped out as well.

  4. Samsung Galaxy Tab 10.1 4G Headphone Jack Replacement: 手順 4、 1の画像 1
    • Place your hand between the device and the back panel. Then continue the wedging motion along the top edge of the device until the back panel comes loose.

    • Do not wedge the tool directly on top of the power buttons and headphone jack. Wedge nearby so that you don’t damage internal hardware.

  5. Samsung Galaxy Tab 10.1 4G Headphone Jack Replacement: 手順 5、 1の画像 1
    • Remove the back from the device.

    • Excessive force shouldn't be necessary here. If the back panel is sticking, find the area of the edge closest to the sticking point and wedge the opening tool there until the back panel pops free.

  6. Samsung Galaxy Tab 10.1 4G Headphone Jack Replacement: 手順 6、 2の画像 1 Samsung Galaxy Tab 10.1 4G Headphone Jack Replacement: 手順 6、 2の画像 2
    • When working with electronics, it's important to choose a tool that's ESD-safe to avoid accidental damage to the device. The regular black nylon spudger or a plastic opening tool should be used whenever possible.

    • The connection between the battery and motherboard is a group of four wires in black housing that can be found near the top middle of the device. Using a plastic spudger or a flat, slim tool, lift the black connector housing upwards to disconnect it.

  7. Samsung Galaxy Tab 10.1 4G Headphone Jack Replacement, SIM Card Reader: 手順 7、 1の画像 1
    • Use a Phillips #00 screwdriver to remove all 4 black 2.5mm screws securing the silver SIM card reader to the motherboard.

  8. Samsung Galaxy Tab 10.1 4G Headphone Jack Replacement: 手順 8、 1の画像 1
    • Using a plastic spudger, gently pop the SIM card reader connection off the motherboard.

    • There are 5 connection points all in a row. The one you want to pull off is the one furthest to the left.

  9. Samsung Galaxy Tab 10.1 4G Headphone Jack Replacement: 手順 9、 1の画像 1
    • Lift up SIM card reader and remove it.

    • You should be able to just pick it up with your fingers. If the piece is hard to grasp, slide the metal spudger tool under the reader to lift it.

  10. Samsung Galaxy Tab 10.1 4G Headphone Jack Replacement: 手順 10、 1の画像 1
    • Lift the SIM card reader off the motherboard, and replace it with a new SIM card reader.

    • Be sure to retrieve your SIM card from the old reader.

  11. Samsung Galaxy Tab 10.1 4G Headphone Jack Replacement, Headphone Jack: 手順 11、 2の画像 1 Samsung Galaxy Tab 10.1 4G Headphone Jack Replacement, Headphone Jack: 手順 11、 2の画像 2
    • Using a plastic spudger, gently lift the connector off of the motherboard.

    • When working with electronics, it's important to choose a tool that's ESD-safe to avoid accidental damage to the device. The regular black nylon spudger or a plastic opening tool should be used whenever possible.

    • If you have removed the SIM card properly, the headphone port connector will now be the furthest left connector.

  12. Samsung Galaxy Tab 10.1 4G Headphone Jack Replacement: 手順 12、 1の画像 1
    • Firmly tug on the connector to remove the headphone jack.

    • If necessary, use the metal spudger tool to pry the headphone jack out of it's housing -- it will be attached with some strong adhesive.

    • Don't worry about losing adhesive, your new headphone port will have new adhesive for you to apply.

終わりに

To reassemble your device, follow these instructions in reverse order.

2 の人々がこのガイドを完成させました。

作成者

3人の作成者と共同で作成されました。

Aaron Lane

メンバー登録日: 09/23/15

431 ポイント

2のガイドは作成済み

チーム

Baylor, Team 10-11, Williams Fall 2015 Baylor, Team 10-11, Williams Fall 2015人のメンバー

BU-WILLIAMS-F15S10G11

3 メンバー

16のガイドは作成済み

0 件のコメント

コメントを追加

統計データ:

過去 24時間: 1

過去 7 日: 1

過去 30 日: 8

今までの合計 1,221