メインコンテンツにスキップ

この翻訳は、ソースガイドの最新の更新を反映していない可能性があります。 翻訳の更新に協力してください。 または ソースガイドを参照してください

Samsung Galaxy S7 Edge ディスプレイ用接着剤の交換

必要な工具と部品

  1. Samsung Galaxy S7 Edge ディスプレイ用接着剤の交換, ディスプレイ用接着剤: 手順 1、 3の画像 1 Samsung Galaxy S7 Edge ディスプレイ用接着剤の交換, ディスプレイ用接着剤: 手順 1、 3の画像 2 Samsung Galaxy S7 Edge ディスプレイ用接着剤の交換, ディスプレイ用接着剤: 手順 1、 3の画像 3
    • デバイス本体のフレーム周辺から、接着剤全てを綺麗に取り除きます。接着面を高濃度(90%以上)のイソプロピルアルコールと糸くずの出ないマジックワイプなどの布で拭き取ります。

    • 接着剤もしくはガラスの残骸が残っていると、新しいディスプレイを正しく装着できず、ダメージを与えてしまいます。

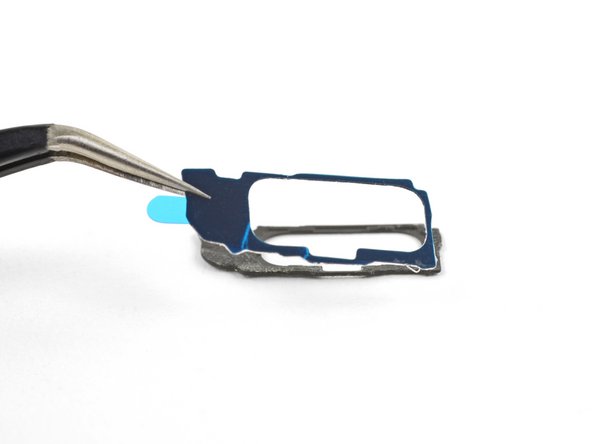
    • 指紋センサーケーブルの下に挟まっている接着ストリップは外さないでください。このストリップの表面に付いた接着剤がある場合は、

    • 容量ボタンは薄くて壊れやすいです。ボタン周辺の接着剤の状態が良好な場合は、取り外さないでください

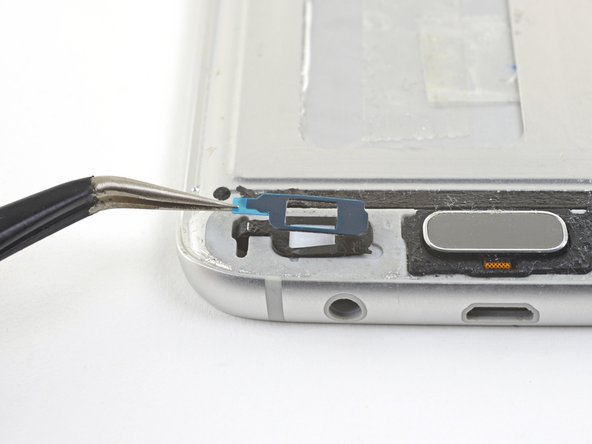
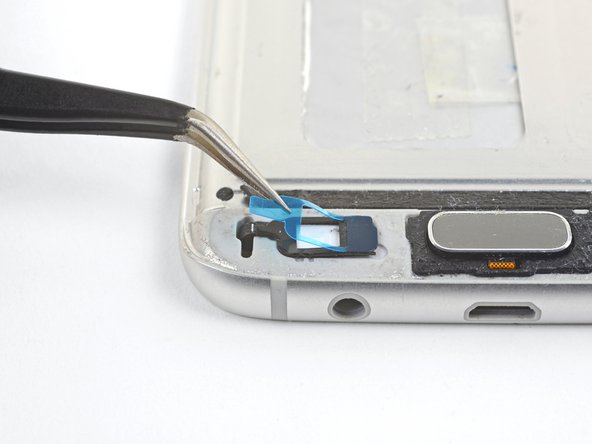
    • ボタンの接着剤を交換する場合は、ピンセットを使用して慎重に接着剤を剥がしてください。必要に応じて、開口部ツールを使用して、接着剤をそっとこすり落とします。

    • 接着ストリップを置いて、どこに行くのかを把握します。

  2. Samsung Galaxy S7 Edge ディスプレイ用接着剤の交換: 手順 2、 3の画像 1 Samsung Galaxy S7 Edge ディスプレイ用接着剤の交換: 手順 2、 3の画像 2 Samsung Galaxy S7 Edge ディスプレイ用接着剤の交換: 手順 2、 3の画像 3
    • 次の3つの手順では、指紋ブラケットの接着剤を交換する方法について説明します。指紋センサーを交換しなかった場合は、おそらくこの交換をスキップできます。

    • 指紋センサーを囲む黒いブラケットの下にある開口部ツールの端を挿入します。

    • 指紋ブラケットを持ち上げて取り外します

    • 開口部ツールを使用して、指紋ブラケットから接着剤の残留物をこすり落とします。

  3. この手順は未翻訳です。 翻訳を手伝う。

    Samsung Galaxy S7 Edge ディスプレイ用接着剤の交換: 手順 3、 3の画像 1 Samsung Galaxy S7 Edge ディスプレイ用接着剤の交換: 手順 3、 3の画像 2 Samsung Galaxy S7 Edge ディスプレイ用接着剤の交換: 手順 3、 3の画像 3
    • Peel off the white backing from the fingerprint bracket adhesive.

    • Carefully align and apply the adhesive to the fingerprint bracket.

    • Use your fingers to press the adhesive onto the bracket.

    • Use tweezers to peel off the blue plastic liner from the adhesive.

  4. この手順は未翻訳です。 翻訳を手伝う。

    Samsung Galaxy S7 Edge ディスプレイ用接着剤の交換: 手順 4、 1の画像 1
    • Carefully lay the bracket around the fingerprint sensor. The bracket holds the sensor in place, so it is important to ensure that it is well aligned.

    • Once the bracket is aligned, use the flat edge of a spudger or a finger to press the bracket in place.

  5. この手順は未翻訳です。 翻訳を手伝う。

    Samsung Galaxy S7 Edge ディスプレイ用接着剤の交換: 手順 5、 3の画像 1 Samsung Galaxy S7 Edge ディスプレイ用接着剤の交換: 手順 5、 3の画像 2 Samsung Galaxy S7 Edge ディスプレイ用接着剤の交換: 手順 5、 3の画像 3
    • This step describes how to replace the capacitative button adhesives. You can skip to the next step if you are not replacing these adhesives.

    • Peel off the white backing from one of the capacitative button adhesives.

    • Carefully align the adhesive over the capacitative button.

    • Use your finger to press the adhesive in place.

    • If needed, repeat the procedure for the other capacitative button.

    • Peel off the blue plastic liners from the adhesives.

  6. この手順は未翻訳です。 翻訳を手伝う。

    Samsung Galaxy S7 Edge ディスプレイ用接着剤の交換: 手順 6、 3の画像 1 Samsung Galaxy S7 Edge ディスプレイ用接着剤の交換: 手順 6、 3の画像 2 Samsung Galaxy S7 Edge ディスプレイ用接着剤の交換: 手順 6、 3の画像 3
    • Peel off the clear plastic backing from the U-shaped adhesive, exposing one side of the adhesive.

    • Carefully line up a long edge of the adhesive with the corresponding edge of the phone frame. The open end of the "U" should face towards the top end of the frame.

    • Set the adhesive down lightly on the frame.

    • If it is not properly aligned, you can carefully peel the adhesive back up and realign it.

    • Once the adhesive is aligned, use your fingers to press the adhesive onto the frame.

  7. この手順は未翻訳です。 翻訳を手伝う。

    Samsung Galaxy S7 Edge ディスプレイ用接着剤の交換: 手順 7、 3の画像 1 Samsung Galaxy S7 Edge ディスプレイ用接着剤の交換: 手順 7、 3の画像 2 Samsung Galaxy S7 Edge ディスプレイ用接着剤の交換: 手順 7、 3の画像 3
    • Peel one of the end adhesive strips from the white plastic backing.

    • The strips are cut for a specific end and are not interchangeable.

    • Holding the strip by the two green end tabs, line the adhesive strip with the phone frame.

    • Set the adhesive down lightly on the phone. Make sure that all cutouts are properly aligned.

    • Once aligned, use your fingers to press the adhesive into place.

    • Repeat the procedure for the remaining end adhesive strip.

  8. この手順は未翻訳です。 翻訳を手伝う。

    Samsung Galaxy S7 Edge ディスプレイ用接着剤の交換: 手順 8、 1の画像 1
    • Continue reassembling your device until you are ready to attach the screen.

    • If possible, test your screen's functionality before adhering it in place.

    • Peel and remove the green plastic liner from all adhesive strips to expose the screen-facing adhesive.

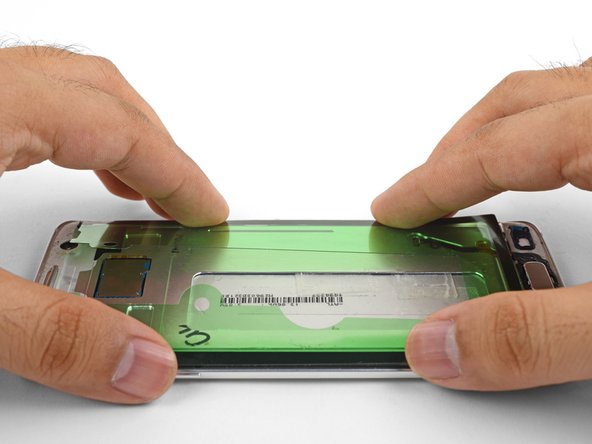
    • Align and set the phone screen on top of the adhesive.

    • Use your fingers to squeeze around the perimeter of the phone to set the adhesive.

    • Apply a few books worth of weight on top of the screen for an hour to help the adhesive bond.

終わりに

このリンクをフォローして、 Galaxy S7 Edgeのディスプレイアセンブリの交換ガイドに戻ってください。

6 の人々がこのガイドを完成させました。

以下の翻訳者の皆さんにお礼を申し上げます:

en jp

50%

これらの翻訳者の方々は世界を修理する私たちのサポートをしてくれています。 あなたも貢献してみませんか?
翻訳を始める ›

作成者

1人の作成者と共同作成されました。

Arthur Shi

メンバー登録日: 01/03/18

252,729 ポイント

526のガイドは作成済み

チーム

iFixit iFixit人のメンバー

Staff

135 メンバー

16,817のガイドは作成済み

0 件のコメント

コメントを追加

統計データ:

過去 24時間: 2

過去 7 日: 12

過去 30 日: 57

今までの合計 9,716