メインコンテンツにスキップ

Samsung Galaxy S5 Mini Display Assembly Replacement

必要な工具と部品

  1. Samsung Galaxy S5 Mini Display Assembly Replacement, Rear Panel: 手順 1、 3の画像 1 Samsung Galaxy S5 Mini Display Assembly Replacement, Rear Panel: 手順 1、 3の画像 2 Samsung Galaxy S5 Mini Display Assembly Replacement, Rear Panel: 手順 1、 3の画像 3
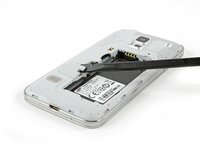
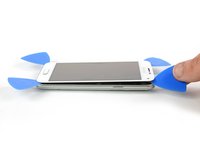
    • Insert a fingernail or a plastic opening tool into the slot located above the power button.

    • Gently pull the panel off the back of the phone.

    • The plastic snaps will make a popping sound as they separate.

  2. Samsung Galaxy S5 Mini Display Assembly Replacement, Battery: 手順 2、 3の画像 1 Samsung Galaxy S5 Mini Display Assembly Replacement, Battery: 手順 2、 3の画像 2 Samsung Galaxy S5 Mini Display Assembly Replacement, Battery: 手順 2、 3の画像 3
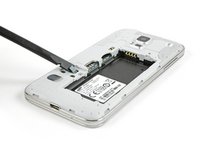
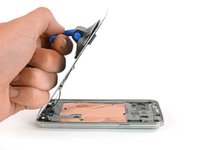
    • Insert fingernail or plastic opening tool into the slot at the bottom of the battery.

    • Gently pry the battery away from the phone.

    • When replacing the battery, ensure the contacts are aligned and press lightly. The battery will appear to fit in multiple directions, so do not force it in.

  3. Samsung Galaxy S5 Mini Display Assembly Replacement, Display Assembly: 手順 3、 3の画像 1 Samsung Galaxy S5 Mini Display Assembly Replacement, Display Assembly: 手順 3、 3の画像 2 Samsung Galaxy S5 Mini Display Assembly Replacement, Display Assembly: 手順 3、 3の画像 3
    この手順で使用する道具:
    iOpener
    $19.99
    購入する
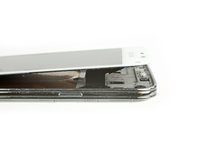
    • Flip the phone and lay it on a flat surface so that the back is facing towards you.

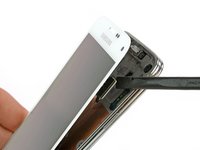
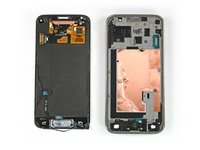
    • Use a spudger or plastic opening tool to pry up the home button cable connector and disconnect it.

    • For reassembly, insert the home button cable connector through the open slot in the display assembly.

    • Use an iOpener to loosen the adhesive beneath the display.

  4. Samsung Galaxy S5 Mini Display Assembly Replacement: 手順 4、 3の画像 1 Samsung Galaxy S5 Mini Display Assembly Replacement: 手順 4、 3の画像 2 Samsung Galaxy S5 Mini Display Assembly Replacement: 手順 4、 3の画像 3
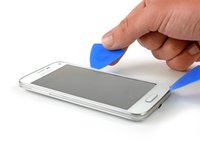
    • Flip the phone over so it is lying on its back.

    • Insert a plastic opening tool or a plastic opening pick in the space between the screen and the frame and slide along the right side of the phone to loosen the adhesive.

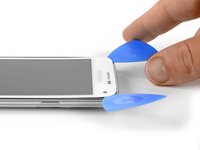
    • Gently lift the display assembly away from the frame until there is a small gap and leave the first opening pick in the bottom right corner next to your home button.

    • Insert a second opening pick and slide it up to the top left corner of the phone by loosening the adhesive beneath the display.

    • Do not insert the opening pick more than 1/8 inch. There are some components that can be harmed.

  5. Samsung Galaxy S5 Mini Display Assembly Replacement: 手順 5、 3の画像 1 Samsung Galaxy S5 Mini Display Assembly Replacement: 手順 5、 3の画像 2 Samsung Galaxy S5 Mini Display Assembly Replacement: 手順 5、 3の画像 3
    • Reheat the display of your phone with the iOpener. Especially the top and left side of the front.

    • Insert a third opening pick and slide it carefully to the top left corner of the phone. Be aware of the front camera and the loudspeaker!

  6. Samsung Galaxy S5 Mini Display Assembly Replacement: 手順 6、 3の画像 1 Samsung Galaxy S5 Mini Display Assembly Replacement: 手順 6、 3の画像 2 Samsung Galaxy S5 Mini Display Assembly Replacement: 手順 6、 3の画像 3
    • Insert a fourth opening pick and slide it to the lower left corner next to your home button.

    • Flip the opening pick in the top right corner to lift the display. If it is still sticky, move the four opening picks around the frame as you did before to find remains of adhesive.

    • Do not remove the display assembly from the frame. It is still connected by a cable.

  7. Samsung Galaxy S5 Mini Display Assembly Replacement: 手順 7、 2の画像 1 Samsung Galaxy S5 Mini Display Assembly Replacement: 手順 7、 2の画像 2
    • Keep the top portion of the display assembly next to the frame.

    • Unplug the display flex connector with a spudger.

  8. Samsung Galaxy S5 Mini Display Assembly Replacement: 手順 8、 3の画像 1 Samsung Galaxy S5 Mini Display Assembly Replacement: 手順 8、 3の画像 2 Samsung Galaxy S5 Mini Display Assembly Replacement: 手順 8、 3の画像 3
    この手順で使用する道具:
    Suction Handle
    $2.99
    購入する
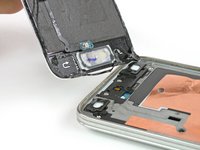
    • Use a suction handle to lift the display off of your phone. The home button cable connector should go with the display through a small gap in the mid frame. If it doesn't, use a tweezer to help a little.

    • Pull the display assembly away from the phone to remove it.

終わりに

To reassemble your device, follow these instructions in reverse order.

21 の人々がこのガイドを完成させました。

作成者

8人の作成者と共同で作成されました。

Jon Kuzmich

メンバー登録日: 09/29/14

1,963 ポイント

7のガイドは作成済み

チーム

Cal Poly, Team 12-4, Forte Fall 2014 Cal Poly, Team 12-4, Forte Fall 2014人のメンバー

CPSU-FORTE-F14S12G4

5 メンバー

38のガイドは作成済み

2 件のコメント

Hi, there! I assume, I can fix the occasional malfunction of my display backpane light. I dropped the phone on the floor one day, and now I sometimes have to knock on die upper right corner of the display to get it working again. Will try to check the connector.

tiger - 返信

When I reassemble the display after a repair, will the glue work again? Do I have to heat it on reassembly to make it sticky again? Will it still be waterproof after repair?

todd - 返信

コメントを追加

統計データ:

過去 24時間: 0

過去 7 日: 7

過去 30 日: 20

今までの合計 22,487