はじめに
このガイドを使用してSamsung Galaxy S4のUSBボードの交換をしましょう。
必要な工具と部品
-
-
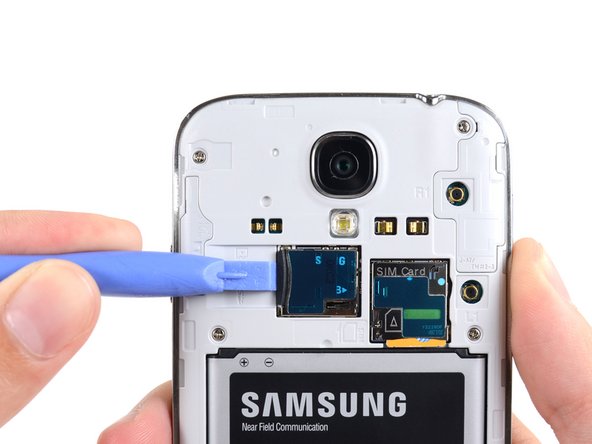
ツールを差し込んだコーナー付近から背面ケースを持ち上げて、本体から取り出します。
I purchased a blue plastic opening tool(AKA: Spudge) like the one used in the above Step 1 rear cover pic and found the divot and was able to take off the rear cover as per the “Step 2 “ instructions.
-
-
-
スパッジャーの平面側先端や指の爪を使って、カッチと音がするまでMicroSDカードを内側深くまで押します。
-
カチッと音がしたら作業をやめてください。カードがスロットから出てきます。
-
MicroSDカードを取り出します。
I was able to remove the MicroSD Card as per the Step 3 MicroSD instructions with no problems.
-
-
-
プラスチック製の開口ツールや指の爪をバッテリーコンパートメントの溝に差し込み、上向きにバッテリーを押し上げます。
-
iPhoneからバッテリーを取り出します。
-
-
-
プラスチック製の開口ツールや指の爪を使って、SIMカードを奥まで軽くおします。カチッという音が鳴ったら止めてください。
-
カードから手を離すとスロットからカードが出てきます。
-
SIMカードを取り出します。
Looks easy but doesn't work. No one has a plastic opening tool. Using fingernail, you can press SIM card into slot but it does not pop out so you can remove it.
I agree with the comment above
I also don't have a plastic tool and my finger nail won't pop the card out.
Grethe Montano. September 22
-
-
-
ディスプレイアセンブリに留められたミッドフレームから 4.0 mm #00プラスネジを9本外します。
How much cost will be on replace a midframe
I purchased a 1.5x40mm Phillips screw driver and was able to remove all 9 40mm screws from the midframe as per the Step 6 Midframe instructions.
-
-
-
-
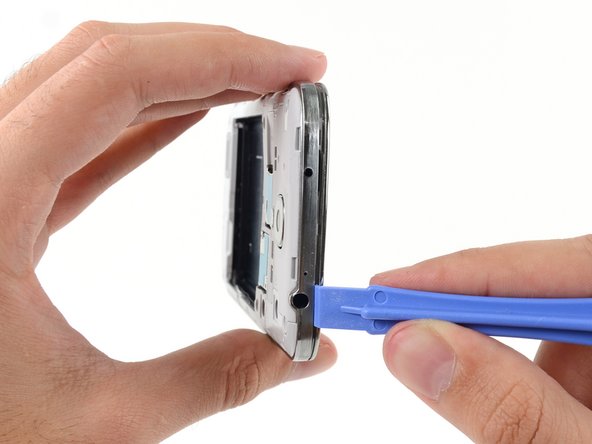
デバイス本体サイドにある音量ボタン側から作業を始めます。ディスプレイガラス周辺のクロムベゼルと大きなクロムの淵部分の間にプラスチック製の開口ツールを差し込みます。この両側の繋ぎ目を探してください。
-
開口ツールを繋ぎ目にそってスライドします。進みながらプラスチッククリップを外します。
I used same tool as in the photo and i broke the display. I think you should use a very thin plastic tool, such as a credit card but even more thin and flexible.
I purchased a blue plastic opening tool(AKA: Spudger) and was able to remove the midframe from the display assembly as per the Step 7. I had to hold the cell phone firmly in my left hand while I gently forced the spudger between the chrome bezel and the midframe with my right hand and heard plastics clips separate and saw the midframe start to separate from the display assembly. Don’t be afraid to get that spudger in and just gently go down the side of the phone and you will hear the plastics clips detach and the midframe to separate more and more until you are able to separate them 100%. I started at the volume button side of the phone in Step 7 and ended at the power button side in Step 9.
-
-
-
本体の角周辺も続けてこじ開けます。
-
開口ツールをミッドフレームとデバイスの底側のディスプレイの間の繋ぎ目に沿ってスライドさせ、プラスチックのクリップを外していきます。
I purchased a blue plastic opening tool(AKA: Spudger) and was able to remove the midframe from the display assembly as per the Step 7. I had to hold the cell phone firmly in my left hand while I gently forced the spudger between the chrome bezel and the midframe with my right hand and heard plastics clips separate and saw the midframe start to separate from the display assembly. Don’t be afraid to get that spudger in and just gently go down the side of the phone and you will hear the plastics clips detach and the midframe to separate more and more until you are able to separate them 100%. I started at the volume button side of the phone in Step 7 and ended at the power button side in Step 9.
-
-
-
開口ツールをデバイス本体上部周辺でスライドさせながらクリップの残りを外し、ディスプレイアセンブリからミッドフレームを外します。
On my phone, there was another clip holding the white midframe to the battery compartment, in the middle of the top edge of the battery compartment, near the battery contacts. If you don't release that before removing the midframe, it is easy to break.
I purchased a blue plastic opening tool(AKA: Spudger) and was able to remove the midframe from the display assembly as per the Step 7. I had to hold the cell phone firmly in my left hand while I gently forced the spudger between the chrome bezel and the midframe with my right hand and heard plastics clips separate and saw the midframe start to separate from the display assembly. Don’t be afraid to get that spudger in and just gently go down the side of the phone and you will hear the plastics clips detach and the midframe to separate more and more until you are able to separate them 100%. I started at the volume button side of the phone in Step 7 and ended at the power button side in Step 9. In Step 10 just make sure all the plastic clips are separated from the midframe and the display assembly so you can pull them apart 100% without breaking them.
-
-
-
ディスプレイアセンブリからミッドフレームを取り出します。
My Sprint S4 was slightly different then the one pictured above but I just completed this repair in under 10 minutes.. It would have been slightly quicker but fooling around with those little screws can be irritating if you have big hands.
-
-
-
スパッジャーや開口ツールの平らな面等を使って、USBボードのケーブルをマザーボードから外してください。
I was able to disconnect the USB board cable connector form the motherboard with the flat end of the blue plastic opening tool(AKA: Spudger) as per the instructions in Step 12 USB Board.
-
-
-
USBポートとUSBポートブラケットの間に、スパッジャーの先を優しく差し込んで、ブラケットの片側をこじ開けます。
Very springy, be prepared for it to fly off!
I had to use a metal scalpel to get in between the USB Port and the USB Port Bracket and it went flying off. richporctor post above on August 15 was right. Be prepared! All in all, the instructions will get the USB Port Bracket off the USB Port.
-
-
-
USBポートブラケットをUSBポートから取り外しましょう。
I had to use a metal scalpel to get in between the USB Port and the USB Port Bracket and it went flying off. richporctor post above on August 15 was right. Be prepared! All in all, the instructions will get the USB Port Bracket off the USB Port.
-
-
-
ソフトボタンケーブルをUSBボードケーブルから外します。
-
USBボードケーブルからアンテナケーブルコネクタも外しましょう。
There's no mention of the need to detach the blue wire on the right side of the phone at this step. It's fairly obvious, but it might cause some confusion for the uninitiated.
Which one should i use for a T-Mobile phone?
After changing the port I got the message battery temperature to low charging paused.
This is one of those generic message computers use when it doesn't know what is wrong.
So I cleaned with alcohol and q-tip the two gold contacts that are located in the mid frame. They touch the two power contacts located on the USB port board and this cleared the low temperature message and phone is charging.
With the blue plastic opening tool(AKA: Spudger) I was able to gently disconnect the soft button cable form the USB board cable and disconnect the antenna cable connector from the USB Board as per the instructions in Step 15. There was no additional antenna cable on the Samsung Galaxy S4 Verizon Service phone.
-
-
-
USBボードの下にスパッジャーの平らな部分をそっと差し込み、ボードを接着剤から慎重に剥がしましょう。
As I inspected the USB board I noticed on the left hand side a gold antenna connector with a red colored wired connected to the USB board. I gently disconnected it using the blue plastic open tool(AKA: Spudger) and it popped off ok. You will now be free to take out the USB Board from the display assembly. If you ordered a Samsung Galaxy S4 Charging Assembly (Verizon) part, you can just take out the USB board from the display assembly . I noticed that you are NOT suppose to take out the soft button cable, just disconnect it from the USB Board Cable. You then insert the new Samsung Galaxy S4 Charging Assembly (Verizon) part and place the soft button cable over the USB Board Cable and connect it.
-
-
-
本体からUSBボードの取り外しができました。
I was able to take out the USB Board and leave the soft button cable on the phone. I then installed the new Samsung Galaxy S4 Charging Assembly (Verizon) part (AKA: USB Board) and will reassemble in reverse order as per the instructions below.
Very good description with good fotos. I was able to easily disassemble the usb board. Much better description than e.g. iDoc!
Markus Schepp
-
デバイスの再組み立てをするには、手順を逆にたどってください。
デバイスの再組み立てをするには、手順を逆にたどってください。
206 の人々がこのガイドを完成させました。
以下の翻訳者の皆さんにお礼を申し上げます:
100%
これらの翻訳者の方々は世界を修理する私たちのサポートをしてくれています。 あなたも貢献してみませんか?
翻訳を始める ›
24 件のコメント
I found this guide excellent and it is very easy to do. I didnt have the plastic opening tool but I do have a long thumbnail. It worked very well.
Too bad the replacement board I got has a defective soft button connector. I had to disassemble the phone 3 times. I thought I did It wrong the 1st time. Opened the phone a 2nd time to check.... closed the phone... nada.... USB changer works but no soft keys... put my old board back in to check the soft buttons and they work. Sent an email to the company that I bought the board from... still no answer after 24hrs. If I still have no answer by the end of the week I will post which company sold me the defect board so no one else gets burned from them. I will then try to unsolder the USB from the new board to replace the USB on my old one.
This guide needs an update as it does not include the 4G antenna on the left side of the device that is under the USB cable and hooks up at the bottom left on the USB board up to just beside the USB connector above the battery. Pictures 12, 15, & 16 will need updated to show this cable.
To follow rnbhays' comment about the antenna connector on the left, it is specifically for i545 Verizon models.
I strongly suggest people to disconnect both left and right cables from the USB board prior to removing it. While doing so, my tool slipped and I accidentally broke the left cable. Thankfully I was able to crimp the connector back on the cable with tweezers and a magnifying glass 'til I get another cable ordered.
It also applies to the Sprint version as well. I have an LTE cable on the left side, and had to be very careful purchasing a replacement part to make sure it was the right one.
After replacement my microphone element isn't working. Possible reasons?
Im having similar problems something doesnt work after replacing this part. Not charging, buttons not working etc. and having a hard time finding the exact version Rev 1.2 1-06
My microphone didn't work after replacing the USB charger flex cord too. Did you ever find a solution?
swynnwoo -
Worked perfectly. Fixed my wife's phone in about 30 minutes. Definitely get the tool kit, they can be had on Amazon for less than $10. Thanks again author for posting these instructions.
I changed my charge port because the little pin in the charge port was damaged and it was a pain to charge but now I get a "charging pause battery temp to low" notification. I've changed it now 4 times thinking I just keep getting duds. anyone know what i'm doing wrong? I've followed every step.
Have you found a solution to this ? Im having the same problem
thank u so much
I have a Samsung Galaxy S4 that was no longer accepting a charge. I've changed out the USB board. I plug the phone in with the device powered off, it vibrates and turns on showing the battery with charging signal, then reboots. It continues to do this. When I power the device on, it remains powered on, but does not accept a charge. I've reopened the phone and checked the install. Same thing occurs. In case of a defective part, I changed it out with another part. Device powered off and plugged in, does not react. Device powered on and plugged in, does not charge.
Any other suggestions at this point?
why the antenna cable were not working after i change the usb board? or my peripheral is broken
I am quite mechanically challenged and was able to easily change my phone’s usb port! Beyond thrilled with this guide that saved me from having to get another phone and possibly lose many great pictures. Thank you for your simple and well put together instructions.
My Samsung Galaxy S8 is not charging pls what do you think about this. https://techensured.com/samsung-galaxy-s...


