メインコンテンツにスキップ

Samsung Galaxy S4 Speaker Enclosure Replacement

必要な工具と部品

  1. Samsung Galaxy S4 Speaker Enclosure Replacement, Rear Case: 手順 1、 2の画像 1 Samsung Galaxy S4 Speaker Enclosure Replacement, Rear Case: 手順 1、 2の画像 2
    • Pry with a plastic opening tool, or your fingernail, in the divot to the left of the rear-facing camera, near the power button.

  2. Samsung Galaxy S4 Speaker Enclosure Replacement: 手順 2、 3の画像 1 Samsung Galaxy S4 Speaker Enclosure Replacement: 手順 2、 3の画像 2 Samsung Galaxy S4 Speaker Enclosure Replacement: 手順 2、 3の画像 3
    • Lift the rear case by the corner nearest the divot and remove it from the phone.

  3. Samsung Galaxy S4 Speaker Enclosure Replacement, MicroSD Card: 手順 3、 3の画像 1 Samsung Galaxy S4 Speaker Enclosure Replacement, MicroSD Card: 手順 3、 3の画像 2 Samsung Galaxy S4 Speaker Enclosure Replacement, MicroSD Card: 手順 3、 3の画像 3
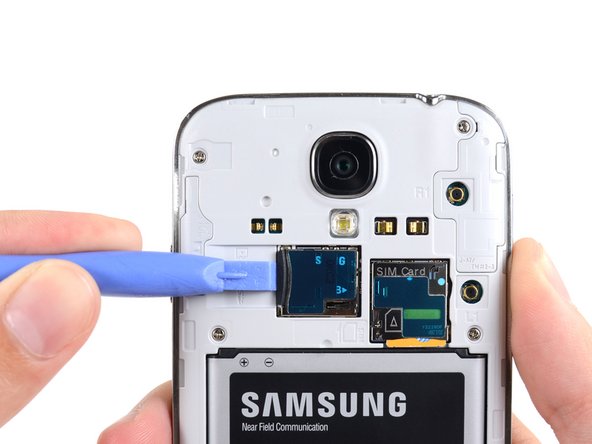
    • Use the flat end of a spudger, or your fingernail, to press the microSD card slightly deeper into its slot until you hear a click.

    • After the click, release the card and it will pop out of its slot.

    • Remove the microSD card.

    • For reassembly, push the microSD card into the slot until it clicks in place.

  4. Samsung Galaxy S4 Speaker Enclosure Replacement, Battery: 手順 4、 3の画像 1 Samsung Galaxy S4 Speaker Enclosure Replacement, Battery: 手順 4、 3の画像 2 Samsung Galaxy S4 Speaker Enclosure Replacement, Battery: 手順 4、 3の画像 3
    • Insert a plastic opening tool, or your finger, into the notch of the battery compartment and lift the battery upward.

    • Remove the battery from your phone.

  5. Samsung Galaxy S4 Speaker Enclosure Replacement, SIM Card: 手順 5、 3の画像 1 Samsung Galaxy S4 Speaker Enclosure Replacement, SIM Card: 手順 5、 3の画像 2 Samsung Galaxy S4 Speaker Enclosure Replacement, SIM Card: 手順 5、 3の画像 3
    • Use a plastic opening tool, or your fingernail, to press the SIM card slightly deeper into its slot until you hear a click.

    • After the click, release the card and it will pop out of its slot.

    • Remove the SIM card.

    • During reassembly, push the SIM card into the slot until it clicks in place.

  6. Samsung Galaxy S4 Speaker Enclosure Replacement, Midframe: 手順 6、 1の画像 1
    • Remove the nine 4.0 mm Phillips #00 screws securing the midframe to the display assembly.

  7. Samsung Galaxy S4 Speaker Enclosure Replacement: 手順 7、 2の画像 1 Samsung Galaxy S4 Speaker Enclosure Replacement: 手順 7、 2の画像 2
    • The midframe is secured to the display assembly by several plastic clips behind the chrome bezel of the midframe. The next few steps will guide you through separating the clips to free the midframe.

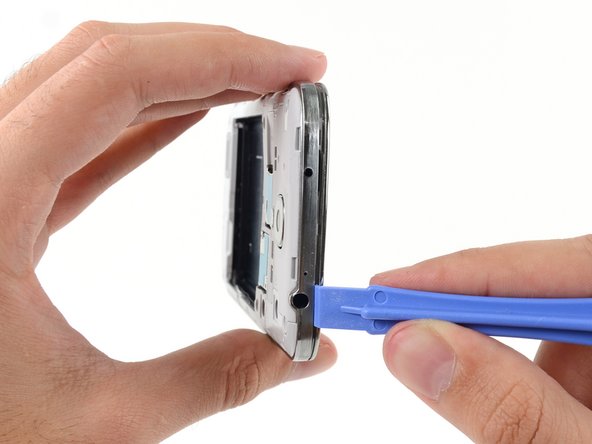
    • Starting on the volume button side of the phone, insert your plastic opening tool between the chrome bezel around the display glass and the larger chrome border piece. Look for the seam between the two.

    • Slide the opening tool along the seam, separating the plastic clips as you go.

    • Be very gentle whilst prying, and pry only enough to separate the plastic clips—there are several thin points in the midframe bezel that may crack if you bend them too much.

  8. Samsung Galaxy S4 Speaker Enclosure Replacement: 手順 8、 2の画像 1 Samsung Galaxy S4 Speaker Enclosure Replacement: 手順 8、 2の画像 2
    • Continue prying around the corner of the phone.

    • Slide your opening tool along the seam between the midframe and display along the bottom of the device, releasing more of the plastic clips.

  9. Samsung Galaxy S4 Speaker Enclosure Replacement: 手順 9、 2の画像 1 Samsung Galaxy S4 Speaker Enclosure Replacement: 手順 9、 2の画像 2
    • Again, pry around the corner, to the power button side.

    • Slide the opening tool along the seam.

  10. Samsung Galaxy S4 Speaker Enclosure Replacement: 手順 10、 2の画像 1 Samsung Galaxy S4 Speaker Enclosure Replacement: 手順 10、 2の画像 2
    • Continue sliding the opening tool around the top of the phone, releasing the last of the clips and freeing the midframe from the display assembly.

    • At this point, you may want to run your plastic opening tool along the entire perimeter of the device again, to make sure you've released all of the plastic clips.

  11. Samsung Galaxy S4 Speaker Enclosure Replacement: 手順 11、 3の画像 1 Samsung Galaxy S4 Speaker Enclosure Replacement: 手順 11、 3の画像 2 Samsung Galaxy S4 Speaker Enclosure Replacement: 手順 11、 3の画像 3
    • Remove the midframe from the display assembly.

  12. Samsung Galaxy S4 Speaker Enclosure Replacement, Speaker Enclosure: 手順 12、 3の画像 1 Samsung Galaxy S4 Speaker Enclosure Replacement, Speaker Enclosure: 手順 12、 3の画像 2 Samsung Galaxy S4 Speaker Enclosure Replacement, Speaker Enclosure: 手順 12、 3の画像 3
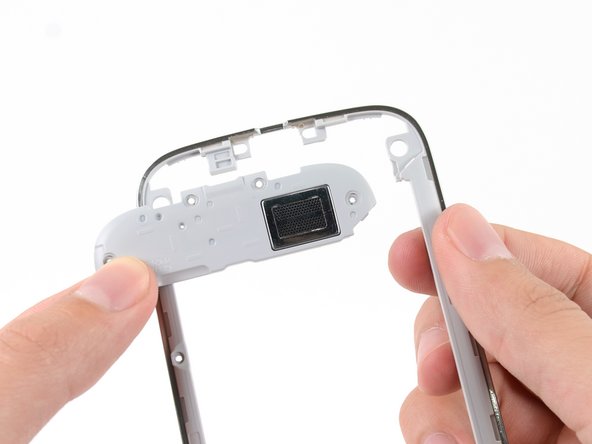
    • Hold the midframe in one hand and the speaker enclosure in the other.

    • Gently twist the speaker enclosure away from the midframe to pop it free from the clips securing it to the midframe.

    • Remove the speaker enclosure from the midframe.

終わりに

To reassemble your device, follow these instructions in reverse order.

39 の人々がこのガイドを完成させました。

作成者

5人の作成者と共同で作成されました。

Andrew Optimus Goldheart

メンバー登録日: 10/17/09

502,825 ポイント

407のガイドは作成済み

チーム

iFixit iFixit人のメンバー

Staff

135 メンバー

16,817のガイドは作成済み

0 件のコメント

コメントを追加

統計データ:

過去 24時間: 0

過去 7 日: 1

過去 30 日: 5

今までの合計 44,123