はじめに
Use this guide to replace the charging assembly in the event of an inability to charge.
必要な工具と部品
-
この手順で使用する道具:Tweezers$4.99
-
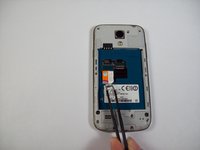
Using tweezers, remove the SIM card by sliding it towards the bottom of the device.
-
-
-
-
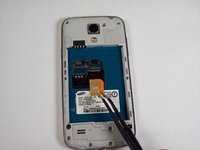
Using a nylon spudger, push through the hole at the top of the memory card holder to slide it out.
-
-
この手順で使用する道具:Tweezers$4.99
-
Remove the 10 4.0 mm Phillips screws on the back of the phone using the #00 Phillips screwdriver.
-
Not needed, but Tweezers can be helpful in removing the screws from their holes, as their size makes removal a tad difficult.
-


To reassemble your device, follow these instructions in reverse order.
To reassemble your device, follow these instructions in reverse order.
35 の人々がこのガイドを完成させました。
チーム

USF Tampa, Team 9-2, Blackwell Fall 2014 USF Tampa, Team 9-2, Blackwell Fall 2014人のメンバー
USFT-BLACKWELL-F14S9G2
5 メンバー
11のガイドは作成済み
4件のガイドコメント
if i open the device like this, can i solder cables on the usb port to connect a wireless charging reciever?
I was looking for the same solution, and I think it is possible, a closer look at the USB port from various spare parts suppliers, I was in doubt if mine would look the same as the one displayed here, after disassembling my phone, it turned out to be this one: http://bit.ly/1GR4SzP
And it is possible, when messuring connection points, it turns out CN2 on the bord is the +, and - you can fit onto the side of the USB connector itself.
I have created a Guide describing the addition of wireless charging, it is in no way affecting the phones stability.
Works great with the S4 mini I9195 LTE version, but mind the different spare part (as linked above: http://bit.ly/1GR4SzP).