はじめに
修理キットにあるすべての接着剤ストリップをどうしたらいいかわからない?そんなあなたにぴったりです。このガイドでは、ガラス背面搭載の Samsung 携帯電話(S7 以降)用のキットに入っている接着剤の使用方法を説明します。また、背面ベゼルや指紋センサーなど、さまざまな背面カバーのコンポーネントを転送してインストールする方法についての説明も含まれています。
キット付属の粘着ストリップをすべて使用する必要はないかもしれません 指紋センサーを移設する場合は、テサテープなどの両面テープが必要な場合があります。
このキットに梱包されている全ての接着ストリップを使用する必要はありません。指紋センサを移植する場合は、Tesaテープのような両面テープが必要です。
Galaxy Sモデル用の接着ストリップリストは、[[ 無効なパーツのリンク ]]を参照してください。
このような接着ストリップを装着する際の、よくあるヒント集です。
- 接着ストリップの装着をスムーズにするには、まだシールを剥がしていないストリップをデバイスの装着したい位置に合わせてください。それから、テープの一辺を剥がして、固定するために装着します。これでプラスチックライナーを剥がして、位置がずれることなく接着面を露出できます。
- 接着ストリップを装着する準備ができたら、まず透明なプラスチックライナーを剥がします。こちら側のレイヤーは簡単に剥がれます。透明なプラスチックライナーが複数ある場合は、接着剤が露出する方の透明ライナーを剥がします。
- 透明なライナーを剥がした後に、露出する接着剤によって、ストリップを最初に貼り付ける面が決まります。 露出した接着剤と揃う面を確認してください。
必要な工具と部品
-
-
-
iOpenerを温めて、指紋センサーを約1分間当ててください。
-
開口ツールを使って、指紋センサー下側のシーム部分を慎重にこじ開けます。この部分がバックカバーと接続しています。
-
上側のシーム部分をこじ開けないでください。ここには指紋センサー用ガスケットのシームがあります。
-
-
-
iOpenerを温めて、デバイス上にリアカメラベゼルを1分間載せます。
-
リアカバーの外側に面する側から始めて、カメラのベゼルを指で内側に押して、ベゼルを切り欠きから緩めます。
-
代わりに、開口ツールでベゼル周辺をこじ開けて、ベゼル周辺バックカバーからベゼルを緩ませます。
-
-
-
-
接着ストリップの輪郭を接着剤の残留物と電話フレームに合わせて、サポートストリップが表面とどのように整列するかを把握します。
-
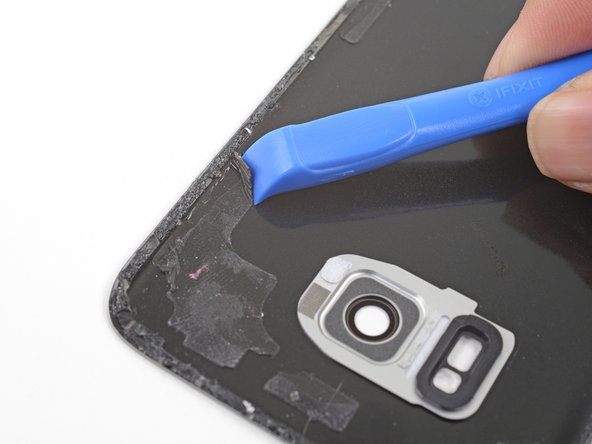
開口ツールと高濃度のイソプロピルアルコールを使って、フレームから接着剤の残留物全てを綺麗に取り除きます。
-
リアカバーを再利用する場合、リアカバーから接着剤の残留物を全て取り除きます。
For my Galaxy S7, it appeared to me there were some minor placement inconsistencies (a millimeter or two) where the Back Cover Support adhesive pads (support strips) were on the backing sheet versus the actual phone. Difficult to know for sure since it is hard to tell where the original pads were after the back cover is pried off. I removed the clear backing to expose the strips and blocks, but placed the clear backing covering 80% of the phone as I transferred one portion of the unconnected adhesive strips at a time where they best appeared to be needed. This falls in the category of tweaking.
The adhesive sheet for the back cover was 100% accurate.
-
-
-
透明なライナーをサポート用接着ストリップから剥がして、接着面を露出させます。
-
接着面に触れないように注意しながら、デバイスフレームの上に接着面を上にして載せます。
-
接着ストリップをデバイスのフレームに揃えてください。接着面の形状をフレームと合わせてください。
-
2つの小さなサポート用ストリップがある場合、両方のストリップにも同じ手順を繰り返してください。
This process of putting the colored plastic with adhesive onto the phone and then sandwiching the back panel on top seemed counter-intuitive so I decided to remove the colored plastic and place the adhesive + clear plastic onto the back of the phone’s guts.
DON’T BE ME!
Follow the instructions and save yourself close to an hour of hassle. The adhesive loves the colored plastic way more than the clear.
It actually worked!!!
-
-
-
慎重にバックカバーを、接着面が露出したサポートストリップに向けて下げます。 こうすることで、接着面をリアカバーの正しい装着位置に移すことができます。
I found it easier to lower the back cover onto the support strips using a suction cup. I felt like this gave me more control over placement and my fingers didn't get in the way on the edges.
-
-
-
開口ツールと高濃度イソプロピルアルコールを使って、デバイスフレームから接着剤の残り全てを除去してください。
-
バックカバーを再利用する場合は、バックカバーからも接着剤の残骸を綺麗に取り除きます。
Scrape and peel the adhesive, using goo gone only after systematically scraping the adhesive as much as possible. The goo gone should only be used to clean up residue once manual scraping has been completed, otherwise the adhesive will become tacky and only scrape off in microscopic layers at a time, which takes forever to remove.
-
-
-
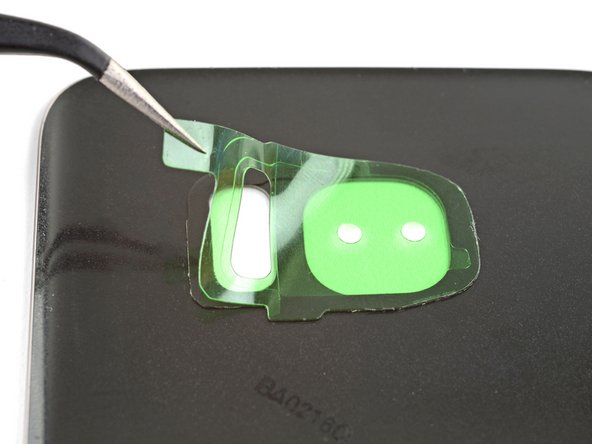
透明なライナーをエッジ用接着ストリップから剥がして、接着面を露出します。
-
タブを掴んでストリップを持ち、慎重に接着ストリップの長辺側端をバックカバーの端に揃えます。
-
バックカバー上に接着ストリップを揃えて、指でカバー上を押さえます。
-
色のついたライナーをエッジ用接着ストリップから剥がして、接着面を露出します。
-
この時点で、バックカバーは密封する準備が整っています。シールする前にデバイスが正しく機能するか、必ず点検を行ってください。
(Galaxy S7 kit): I peeled away the clear liner (Step 1), aligned it to the cover edge (Step 2) and pressed it down (Step 3).
When I peeled off the tabbed "coloured" liner (Step 4), it turned out to be two layers: a clear, tabbed one that came away and a green one consisting of a central part and a thin, outer strip that still covered the adhesive.
This thin strip had been partially lifted by the removal of the clear tabbed layer, so I started to remove it all. As I slowly and carefully pulled it, it tried to lift the adhesive strip itself off the cover so I held that down with the tweezer points. That still left the main green part in the centre of the case, but that was easily removed.
However, when I turned the back cover over I saw that where the adhesive strip had lifted slightly it had detached some of the cover's coloured film, leaving it buckled and a bit of a mess.
Alan Olrog - 返信
When I tried to pull away the cover strip, the adhesive stuck to it. I also have no idea why the clear liner and green liner are attached to each other.
The pictures don’t match what is received for the Galaxy S8+. It’s also not clear where to attach the perimeter adhesive. On the lip of the back cover or just inside the well area. In addition, after exposing the adhesive (after removing the clear side), no matter how weel you pre-align the position, you can’t count on the adhesive to stick to whichever method questioned above, without some of it not releasing cleanly from the colored backing. Yes. firm pressure was applied before moving a little further down. At times the adhesive stuck so strongly to the colored backing, it stretched the adhesive out of shape.
I have repaired hundreds of laptops and all in ones, so I understand there are subtleties in a repair, and I found it quite confusing replacing the battery and fingerprint sensor and other necessary parts related to doing that repair with the either inaccurate, outdated, or lack of detail provided (but much needed) in this guide.
If you're like most people and the original back glass (S8) cracked upon removal, and you've ordered and received a plastic replacement from iFixit, remove the adhesive that comes on the replacement plastic back panel, and use the adhesive in this kit. The back panel adhesive in this kit is THICC and seems like it would create a much better seal than what comes preinstalled on the replacement back panel.
-


123 の人々がこのガイドを完成させました。
以下の翻訳者の皆さんにお礼を申し上げます:
100%

Midori Doiさんは世界中で修理する私たちを助けてくれています! あなたも貢献してみませんか?
翻訳を始める ›


14 件のコメント
The flex cable for the fingerprint sensor is so short and delicate that it’s fiendishly difficult to locate and snap in. You only have a very narrow gap between the back cover and the phone, it wants to jump out of position if you misalign at all, and you can’t reach under there with normal size fingers. Not only that, it’s done with the rear cover adhesive in place so if that touches, it sticks.
I got it snapped on, and the flex cable broke at the same moment. So, no fingerprint sensor for me. Also, the new back cover arrived broken. If it was usable, the way to do it IMHO is to attach the flex cable first, then push the fingerprint sensor assembly on to the new back cover adhesive (it goes on from behind), then close the back cover.
Hey William,
If you bought the back cover from iFixit, please contact our support team here and we will get a replacement sorted out for you!
P.S. I got the battery and cover because the old cover was warped and separated, figured may as well replace the battery in a 2-year-old phone. Turns out, the battery was swollen and huge and it had pushed the back cover open. Not a good situation. So if your back cover is coming off, suspect that battery.
P.P.S. The fingerprint sensor flex cable connector probably could be manipulated into position with the tweezers from the tool kit and pressed down into place with the plastic screwdriver thingy, Just hover the back cover over it with your third hand (or a helper).
Will the phone still be water-resistant after this repair?
Hi Shai,
The phone won’t be as water resistant compared to when it is brand new. However, this is true even if you didn’t repair the phone—adhesive seals break down and lose water resistance over time.
Do you have custom-cut adhesive strips for Samsung galaxy s9+? Can’t find it in store.
Hi Michael,
We are currently in the process of sourcing the adhesive. Please check back in the future!
where i can buy the adhesive
It’s a little confusing going through the battery removal for the Samsung S10+ and then being sent to the Samsung S10 installation process instead of the Samsung S10+ install. Although moderately intuitive, it would be nice to have a specific article for a specific phone that identifies the actual process with the physical parts involved since The S10 and the S10+ are not the same back covers and the same parts involved.
Additionally, the inner wireless connector plate NEEDS to be connected to validate a connection otherwise the battery will not power the phone. This is a Requirement on the S10+.
I need to do the front gasket...is there an article for the front, I'm replacing my screen. Also, my child lost the earpiece mesh, is there something else I can use? Thanks
Kristabell - 返信
I got the S9 battery kit and all of the precut adhesive pieces had been cut backwards. The stiff green/blue plastic was on the wrong side. I had to remove the adhesive pieces entirely and try to use the clear plastic backing as the transfer agent instead of the stiffer, cut plastic pieces. I eventually did get it installed but it took a lot longer than planned.