-
-
在拆解之前,让我们再次查看一下Note 10+ 5G的技术参数:
-
6.8英寸的AMOLED Infinity-O 显示屏,分辨率为3040 x 1440(498ppi),拥有HDR10+认证
-
高通骁龙855处理器、12GB的运存以及256GB的闪存
-
4300毫安时电池
-
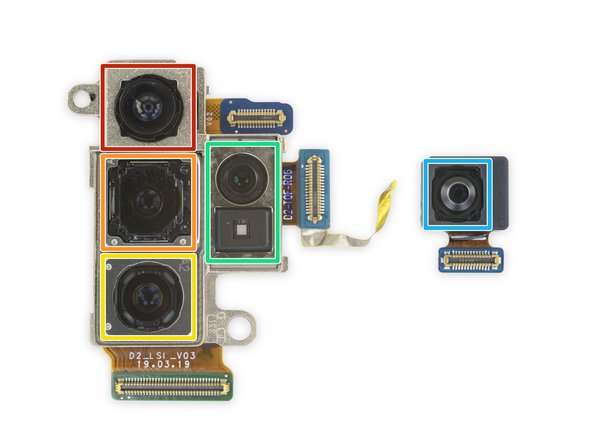
4枚后置摄像头(分别是1600万超广角、1200万广角带光学防抖、1200万长焦带光学防抖以及VGA深感摄像头),前置摄像头为1000万像素
-
超声波屏下指纹传感器
-
拥有蓝牙连接和六轴传感器的S-Pen
-
IP68防水防尘等级
-
-
-
我们将去年发布的Note 9、新发布的Note 10+和Note 10+ 5G按照从左到右的顺序放好,试着找出他们的不同。
-
今年,三星将Note系列的摄像头改成了垂直排列。同时三星也取消了后置指纹传感器,并放到了屏幕下方,就像我们今年早些时候看到的一样。
-
最后,我们对失去了耳机孔感到很遗憾。(据说这是为了更大的电池以及改进的触觉反馈所做的必要牺牲)
-
在我们进一步了解之前,Creative Electron已经让我们提前看到了内部结构 ,看起来我们已经进行了一些有趣的探索。
-
-
-
本节目的明星出场了:一根
魔杖改进过的新S-Pen。 -
所有最新Note系列上的摄像头都是垂直排列的,但是Note 10 +包含一个奇特的新功能以及一大堆传感器。
-
-
-
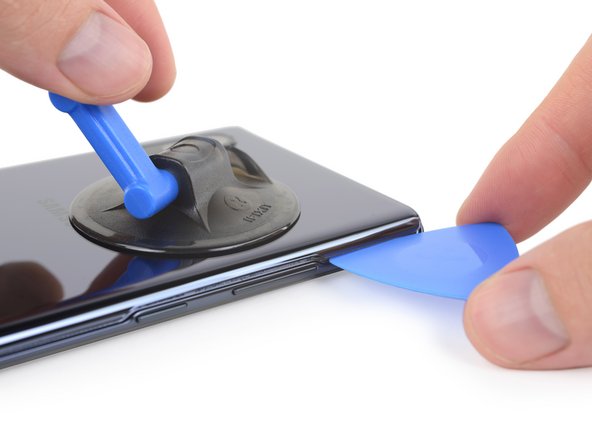
一些Phillips螺丝固定住了中框总成——没有我们的Mako 64螺丝刀套装无法处理的情况!
-
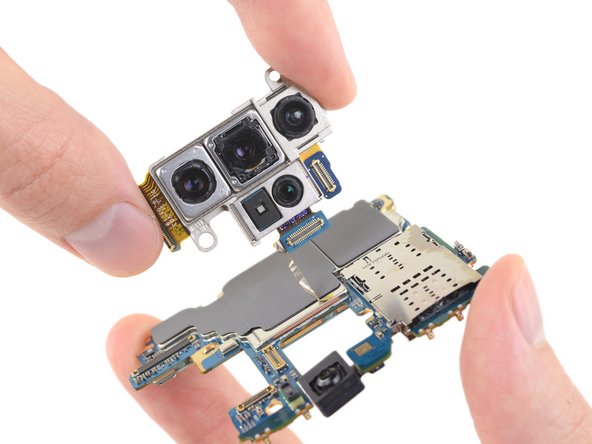
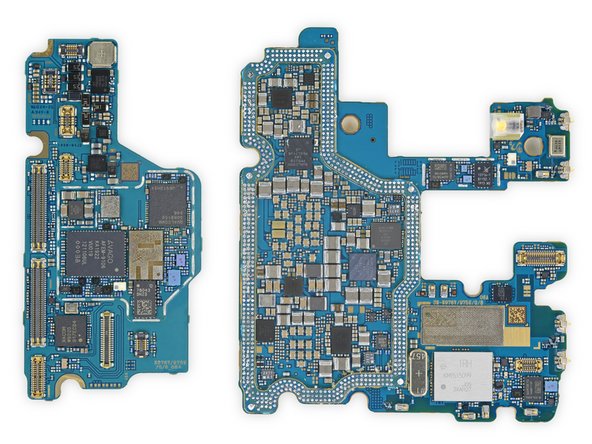
随着中框总成被移除,我们发现了一些根本性的变化:主板完全位于设备的顶部,就像Pixel的风格。
-
好的是,至少这些排线在电池的上面。假如在电池下面的话,它们更容易被损坏。目前为止,苹果的 “L”形排线连接方式似乎是我们所见过的最佳空间利用方式…
-
-
-
I did not realize that you guys were fanboys. Stacked boards are not new but of course Apple invented them. Disappointed..
Is it possible to reassemble the motherboard after separating the 2 layers?
-
Does the microSD slot have UHS-II pins? Snapdragon 855 includes support for it via the UFS 3.0 spec
-
-
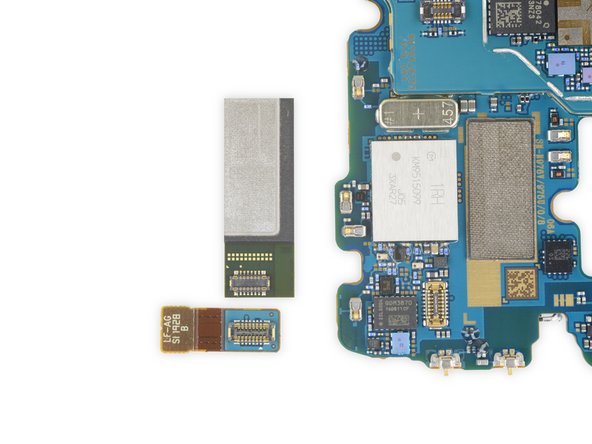
子板被拿出来时,我们完全不慌,上面焊接着USB-C端口和底端麦克风。
-
我们看了看手机的边缘…找到了两个毫米波天线模块!考虑到5G毫米波的限制,每侧都有这些定向的波束成形天线(加上第三个面向屏幕的天线)有助于Note10 +实现最好的效果。
-
听筒看起来很普通,只不过它被放在了屏幕后面。 声音是怎么出来的? 稍后会详细说明......
-
-
-
只剩几个零件没有拆除了:
-
首先,是一个方形的振动电机! 在我们的记忆中,三星已经为所有手机采用了相同的圆形LRA电机。
-
或者,依据我们的说法——也许他们只需要一些东西来占用耳机插孔曾经的空间而已。
-
最后,我们取出了新的均热板——毫无疑问,这是无数小时工程的产物,因为这款手机本质上就是一个带电池的暖手宝。散热器所耗费的资金不比5G技术和反向无线充电所消耗的少。
-
-
-
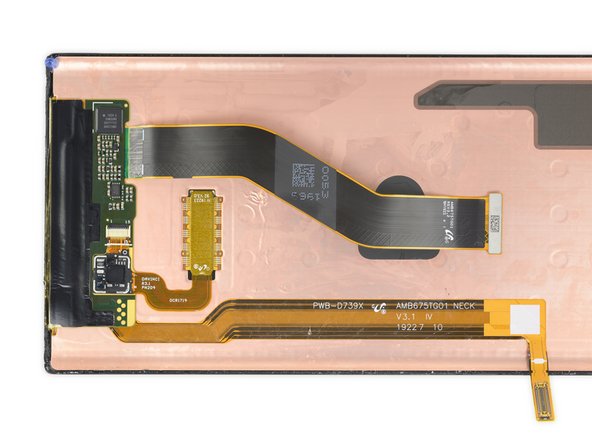
经过了一些枯燥乏味的屏幕加热和反复撬动,我们看到了这块由三星制造的6.8英寸动态AMOLED Infinity-O显示器的背面。
-
超声波指纹传感器紧贴在这个庞然大物的显示器背面,就像我们不久前拆解的S10一样。
-
屏幕被拆除后,我们发现听筒实际上是一个比较浅的金属腔室,它将声波引入到了框架顶部边缘的微小格栅。
-
没看明白吗?其实我们也不明白。用电脑、放大点、再增强
-
-
-
让我们把视线( x) ( x)移动到S-Pen。 无缝结构让我们不愿意把它撬开,所以我们通过CreativeElectron来看看内部的电子结构。
-
虽然这么说,但现在我们考虑一下,这支笔确实有一些新功能......它可能与去年的内部完全不同......哦,天哪,你知道我们无法抗拒。 超声波切割机,配合S-Pen。
-
新款S-Pen的采用了额外的硬塑料和环氧树脂作为外壳。 拆开那些,我们发现:
-
一款标有SP912的神秘芯片,可能是三星在发布会中提到的6轴传感器。 一定有什么东西在检测这只笔的信号。
-
Dialog半导体 DA14585 蓝牙5.0系统芯片
-
尼吉康 2.4v SLB锂离子电池
Nichicon makes capacitors. Not batteries. This is a capacitor.
Thanh Tran - 返信
It does look like a capacitor, but Nichicon says it’s a li-ion battery. Check the link. ;)
-
-
-
好吧,我们并不了解你们的情况,但我们确实从这些方面学到了很多——你做笔记了吗?
-
我们第一次看到了5G毫米波天线。
-
我们拆解了三星首款“iPhone X”风格的主板。
-
我们揭开了消失的听筒的神秘面纱。
-
我们甚至在不破坏屏幕的情况下移除了顽固的电池。
-
我们称拆机是一场胜利,但我们不能说我们是Note系列的最大粉丝,我们有一种感觉,可修复性分数将说明这一点……
Keep hammering away about the IPHONE X style board that Samsung COPIED!!!!
I don’t see that little haptic motor having enough mass to be effective. Anyone tried it out?
great teardown! thank you From John.
Very good, i love you… OnliOnli keep hammering about the IPhoto X style board that samsung copied…!!!
the double stacked boards is not exactly like Apple. Apple use flex to connect the boards. Samsung use a tertiary board and vias which should be much more reliable. we’ll see what happens next year. can iFixit x-ray the boards to see how many layers do they have?
Thanh Tran - 返信
Check the iPhone X teardown—it’s a stacked board configuration with a tertiary board and a multitude of vias. No flex cables. Same thing in the iPhone XS and XS Max.
Hola no me funciona la camara de este modelo ,no me llega voltaje a dos de sus conectores despues de una caida.
Sm n975f/ds es mi modelo podría ayudarme o tener wl diagrama esquematico
-


以下の翻訳者の皆さんにお礼を申し上げます:
77%

これらの翻訳者の方々は世界を修理する私たちのサポートをしてくれています。 あなたも貢献してみませんか?
翻訳を始める ›
22 件のコメント
Really impressive work. Love that another company has finally started using stacked boards. Thanks for the teardown!
Will you guys do the Note 10 as well? I'm interested in seeing whether they've accomplished a density similar to the X.
Stop drinking the Apple Kool Aid
Bravo. Fantastic. Sending you more Kool Aid!
Hi Saul,
You can find the wallpapers here!
Let’s say, just hypothetically of course, someone attempted to open the SIM Tray by accidentally inserting the ejection tool into the other round hole (or the ob-round hole between the two in case someone else “didn’t” make that mistake also) on the top edge of the phone. What type of damage would be done? Asking for a friend.
Hi Casey,
If someone inserted the SIM ejection tool (hypothetically of course!) into the oblong hole, no damage would be done to the phone. The point would have poked against a wall that is part of the earpiece speaker’s channel.
Why not a detailed explanation on how to step #1 remove glue and remove cover? And where can I get some of the kool-aid? Can you inject it?
Hi Erik,
As stated in the warning at top, this teardown is an educational first look at the device, and is not meant to be used as a guide. Our repair guides will show up here, and contain accurate details (such as tools needed, how to unlock ZIF connectors, etc.) as well as step by step instructions on how to complete the repair.
awesome phone hope i win lotto so i can afford service payments for up to 3-5 phones
DARKMATTER - 返信
Si introduzco por error el “clip” o “pincho” para quitar la bandeja "Sim” en el orificio del micrófono que se encuentra al costado, hay posibilidades de que rompa el micrófono o en el caso de que no, de que mi note 10+ pierda la certificación i68 y deje de ser resistente al agua?
If I mistakenly insert the "clip" or "skewer" to remove the "Sim" tray in the hole in the microphone, there is a chance that it will break the microphone or, if not, that my note 10 + lose the i68 certification and stop being waterproof?
HELP ME PLEASE!
Don’t worry! You did not damage the microphone or lose the water resistance. The mic hole has a bend: https://www.ifixit.com/News/why-you-cant...
Thank you very much, I am grateful… thanks!!!
tronkins -
I believe there is a screen there for dust. I poked the hole too and felt like I pushed through something. Would be nice to see a zoomed in picture of inside the hole with a bright light
XES Dan -
I need to remove the cameras to use the phone at work. Can the cameras be removed and the phone still work? Anyone try this yet?
Do guys have s10+ to change the screen please they asking me 500+$ for Screen replacement
What about replacing the main board (motherboard). It's doable naturally. But do you do so if the customer supplies the replacement. Your only guarantee being a good faith effort to do the job? … Or can you source one and do so cheaper than just buying another.
I need to change the volume power flex my current sm-n975u note 10 plus volume rocker is not working when I press volume up or down but the power button still works. How difficult is it to change?
ty for the guide i jus repair my note 10 plus . even i been repair my phone and laptop for a while . however i notice galaxie phone have common usb soak issue resulting failure to be able to charge . drying naturally do not always work . as this is my second time the type c port fail . . the power type c does not need complete tear down . jus need to remove the thre outer cable which enquire delicate handling . the glasses on the back cannot pry or it crack easily . the front display also is delicate avoid pry
Can I replace the battery of s pen
ديناً قيما - 返信