メインコンテンツにスキップ

Samsung Galaxy Note 4 Volume Buttons Replacement

必要な工具と部品

  1. Samsung Galaxy Note 4 Volume Buttons Replacement, Rear Case: 手順 1、 2の画像 1 Samsung Galaxy Note 4 Volume Buttons Replacement, Rear Case: 手順 1、 2の画像 2
    • Insert a fingernail or plastic opening tool into the divot to the left of the rear-facing camera.

    • Gently pry and twist the flexible rear cover off the back of the phone.

  2. Samsung Galaxy Note 4 Volume Buttons Replacement, Battery: 手順 2、 1の画像 1
    • Insert a fingernail or plastic opening tool into the recess in the bottom right corner of the battery and lift upward.

    • Remove the battery.

  3. Samsung Galaxy Note 4 Volume Buttons Replacement, SIM Card: 手順 3、 2の画像 1 Samsung Galaxy Note 4 Volume Buttons Replacement, SIM Card: 手順 3、 2の画像 2
    • Remove the SIM card by first pushing the card slightly out of its housing, then pulling it the rest of the way.

  4. Samsung Galaxy Note 4 Volume Buttons Replacement, Midframe: 手順 4、 1の画像 1
    • Remove the sixteen 4.0 mm Phillips #00 screws securing the midframe to the display assembly.

    • Grasp the cap of the S Pen and remove it from its slot in the midframe.

  5. Samsung Galaxy Note 4 Volume Buttons Replacement: 手順 5、 3の画像 1 Samsung Galaxy Note 4 Volume Buttons Replacement: 手順 5、 3の画像 2 Samsung Galaxy Note 4 Volume Buttons Replacement: 手順 5、 3の画像 3
    • Insert a plastic opening tool between the midframe and the display assembly.

    • Work the plastic opening tool around the perimeter of the phone to break the adhesive.

    • This adhesive is relatively weak, so no heat gun should be necessary.

    • Be careful to not separate the front glass panel from the rest of the display assembly, as it is still held together with adhesive.

  6. Samsung Galaxy Note 4 Volume Buttons Replacement: 手順 6、 1の画像 1
    • Use a plastic opening tool to loosen the clasps around the battery housing.

  7. Samsung Galaxy Note 4 Volume Buttons Replacement: 手順 7、 3の画像 1 Samsung Galaxy Note 4 Volume Buttons Replacement: 手順 7、 3の画像 2 Samsung Galaxy Note 4 Volume Buttons Replacement: 手順 7、 3の画像 3
    • Push on the battery housing to separate the midframe from the display assembly.

    • You will have to apply a reasonable amount of pressure to separate the two parts.

    • If your new midframe does not come with a headphone jack assembly, you'll need to transfer the one from the old midframe into the new one. It can be pried loose with plastic opening tools, as it is held in place with several plastic pins.

  8. Samsung Galaxy Note 4 Volume Buttons Replacement, Volume Buttons: 手順 8、 2の画像 1 Samsung Galaxy Note 4 Volume Buttons Replacement, Volume Buttons: 手順 8、 2の画像 2
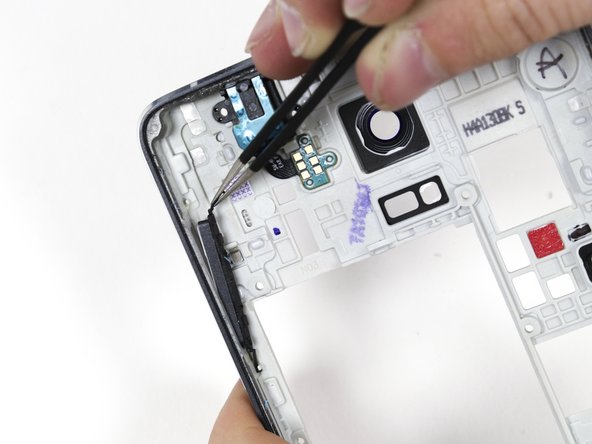
    • Use a set of tweezers to free the volume buttons from the midframe.

終わりに

To reassemble your device, follow these instructions in reverse order.

18 の人々がこのガイドを完成させました。

作成者

4人の作成者と共同で作成されました。

Derek Nola

メンバー登録日: 01/06/15

2,244 ポイント

5のガイドは作成済み

チーム

Cal Poly, Team 70-6, Forte Winter 2015 Cal Poly, Team 70-6, Forte Winter 2015人のメンバー

CPSU-FORTE-W15S70G6

4 メンバー

16のガイドは作成済み

2 件のコメント

I remember wwwdrcelluar.com  its gone,. Apple must have shut them down in law suit. How the !&&* do I do now?

savecityofheroes1 - 返信

I remember Drcellular*com that was the place where I buy my parts from. there are gone  Apple must have shut down another 3rd party repair on law suits now how the H E L L do I do now?

savecityofheroes1 - 返信

コメントを追加

統計データ:

過去 24時間: 1

過去 7 日: 3

過去 30 日: 10

今までの合計 16,061