メインコンテンツにスキップ

この翻訳は、ソースガイドの最新の更新を反映していない可能性があります。 翻訳の更新に協力してください。 または ソースガイドを参照してください

Samsung Galaxy Note 4のヘッドホンジャックの交換

必要な工具と部品

  1. この手順は未翻訳です。 翻訳を手伝う。

    Samsung Galaxy Note 4のヘッドホンジャックの交換: 手順 1、 2の画像 1 Samsung Galaxy Note 4のヘッドホンジャックの交換: 手順 1、 2の画像 2
    • Insert a fingernail or plastic opening tool into the divot to the left of the rear-facing camera.

    • Gently pry and twist the flexible rear cover off the back of the phone.

  2. この手順は未翻訳です。 翻訳を手伝う。

    Samsung Galaxy Note 4のヘッドホンジャックの交換: 手順 2、 1の画像 1
    • Insert a fingernail or plastic opening tool into the recess in the bottom right corner of the battery and lift upward.

    • Remove the battery.

  3. Samsung Galaxy Note 4のヘッドホンジャックの交換: 手順 3、 2の画像 1 Samsung Galaxy Note 4のヘッドホンジャックの交換: 手順 3、 2の画像 2
    • まず、ハウジングからカードをわずかに押し出してから、残りを引っ張り、SIMカードを取り出します。

  4. この手順は未翻訳です。 翻訳を手伝う。

    Samsung Galaxy Note 4のヘッドホンジャックの交換, ミッドフレーム: 手順 4、 1の画像 1
    • Remove the sixteen 4.0 mm Phillips #00 screws securing the midframe to the display assembly.

    • Grasp the cap of the S Pen and remove it from its slot in the midframe.

  5. この手順は未翻訳です。 翻訳を手伝う。

    Samsung Galaxy Note 4のヘッドホンジャックの交換: 手順 5、 3の画像 1 Samsung Galaxy Note 4のヘッドホンジャックの交換: 手順 5、 3の画像 2 Samsung Galaxy Note 4のヘッドホンジャックの交換: 手順 5、 3の画像 3
    • Insert a plastic opening tool between the midframe and the display assembly.

    • Work the plastic opening tool around the perimeter of the phone to break the adhesive.

    • This adhesive is relatively weak, so no heat gun should be necessary.

    • Be careful to not separate the front glass panel from the rest of the display assembly, as it is still held together with adhesive.

  6. この手順は未翻訳です。 翻訳を手伝う。

    Samsung Galaxy Note 4のヘッドホンジャックの交換: 手順 6、 1の画像 1
    • Use a plastic opening tool to loosen the clasps around the battery housing.

  7. この手順は未翻訳です。 翻訳を手伝う。

    Samsung Galaxy Note 4のヘッドホンジャックの交換: 手順 7、 3の画像 1 Samsung Galaxy Note 4のヘッドホンジャックの交換: 手順 7、 3の画像 2 Samsung Galaxy Note 4のヘッドホンジャックの交換: 手順 7、 3の画像 3
    • Push on the battery housing to separate the midframe from the display assembly.

    • You will have to apply a reasonable amount of pressure to separate the two parts.

    • If your new midframe does not come with a headphone jack assembly, you'll need to transfer the one from the old midframe into the new one. It can be pried loose with plastic opening tools, as it is held in place with several plastic pins.

  8. この手順は未翻訳です。 翻訳を手伝う。

    Samsung Galaxy Note 4のヘッドホンジャックの交換, ヘッドホンジャック: 手順 8、 3の画像 1 Samsung Galaxy Note 4のヘッドホンジャックの交換, ヘッドホンジャック: 手順 8、 3の画像 2 Samsung Galaxy Note 4のヘッドホンジャックの交換, ヘッドホンジャック: 手順 8、 3の画像 3
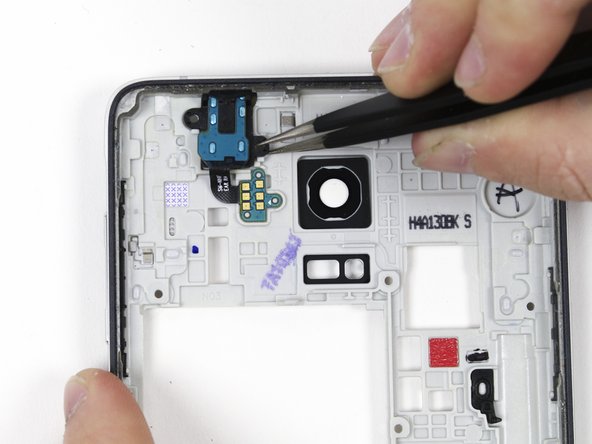
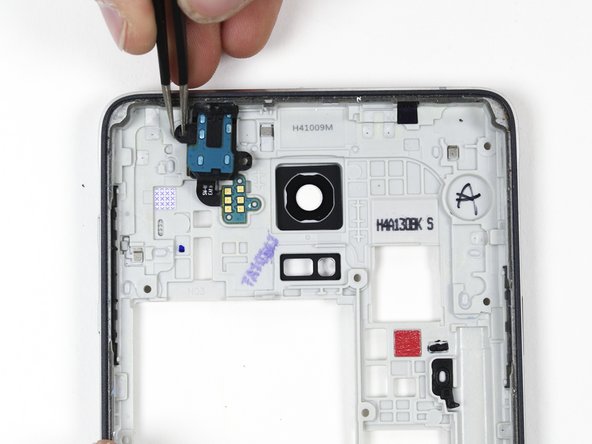
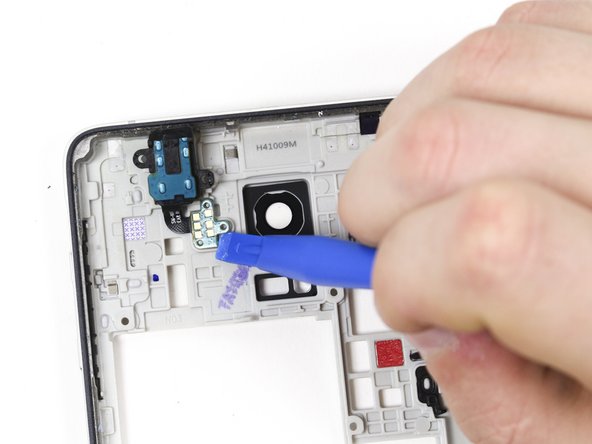
    • Use the plastic spudger and tweezers to remove the headphone jack from the middle housing.

  9. Samsung Galaxy Note 4のヘッドホンジャックの交換: 手順 9、 2の画像 1 Samsung Galaxy Note 4のヘッドホンジャックの交換: 手順 9、 2の画像 2
    • ミッドフレームからヘッドホンジャックを持ち上げます。

終わりに

デバイスを再度組み立てるには、この説明書の逆の順番で組み立ててください。

21 の人々がこのガイドを完成させました。

以下の翻訳者の皆さんにお礼を申し上げます:

en jp

83%

railgunさんは世界中で修理する私たちを助けてくれています! あなたも貢献してみませんか?
翻訳を始める ›

作成者

5人の作成者と共同で作成されました。

Derek Nola

メンバー登録日: 01/06/15

2,244 ポイント

5のガイドは作成済み

チーム

Cal Poly, Team 70-6, Forte Winter 2015 Cal Poly, Team 70-6, Forte Winter 2015人のメンバー

CPSU-FORTE-W15S70G6

4 メンバー

16のガイドは作成済み

0 件のコメント

コメントを追加

統計データ:

過去 24時間: 2

過去 7 日: 3

過去 30 日: 4

今までの合計 20,042