メインコンテンツにスキップ

Samsung Galaxy Mega Rear Facing Camera Replacement

必要な工具と部品

  1. Samsung Galaxy Mega Rear Facing Camera Replacement, Battery: 手順 1、 3の画像 1 Samsung Galaxy Mega Rear Facing Camera Replacement, Battery: 手順 1、 3の画像 2 Samsung Galaxy Mega Rear Facing Camera Replacement, Battery: 手順 1、 3の画像 3
    • Before starting, ensure device is completely turned off.

    • On the back of phone, locate the slot on the top left corner.

    • Insert plastic opening tool or fingernail and pull up on the back plate.

    • With the corner released, slide your finger around the device between the back plate and the phone to release connectors.

  2. Samsung Galaxy Mega Rear Facing Camera Replacement: 手順 2、 3の画像 1 Samsung Galaxy Mega Rear Facing Camera Replacement: 手順 2、 3の画像 2 Samsung Galaxy Mega Rear Facing Camera Replacement: 手順 2、 3の画像 3
    • Insert fingernail into the slot on bottom of battery and gently pull up.

    • Remove the battery.

  3. Samsung Galaxy Mega Rear Facing Camera Replacement, Midframe: 手順 3、 3の画像 1 Samsung Galaxy Mega Rear Facing Camera Replacement, Midframe: 手順 3、 3の画像 2 Samsung Galaxy Mega Rear Facing Camera Replacement, Midframe: 手順 3、 3の画像 3
    • Remove the 14 3.45 mm Phillips #000 screws from the assembly.

    • Gently, insert plastic opening tool into seam above the volume buttons of your phone.

    • You may substitute metal spudger for plastic opening tool to first start the opening of the seam. This may cause exterior cosmetic damage.

  4. Samsung Galaxy Mega Rear Facing Camera Replacement: 手順 4、 2の画像 1 Samsung Galaxy Mega Rear Facing Camera Replacement: 手順 4、 2の画像 2
    • Slowly slide plastic opening tool around the device to release all the connectors internal to the device.

    • The device should easily come apart after the plastic opening tool is slid around the entire device.

    • During reassembly, ensure volume and power buttons align properly.

  5. Samsung Galaxy Mega Rear Facing Camera Replacement, Motherboard: 手順 5、 1の画像 1
    • Remove the 2.55 mm Phillips #000 screw from the motherboard panel.

  6. Samsung Galaxy Mega Rear Facing Camera Replacement: 手順 6、 3の画像 1 Samsung Galaxy Mega Rear Facing Camera Replacement: 手順 6、 3の画像 2 Samsung Galaxy Mega Rear Facing Camera Replacement: 手順 6、 3の画像 3
    • Remove the connector clips on motherboard.

  7. Samsung Galaxy Mega Rear Facing Camera Replacement: 手順 7、 2の画像 1 Samsung Galaxy Mega Rear Facing Camera Replacement: 手順 7、 2の画像 2
    • Remove the final motherboard connectors.

  8. Samsung Galaxy Mega Rear Facing Camera Replacement: 手順 8、 3の画像 1 Samsung Galaxy Mega Rear Facing Camera Replacement: 手順 8、 3の画像 2 Samsung Galaxy Mega Rear Facing Camera Replacement: 手順 8、 3の画像 3
    • Lift motherboard gently with finger.

    • There is a total of six connectors on the motherboard that need to be removed. All of them are shown in the pictures in this guide, make sure all of them are disconnected before removing.

  9. Samsung Galaxy Mega Rear Facing Camera Replacement, Rear Facing Camera: 手順 9、 2の画像 1 Samsung Galaxy Mega Rear Facing Camera Replacement, Rear Facing Camera: 手順 9、 2の画像 2
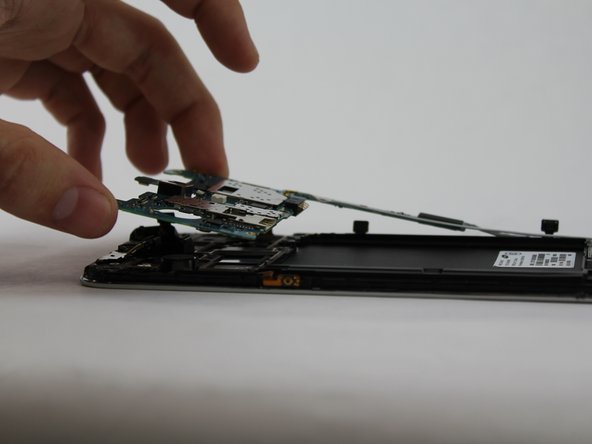
    • On the back of the motherboard, remove the connector of the rear facing camera from the motherboard.

    • Camera is now detached from device.

終わりに

To reassemble your device, follow these instructions in reverse order.

ある他の人がこのガイドを完成しました。

作成者

3人の作成者と共同で作成されました。

Max Rathman

メンバー登録日: 02/04/16

915 ポイント

4のガイドは作成済み

チーム

USF Tampa, Team 17-2, Blackwell Winter 2016 USF Tampa, Team 17-2, Blackwell Winter 2016人のメンバー

USFT-BLACKWELL-W16S17G2

4 メンバー

8のガイドは作成済み

0 件のコメント

コメントを追加

統計データ:

過去 24時間: 0

過去 7 日: 0

過去 30 日: 0

今までの合計 634