メインコンテンツにスキップ

Samsung Galaxy A32 5G Battery Replacement

必要な工具と部品

  1. Samsung Galaxy A32 5G Battery Replacement, Heat the back cover: 手順 1、 1の画像 1
    • Prepare an iOpener and apply it to the back cover for at least two minutes to loosen the adhesive underneath.

    • A hair dryer, heat gun, or hot plate may also be used, but be careful not to overheat the phone—the display and internal battery are both susceptible to heat damage.

  2. Samsung Galaxy A32 5G Battery Replacement, Insert an opening pick: 手順 2、 3の画像 1 Samsung Galaxy A32 5G Battery Replacement, Insert an opening pick: 手順 2、 3の画像 2 Samsung Galaxy A32 5G Battery Replacement, Insert an opening pick: 手順 2、 3の画像 3
    • Secure a suction handle to the bottom edge of the back cover, as close to the edge as possible.

    • If the back cover is cracked, the suction handle may not stick. Try lifting it with strong tape, or superglue the suction handle in place and allow it to cure so you can proceed.

    • Lift the back cover with the suction handle to create a small gap between the back cover and the frame.

    • In case you have trouble creating a gap, apply more heat to further soften the adhesive. Follow the iOpener instructions to avoid overheating.

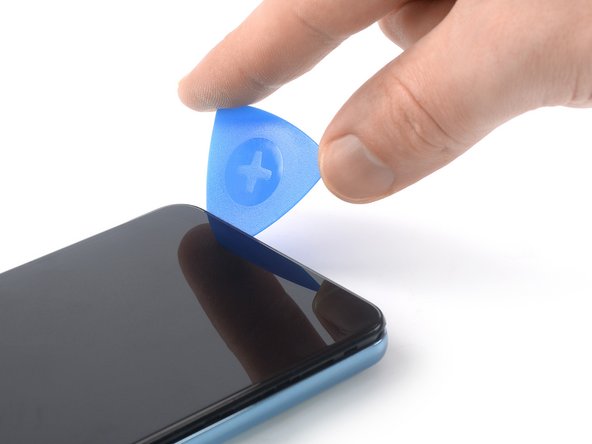
    • Insert an opening pick into the gap you created.

    • Slide the opening pick to the bottom right corner to slice the adhesive.

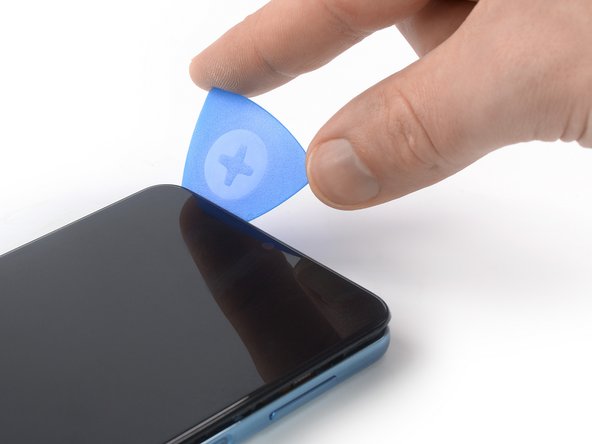
    • Leave the opening pick in place to prevent the adhesive from resealing.

  3. Samsung Galaxy A32 5G Battery Replacement, Slice the adhesive: 手順 3、 2の画像 1 Samsung Galaxy A32 5G Battery Replacement, Slice the adhesive: 手順 3、 2の画像 2
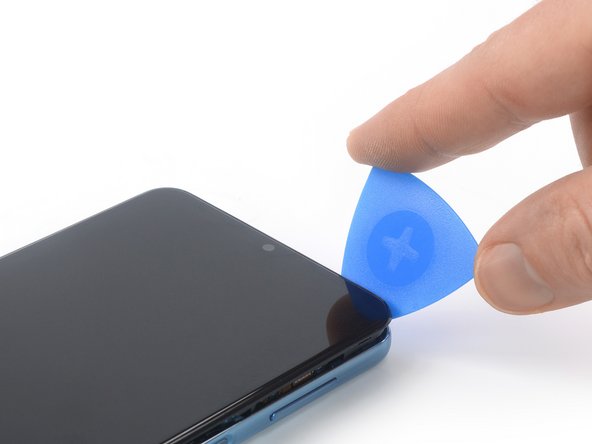
    • Insert a second opening pick at the bottom edge of your phone.

    • Slide the opening pick to the bottom left corner to slice the adhesive.

    • Leave the opening picks in place to prevent the adhesive from resealing.

  4. Samsung Galaxy A32 5G Battery Replacement, Slice the adhesive: 手順 4、 3の画像 1 Samsung Galaxy A32 5G Battery Replacement, Slice the adhesive: 手順 4、 3の画像 2 Samsung Galaxy A32 5G Battery Replacement, Slice the adhesive: 手順 4、 3の画像 3
    • If the adhesive becomes hard to cut, it has most likely cooled down. Use your iOpener for one to two minutes to reheat it.

    • Insert a third opening pick at the bottom left corner of your phone.

    • Slide the opening pick along the left edge of your phone to slice the adhesive.

    • Leave the opening pick in the top left corner to prevent the adhesive from resealing.

  5. Samsung Galaxy A32 5G Battery Replacement: 手順 5、 2の画像 1 Samsung Galaxy A32 5G Battery Replacement: 手順 5、 2の画像 2
    • Insert a fourth opening pick underneath the top left corner of your phone.

    • Slide the opening pick along the top edge to slice the adhesive.

    • Leave the opening pick in the top right corner to prevent the adhesive from resealing.

  6. Samsung Galaxy A32 5G Battery Replacement: 手順 6、 2の画像 1 Samsung Galaxy A32 5G Battery Replacement: 手順 6、 2の画像 2
    • Insert a fifth opening pick underneath the top right corner.

    • Slide the opening pick along the right edge of the back cover to slice the remaining adhesive.

  7. Samsung Galaxy A32 5G Battery Replacement, Remove the back cover: 手順 7、 2の画像 1 Samsung Galaxy A32 5G Battery Replacement, Remove the back cover: 手順 7、 2の画像 2
    • Remove the back cover.

    • Apply new adhesive where necessary after cleaning the relevant areas with isopropyl alcohol (>90%).

    • Secure the new back cover with pre-cut adhesive or double-sided adhesive tape. After installing the back cover, apply strong, steady pressure to your phone for several minutes to help the adhesive form a good bond—a stack of heavy books works well.

  8. Samsung Galaxy A32 5G Battery Replacement, Eject the SIM card tray: 手順 8、 3の画像 1 Samsung Galaxy A32 5G Battery Replacement, Eject the SIM card tray: 手順 8、 3の画像 2 Samsung Galaxy A32 5G Battery Replacement, Eject the SIM card tray: 手順 8、 3の画像 3
    • Insert a SIM card eject tool, a SIM eject bit, or a straightened paper clip into the hole on the SIM tray located at the left edge of the phone.

    • Press directly into the hole to eject the SIM card tray.

    • Remove the SIM card tray.

  9. Samsung Galaxy A32 5G Battery Replacement, Unfasten the midframe screws: 手順 9、 2の画像 1 Samsung Galaxy A32 5G Battery Replacement, Unfasten the midframe screws: 手順 9、 2の画像 2
    • Use a Phillips screwdriver to remove the sixteen 4.1 mm-long screws securing the midframe.

  10. Samsung Galaxy A32 5G Battery Replacement, Disconnect the power and volume button flex cable: 手順 10、 2の画像 1 Samsung Galaxy A32 5G Battery Replacement, Disconnect the power and volume button flex cable: 手順 10、 2の画像 2
    • Use a spudger to disconnect the power and volume button flex cable by prying the connector straight up from its socket.

  11. Samsung Galaxy A32 5G Battery Replacement, Insert an opening pick: 手順 11、 2の画像 1 Samsung Galaxy A32 5G Battery Replacement, Insert an opening pick: 手順 11、 2の画像 2
    • The midframe of the Samsung Galaxy A32 5G is held in place by plastic clips.

    • Insert an opening pick between the midframe and front panel assembly on the left edge of the phone where the SIM tray slot is located.

  12. Samsung Galaxy A32 5G Battery Replacement, Release the plastic clips: 手順 12、 3の画像 1 Samsung Galaxy A32 5G Battery Replacement, Release the plastic clips: 手順 12、 3の画像 2 Samsung Galaxy A32 5G Battery Replacement, Release the plastic clips: 手順 12、 3の画像 3
    • The plastic clips of the midframe are sitting in place tightly. Releasing them might require some force.

    • Slide the opening pick along the left edge of the phone to release the plastic clips.

  13. Samsung Galaxy A32 5G Battery Replacement: 手順 13、 3の画像 1 Samsung Galaxy A32 5G Battery Replacement: 手順 13、 3の画像 2 Samsung Galaxy A32 5G Battery Replacement: 手順 13、 3の画像 3
    • Slide the opening pick around the bottom left corner.

    • Slide the opening pick along the bottom edge of the phone to release the plastic clips.

  14. Samsung Galaxy A32 5G Battery Replacement: 手順 14、 3の画像 1 Samsung Galaxy A32 5G Battery Replacement: 手順 14、 3の画像 2 Samsung Galaxy A32 5G Battery Replacement: 手順 14、 3の画像 3
    • Slide the opening pick around the bottom right corner.

    • Slide the opening pick along the right edge of the phone to release the plastic clips.

  15. Samsung Galaxy A32 5G Battery Replacement: 手順 15、 3の画像 1 Samsung Galaxy A32 5G Battery Replacement: 手順 15、 3の画像 2 Samsung Galaxy A32 5G Battery Replacement: 手順 15、 3の画像 3
    • Slide the opening pick around the top right corner.

    • Slide the opening pick along the top edge of the phone to release the remaining plastic clips.

  16. Samsung Galaxy A32 5G Battery Replacement, Remove the midframe: 手順 16、 2の画像 1 Samsung Galaxy A32 5G Battery Replacement, Remove the midframe: 手順 16、 2の画像 2
    • Place your phone with the display facing downwards on your working surface.

    • Remove the midframe.

  17. Samsung Galaxy A32 5G Battery Replacement, Disconnect the battery cable: 手順 17、 2の画像 1 Samsung Galaxy A32 5G Battery Replacement, Disconnect the battery cable: 手順 17、 2の画像 2
    • Use a spudger to disconnect the battery cable by prying the connector straight up from its socket.

  18. Samsung Galaxy A32 5G Battery Replacement, Disconnect the display cable: 手順 18、 2の画像 1 Samsung Galaxy A32 5G Battery Replacement, Disconnect the display cable: 手順 18、 2の画像 2
    • Use a spudger to disconnect the display cable by prying the connector straight up from its socket.

  19. Samsung Galaxy A32 5G Battery Replacement, Loosen the battery adhesive: 手順 19、 1の画像 1
    • Apply a heated iOpener to the screen to loosen the adhesive underneath the battery. Apply the iOpener for at least five minutes.

    • A hair dryer, heat gun, or hot plate may also be used, but be careful not to overheat the device.

    • Do not apply heat directly onto the battery as doing so is a potential safety hazard.

  20. Samsung Galaxy A32 5G Battery Replacement, Free the battery: 手順 20、 2の画像 1 Samsung Galaxy A32 5G Battery Replacement, Free the battery: 手順 20、 2の画像 2
    • During the following step do not fold the cable sharply and only bend it to avoid cable damage.

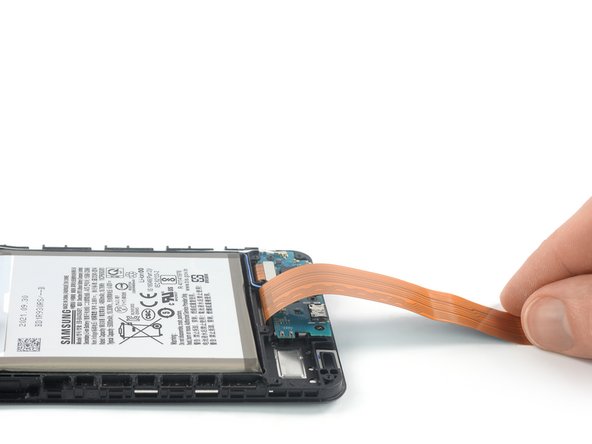
    • Fold the display flex cable towards the charging port in order to get free access to the battery.

    • You might want to use a small piece of tape to temporarily stick the cable onto your working surface to avoid accidentally damaging it during the battery removal.

  21. Samsung Galaxy A32 5G Battery Replacement, Insert an opening pick: 手順 21、 2の画像 1 Samsung Galaxy A32 5G Battery Replacement, Insert an opening pick: 手順 21、 2の画像 2
    • The battery adhesive of the Samsung Galaxy A32 5G is strong. If you can't manage to remove the battery by only using your iOpener, you can apply a few drops of high concentration isopropyl alcohol (over 90%) into the gaps between the battery and the midframe.

    • If you're using isopropyl alcohol let the alcohol penetrate the battery adhesive for at least two to three minutes before removing the battery.

    • Take care not to puncture or bend the battery with your tool—a punctured or bent battery may leak dangerous chemicals or cause a fire.

    • For this step, insert the opening pick into the edge with a wider gap between the midframe and the battery so that you have more space for the opening pick and get a better leverage.

    • Insert an opening pick into the gap between the edge of the battery and the frame.

  22. Samsung Galaxy A32 5G Battery Replacement, Slice the battery adhesive: 手順 22、 3の画像 1 Samsung Galaxy A32 5G Battery Replacement, Slice the battery adhesive: 手順 22、 3の画像 2 Samsung Galaxy A32 5G Battery Replacement, Slice the battery adhesive: 手順 22、 3の画像 3
    • Slide the tip of your opening pick underneath the edge of the battery.

    • Slide the the opening pick along the edge of the battery to slice its adhesive and to widen the gap between battery and frame.

  23. Samsung Galaxy A32 5G Battery Replacement, Insert a plastic card: 手順 23、 3の画像 1 Samsung Galaxy A32 5G Battery Replacement, Insert a plastic card: 手順 23、 3の画像 2 Samsung Galaxy A32 5G Battery Replacement, Insert a plastic card: 手順 23、 3の画像 3
    この手順で使用する道具:
    Plastic Cards
    $2.99
    購入する
    • In case you're struggling to insert a plastic card apply more heat to the screen and/or isopropyl alcohol around the battery and try again.

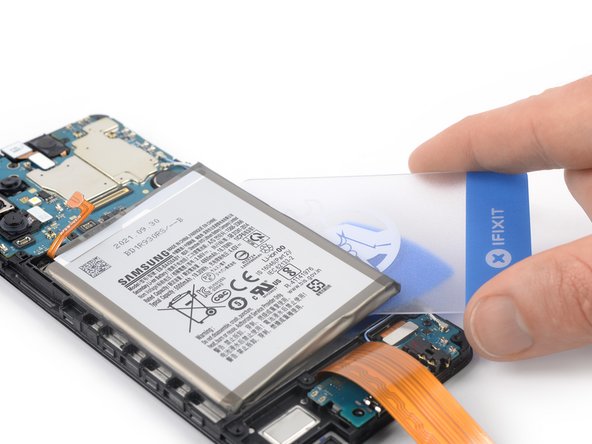
    • Insert a plastic card at the edge you priorly worked with your opening pick.

    • Slide the plastic card underneath the battery.

    • Use the plastic card to slice the adhesive underneath the battery and pry it up.

  24. Samsung Galaxy A32 5G Battery Replacement, Remove the battery: 手順 24、 3の画像 1 Samsung Galaxy A32 5G Battery Replacement, Remove the battery: 手順 24、 3の画像 2 Samsung Galaxy A32 5G Battery Replacement, Remove the battery: 手順 24、 3の画像 3
    • Peel the battery off the remaining adhesive.

    • Remove the battery.

    • Do not reinstall a damaged or deformed battery, as doing so is a potential safety hazard.

    • Secure the new battery with pre-cut adhesive or double-sided adhesive tape. In order to position it correctly, apply the new adhesive into the device at the places where the old adhesive was located, not directly onto the battery. Press the new battery firmly into place.

    • During reassembly, temporarily reconnect the battery to the motherboard to help align it correctly. Disconnect the battery after it is seated.

終わりに

If possible, turn on your device and test your repair before installing new adhesive and resealing.

To reassemble your device, follow these instructions in reverse order.

For optimal performance, calibrate your newly installed battery after completing this guide.

Take your e-waste to an R2 or e-Stewards certified recycler.

Repair didn’t go as planned? Try some basic troubleshooting, or ask our Answers community for help.

8 の人々がこのガイドを完成させました。

作成者

1人の作成者と共同作成されました。

Dominik Schnabelrauch

メンバー登録日: 11/23/16

202,836 ポイント

682のガイドは作成済み

チーム

iFixit iFixit人のメンバー

Staff

135 メンバー

16,734のガイドは作成済み

6 件のコメント

Thanks for this tutorial. I was dismayed to learn that Samsung has followed Apple down this path of selling phones with sealed batteries that can't be quickly replaced by just popping off the back and dropping in a new battery. It seems crazy to me that phones that cost $500 to $1200 are considered to be so "disposable" that they're being manufactured without any consideration, that it might be better to just replace a $20 battery and get 5 more years of use out of the phone, instead of adding even more e-waste to the burden of responsibly recycling the tens of millions of unwanted phones, tablets, and laptops that are already ending up in landfills. This battery replacement, while technically "possible", looks far too difficult for the average cell phone owner who isn't a professional small-electronics repair technician.

LAURA-ANN CHARLOT - 返信

Could not have said it better myself 100% agree

Xgred -

This is ridiculous! My phone cost almost $300, and around a year later, the battery can't hold a charge more than 24 hours! It used to last 3-5 days! I live on Social Security, and can't afford to throw money around like crazy. I stayed away from cell phones for over fifteen years because their operating systems were written by morons and idiots, but now it's so ridiculous you can't FART ubless you have a smartphone. I don't call this progress.

William Kuns - 返信

The tutorial is helpful, and also the tools, but there is no answer to the most important question - where to buy original battery.

Dimiter - 返信

I got one from eBay, Now I need to source the tools so i can do this proper

Redacted “Case” -

コメントを追加

統計データ:

過去 24時間: 26

過去 7 日: 157

過去 30 日: 791

今までの合計 15,446