メインコンテンツにスキップ

Samsung Galaxy A10e Daughterboard Replacement

必要な工具と部品

  1. Samsung Galaxy A10e Daughterboard Replacement, SIM Card: 手順 1、 2の画像 1 Samsung Galaxy A10e Daughterboard Replacement, SIM Card: 手順 1、 2の画像 2
    • Insert a SIM card eject tool, bit, or a straightened paperclip into the small hole in the SIM card tray.

    • Press to eject the tray.

  2. Samsung Galaxy A10e Daughterboard Replacement: 手順 2、 2の画像 1 Samsung Galaxy A10e Daughterboard Replacement: 手順 2、 2の画像 2
    • Remove the SIM card tray from the phone.

    • The SIM card(s) and SD card will fall out of the tray easily.

    • When reinserting the tray, ensure the SIM card and SD card are in the correct slots and oriented correctly.

    • For dual-SIM versions of this phone, there may be two SIM cards. Ensure the SIM cards are placed in the slots corresponding to the correct phone lines.

  3. Samsung Galaxy A10e Daughterboard Replacement, Back Cover: 手順 3、 1の画像 1
    • The back cover is held in place by plastic clips.

    • Insert an opening pick between the screen and the back cover on the bottom of the phone where the charging port is located.

  4. Samsung Galaxy A10e Daughterboard Replacement: 手順 4、 1の画像 1
    • Slide the opening pick to the bottom left corner to release the clips.

  5. Samsung Galaxy A10e Daughterboard Replacement: 手順 5、 1の画像 1
    • Slide the opening pick along the left edge to the top left corner of the phone, to release the clips.

  6. Samsung Galaxy A10e Daughterboard Replacement: 手順 6、 1の画像 1
    • Slide the opening pick from the top left corner to the top right corner to release the plastic clips.

  7. Samsung Galaxy A10e Daughterboard Replacement: 手順 7、 1の画像 1
    • Slide the opening pick from the top right corner to the bottom right corner to release the remaining clips.

  8. Samsung Galaxy A10e Daughterboard Replacement: 手順 8、 1の画像 1
    • Remove the back cover.

  9. Samsung Galaxy A10e Daughterboard Replacement, Motherboard Cover: 手順 9、 1の画像 1
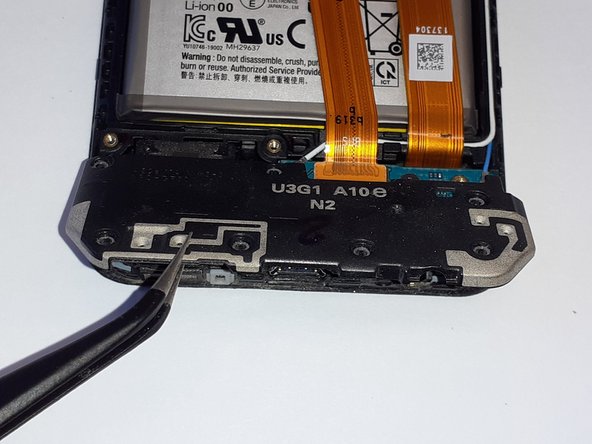
    • Remove screws from the motherboard antenna cover.

    • 3 Phillips #00, 3mm length.

  10. Samsung Galaxy A10e Daughterboard Replacement: 手順 10、 1の画像 1
    • Use the tip of a spudger or tweezers to remove the antenna cover.

  11. Samsung Galaxy A10e Daughterboard Replacement: 手順 11、 1の画像 1
    • Remove screws from the motherboard cover.

    • 3 Phillips #00, 3mm length

  12. Samsung Galaxy A10e Daughterboard Replacement: 手順 12、 1の画像 1
    • Use the tip of a spudger or tweezers to remove the motherboard cover.

  13. Samsung Galaxy A10e Daughterboard Replacement, Battery Disconnect: 手順 13、 2の画像 1 Samsung Galaxy A10e Daughterboard Replacement, Battery Disconnect: 手順 13、 2の画像 2
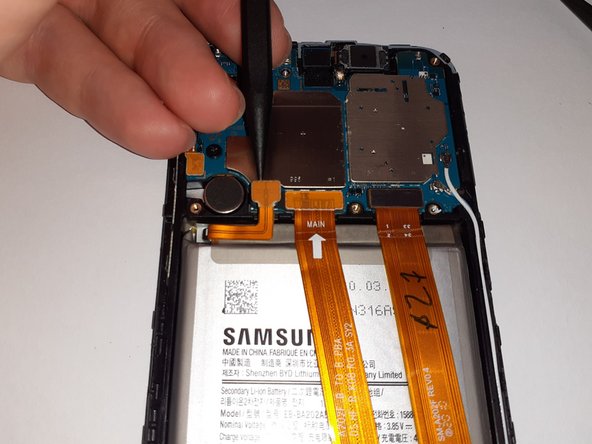
    • Use a spudger to disconnect the battery by prying the connector straight up from its socket.

  14. Samsung Galaxy A10e Daughterboard Replacement: 手順 14、 1の画像 1
    • Gently flex the battery connector away from its socket.

  15. Samsung Galaxy A10e Daughterboard Replacement, Daughterboard Cover: 手順 15、 1の画像 1
    • Remove screws from daughterboard cover.

    • 7 Phillips #00, 3mm length.

  16. Samsung Galaxy A10e Daughterboard Replacement: 手順 16、 2の画像 1 Samsung Galaxy A10e Daughterboard Replacement: 手順 16、 2の画像 2
    • There is a plastic tab securing the top left corner of the daughterboard cover.

    • Use a pair of tweezers to lift up the bottom of the daughterboard cover to a ~30 degree angle.

    • Pull the daughterboard cover straight out, away from the phone.

  17. Samsung Galaxy A10e Daughterboard Replacement, Interconnect Flex: 手順 17、 2の画像 1 Samsung Galaxy A10e Daughterboard Replacement, Interconnect Flex: 手順 17、 2の画像 2
    • Insert the flat end of a spudger under the interconnect flex connector, and gently pry it straight up.

  18. Samsung Galaxy A10e Daughterboard Replacement: 手順 18、 2の画像 1 Samsung Galaxy A10e Daughterboard Replacement: 手順 18、 2の画像 2
    • Using a pair of tweezers, gently disconnect one of the antenna connectors.

  19. Samsung Galaxy A10e Daughterboard Replacement: 手順 19、 1の画像 1
    • Using a pair of tweezers, gently disconnect the other antenna connector.

  20. Samsung Galaxy A10e Daughterboard Replacement: 手順 20、 1の画像 1
    • Remove screw from daughterboard.

    • 1 Phillips #00, 2mm length.

  21. Samsung Galaxy A10e Daughterboard Replacement, Remove Daughterboard: 手順 21、 1の画像 1
    • Remove the daughterboard.

終わりに

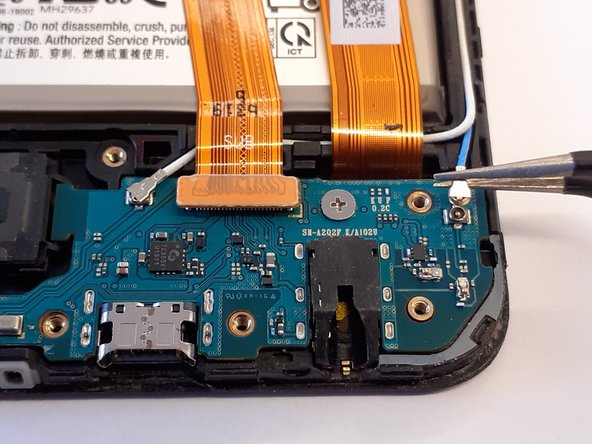
To reassemble your device, follow these instructions in reverse order.

12 の人々がこのガイドを完成させました。

作成者

1人の作成者と共同作成されました。

Thomas Boland

メンバー登録日: 09/29/20

1,734 ポイント

5のガイドは作成済み

2 件のコメント

a common issue with the A10E is the phone notifying you that you have water damage in the usb type-C port this can be fixed by replacing the daughter board which has a IC which is commonly faulty.

ryley niemi - 返信

From where can you obtain a new daughterboard?

Will Pursley - 返信

コメントを追加

統計データ:

過去 24時間: 1

過去 7 日: 10

過去 30 日: 40

今までの合計 2,720