メインコンテンツにスキップ

Samsung DV300F Front LCD Screen Replacement

必要な工具と部品

  1. Samsung DV300F Front LCD Screen Replacement, Front and Rear Casing: 手順 1、 3の画像 1 Samsung DV300F Front LCD Screen Replacement, Front and Rear Casing: 手順 1、 3の画像 2 Samsung DV300F Front LCD Screen Replacement, Front and Rear Casing: 手順 1、 3の画像 3
    • Remove the two black 4.2 mm screws on the right side of the camera using a Phillips #0 screwdriver.

    • Remove the two black 4.2 mm screws on the left side of the camera using a Phillips #0 screwdriver.

    • Remove the two black 4.2 mm screws on the bottom of the camera using a Phillips #0 screwdriver.

  2. Samsung DV300F Front LCD Screen Replacement: 手順 2、 2の画像 1 Samsung DV300F Front LCD Screen Replacement: 手順 2、 2の画像 2
    • Remove the back case of the camera carefully.

  3. Samsung DV300F Front LCD Screen Replacement: 手順 3、 3の画像 1 Samsung DV300F Front LCD Screen Replacement: 手順 3、 3の画像 2 Samsung DV300F Front LCD Screen Replacement: 手順 3、 3の画像 3
    • Remove the front case of the camera.

    • Remove the front LCD screen from the front case next to the lens.

  4. Samsung DV300F Front LCD Screen Replacement, Back Button Control: 手順 4、 2の画像 1 Samsung DV300F Front LCD Screen Replacement, Back Button Control: 手順 4、 2の画像 2
    • Remove the blue button control from its position next to the LCD screen.

    • Pull the ribbon cable to disconnect the blue button control from the camera.

  5. Samsung DV300F Front LCD Screen Replacement, Back LCD Screen: 手順 5、 1の画像 1
    • Remove the back LCD screen from its place carefully.

  6. Samsung DV300F Front LCD Screen Replacement: 手順 6、 2の画像 1 Samsung DV300F Front LCD Screen Replacement: 手順 6、 2の画像 2
    • Flip the black tab where the back LCD screen connects to the circuit board.

    • Pull the tape connection to disconnect the back LCD screen from the circuit board.

  7. Samsung DV300F Front LCD Screen Replacement, Front LCD Screen: 手順 7、 2の画像 1 Samsung DV300F Front LCD Screen Replacement, Front LCD Screen: 手順 7、 2の画像 2
    • Unscrew the 3 silver 4.5 mm screws from the circuit board using a Phillips #0 screwdriver.

    • Remove the circuit board cover.

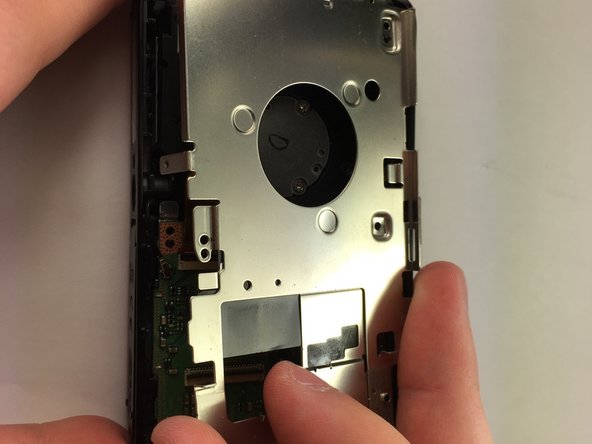
  8. Samsung DV300F Front LCD Screen Replacement: 手順 8、 3の画像 1 Samsung DV300F Front LCD Screen Replacement: 手順 8、 3の画像 2 Samsung DV300F Front LCD Screen Replacement: 手順 8、 3の画像 3
    • Flip the black tab where the front LCD screen connects to the circuit board.

    • Pull the tape connection to disconnect the front LCD screen from the circuit board.

    • You can do this easily with your fingers.

    • Remove the front LCD screen from the front of the camera.

終わりに

To reassemble your device, follow these instructions in reverse order.

ある他の人がこのガイドを完成しました。

作成者

7人の作成者と共同で作成されました。

Timothy Gordon

メンバー登録日: 03/23/15

820 ポイント

5のガイドは作成済み

チーム

Baylor, Team 5-10, Williams Spring 2015 Baylor, Team 5-10, Williams Spring 2015人のメンバー

BU-WILLIAMS-S15S5G10

3 メンバー

10のガイドは作成済み

0 件のコメント

コメントを追加

統計データ:

過去 24時間: 2

過去 7 日: 3

過去 30 日: 13

今までの合計 738