メインコンテンツにスキップ

Samsung Chromebook 4 Plus XE350XBA-K05US Device Motherboard Replacement

必要な工具と部品

  1. Samsung Chromebook 4 Plus XE350XBA-K05US Device Motherboard Replacement, Battery: 手順 1、 3の画像 1 Samsung Chromebook 4 Plus XE350XBA-K05US Device Motherboard Replacement, Battery: 手順 1、 3の画像 2 Samsung Chromebook 4 Plus XE350XBA-K05US Device Motherboard Replacement, Battery: 手順 1、 3の画像 3
    • Hold down the power button until the device powers off

    • Close the device and flip it over

    • Remove the four rubber sockets near the corners of the device

    • Then remove the four 4.6 mm Phillips #00 screws

  2. Samsung Chromebook 4 Plus XE350XBA-K05US Device Motherboard Replacement: 手順 2、 2の画像 1 Samsung Chromebook 4 Plus XE350XBA-K05US Device Motherboard Replacement: 手順 2、 2の画像 2
    • Use the metal spudger to pop the back off. Near the hinges is typically an easier place to start.

    • Continue along the edges until the back is completely detached.

  3. Samsung Chromebook 4 Plus XE350XBA-K05US Device Motherboard Replacement: 手順 3、 2の画像 1 Samsung Chromebook 4 Plus XE350XBA-K05US Device Motherboard Replacement: 手順 3、 2の画像 2
    • Locate the long grey box with the black band, which is labeled "Laptop Battery."

    • Remove the gray piece labeled "bracket battery BA61 - 03983A" located over the golden band connecting the battery and motherboard by unscrewing the two 4 mm Phillips #00 screws

  4. Samsung Chromebook 4 Plus XE350XBA-K05US Device Motherboard Replacement: 手順 4、 1の画像 1
    • Unplug the golden band coming from the battery to the motherboard.

    • Using the Philips #000 remove the four 4mm screws holding the battery in place.

  5. Samsung Chromebook 4 Plus XE350XBA-K05US Device Motherboard Replacement, Motherboard: 手順 5、 3の画像 1 Samsung Chromebook 4 Plus XE350XBA-K05US Device Motherboard Replacement, Motherboard: 手順 5、 3の画像 2 Samsung Chromebook 4 Plus XE350XBA-K05US Device Motherboard Replacement, Motherboard: 手順 5、 3の画像 3
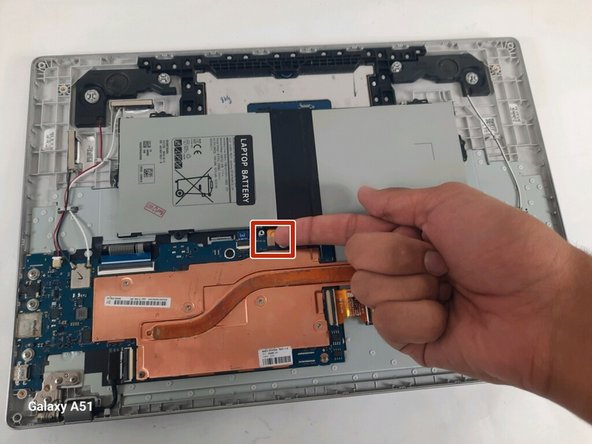
    • Unplug the black and red wire and the black and white wire.

    • Unclip and remove the black and gold ribbons and the black wire from the motherboard.

  6. Samsung Chromebook 4 Plus XE350XBA-K05US Device Motherboard Replacement: 手順 6、 3の画像 1 Samsung Chromebook 4 Plus XE350XBA-K05US Device Motherboard Replacement: 手順 6、 3の画像 2 Samsung Chromebook 4 Plus XE350XBA-K05US Device Motherboard Replacement: 手順 6、 3の画像 3
    • Remove the three 4.53 mm Philips #00 screws from the grey metal piece labeled "BRKT-PORT-SUB JOAN-15 BA61-03942A".

    • Remove the 4.50 mm Philips #00 screw from the right side of the motherboard.

  7. Samsung Chromebook 4 Plus XE350XBA-K05US Device Motherboard Replacement: 手順 7、 1の画像 1
    • Remove the two 4.56 mm Philips #00 screws from the copper heat sink.

    • Remove the four 4.63 mm Philips #00 screws

  8. Samsung Chromebook 4 Plus XE350XBA-K05US Device Motherboard Replacement: 手順 8、 2の画像 1 Samsung Chromebook 4 Plus XE350XBA-K05US Device Motherboard Replacement: 手順 8、 2の画像 2
    • Carefully turn the motherboard and heat sink over being careful not to touch any of the components.

    • Remove the four 4.63 mm Philips #00 screws from the back of the motherboard and remove the heat sink.

終わりに

To reassemble your device, follow these instructions in reverse order.

ある他の人がこのガイドを完成しました。

作成者

2人の作成者と共同で作成されました。

Katherine Vu

メンバー登録日: 09/08/23

366 ポイント

3のガイドは作成済み

チーム

University of New Orleans, Team 3-3, McDonald Fall 2023 University of New Orleans, Team 3-3, McDonald Fall 2023人のメンバー

UNO-MCDONALD-F23S3G3

3 メンバー

5のガイドは作成済み

0 件のコメント

コメントを追加

統計データ:

過去 24時間: 0

過去 7 日: 0

過去 30 日: 17

今までの合計 103