メインコンテンツにスキップ

Samsung BD-F7500 Blu-ray Player Mother Board Replacement

必要な工具と部品

  1. Samsung BD-F7500 Blu-ray Player Mother Board Replacement, Power Cord: 手順 1、 2の画像 1 Samsung BD-F7500 Blu-ray Player Mother Board Replacement, Power Cord: 手順 1、 2の画像 2
    • Use a Phillips head #J1 screwdriver to remove all three (3) 10 mm screws.

  2. Samsung BD-F7500 Blu-ray Player Mother Board Replacement: 手順 2、 2の画像 1 Samsung BD-F7500 Blu-ray Player Mother Board Replacement: 手順 2、 2の画像 2
    • While firmly gripping the gray, metal base, lift the black plastic cover off the device.

    • The case is clamped onto the edges of the device, so bending of the plastic top will be required. Don't be afraid to use some force, it is unlikely that it will break.

    • Be careful not to tear ribbon cables attached to the outer cover.

  3. Samsung BD-F7500 Blu-ray Player Mother Board Replacement: 手順 3、 3の画像 1 Samsung BD-F7500 Blu-ray Player Mother Board Replacement: 手順 3、 3の画像 2 Samsung BD-F7500 Blu-ray Player Mother Board Replacement: 手順 3、 3の画像 3
    • Using the Philips head #J1 bit, remove the three (3) 10 mm screws that secure the plastic cover.

    • Gently remove the plastic cover.

  4. Samsung BD-F7500 Blu-ray Player Mother Board Replacement: 手順 4、 2の画像 1 Samsung BD-F7500 Blu-ray Player Mother Board Replacement: 手順 4、 2の画像 2
    • To remove the power cord, gently apply pressure to the tab located at the base of the cord and lift the cord with your fingers.

  5. Samsung BD-F7500 Blu-ray Player Mother Board Replacement: 手順 5、 1の画像 1
    • Locate the black plastic tab located on the power cord.

    • Using a spudger, gently insert the tool into the crack, to allow space for the wire to slide out.

    • Pull the plastic tab off of the wire, so that it can be placed on the replacement power cord.

  6. Samsung BD-F7500 Blu-ray Player Mother Board Replacement, DC Power Board: 手順 6、 2の画像 1 Samsung BD-F7500 Blu-ray Player Mother Board Replacement, DC Power Board: 手順 6、 2の画像 2
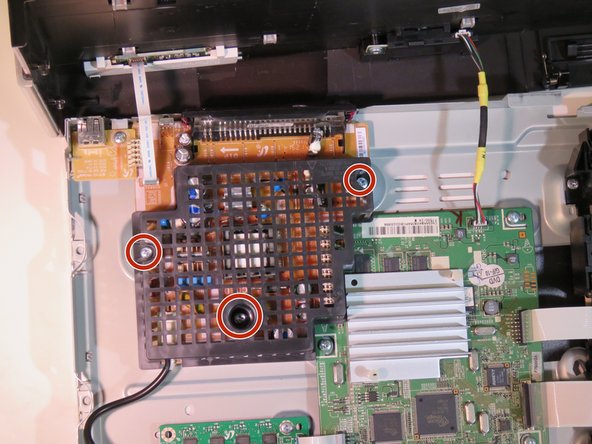
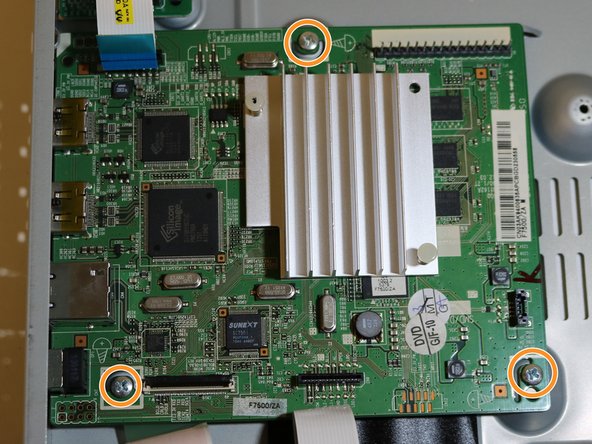
    • Remove the 7 mm screw using a phillips head #J1 screwdriver.

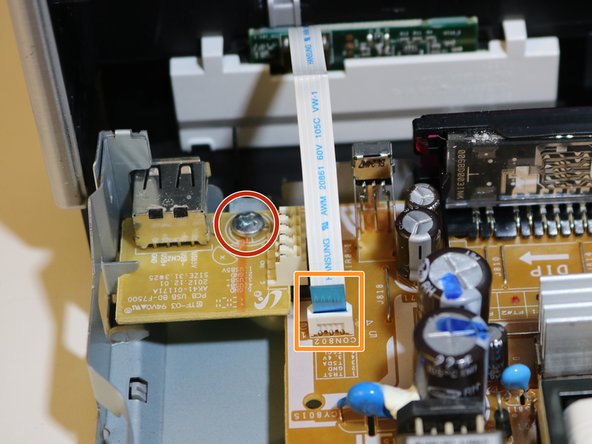
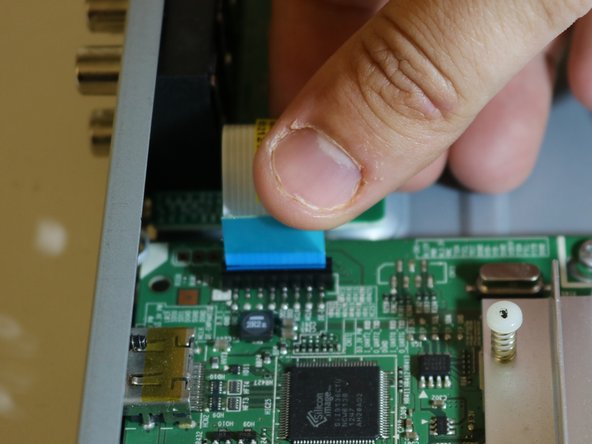
    • To remove the ribbon cable, firmly grip the blue tab attached to the base and pull upwards.

    • The DC Power board needs to be drained of excess charge. This can be done by unplugging the device from the wall and pressing the power button a few times.

  7. Samsung BD-F7500 Blu-ray Player Mother Board Replacement: 手順 7、 1の画像 1
    • To remove the USB board, grab the board and pull upwards until the plastic casing has been detached from the power board

    • The USB board is lodged against the metal frame. It is helpful to pull up from the white connector and rotate it out.

    • Be careful not to bend any pins, located beneath the white connector, while removing the USB board.

  8. Samsung BD-F7500 Blu-ray Player Mother Board Replacement: 手順 8、 1の画像 1
    • To remove the board, grip the edges and pull upwards.

    • Be careful not to bend the pins located beneath the long white connector.

  9. Samsung BD-F7500 Blu-ray Player Mother Board Replacement, Motherboard: 手順 9、 3の画像 1 Samsung BD-F7500 Blu-ray Player Mother Board Replacement, Motherboard: 手順 9、 3の画像 2 Samsung BD-F7500 Blu-ray Player Mother Board Replacement, Motherboard: 手順 9、 3の画像 3
    • To remove the three ribbon cables connected to the mother board, firmly grip the blue tab attached to the base and pull upwards.

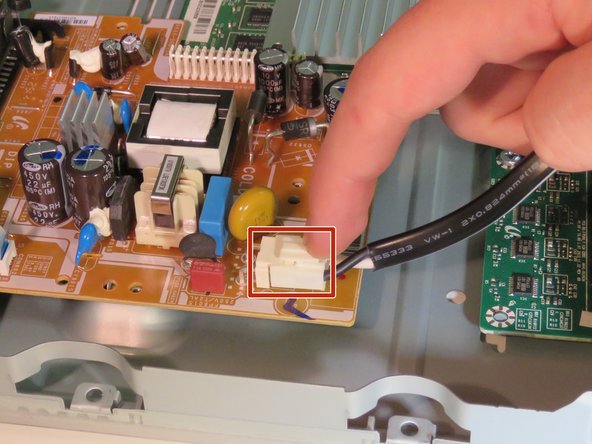
    • To remove the small, three wire connector, pinch the tab at the base of the wires and pull upwards.

  10. Samsung BD-F7500 Blu-ray Player Mother Board Replacement: 手順 10、 2の画像 1 Samsung BD-F7500 Blu-ray Player Mother Board Replacement: 手順 10、 2の画像 2
    • Remove two (2) 7 mm, black screws above HDMI outputs located on back of device using a phillips head #PH0 screwdriver.

    • Remove three (3) 7 mm, silver screws using a phillips head #J1 screwdriver.

    • There are screws that do not need to be removed, only remove those indicated in the image.

  11. Samsung BD-F7500 Blu-ray Player Mother Board Replacement: 手順 11、 1の画像 1
    • To remove the mother board grip the edges of the board and pull upwards.

    • It may be necessary to slide the mother board towards the front of the device to remove the Ethernet port from being lodged into the rear frame.

終わりに

To reassemble your device, follow these instructions in reverse order.

作成者

4人の作成者と共同で作成されました。

James McMicheal

メンバー登録日: 09/28/17

511 ポイント

5のガイドは作成済み

チーム

Eastern Washington University, Team S2-G6, Crane Fall 2017 Eastern Washington University, Team S2-G6, Crane Fall 2017人のメンバー

EWU-CRANE-F17S2G6

4 メンバー

5のガイドは作成済み

0 件のコメント

コメントを追加

統計データ:

過去 24時間: 0

過去 7 日: 2

過去 30 日: 17

今までの合計 1,007