メインコンテンツにスキップ

Samsung ATIV Book 9 Plus NP930X5J-S01US Fan Replacement

必要な工具と部品

  1. Samsung ATIV Book 9 Plus NP930X5J-S01US Fan Replacement, Battery: 手順 1、 2の画像 1 Samsung ATIV Book 9 Plus NP930X5J-S01US Fan Replacement, Battery: 手順 1、 2の画像 2
    • Remove the ten 4.3mm Phillips #00 screws from the bottom cover of the laptop.

  2. Samsung ATIV Book 9 Plus NP930X5J-S01US Fan Replacement: 手順 2、 3の画像 1 Samsung ATIV Book 9 Plus NP930X5J-S01US Fan Replacement: 手順 2、 3の画像 2 Samsung ATIV Book 9 Plus NP930X5J-S01US Fan Replacement: 手順 2、 3の画像 3
    • Press the button to release the bottom cover.

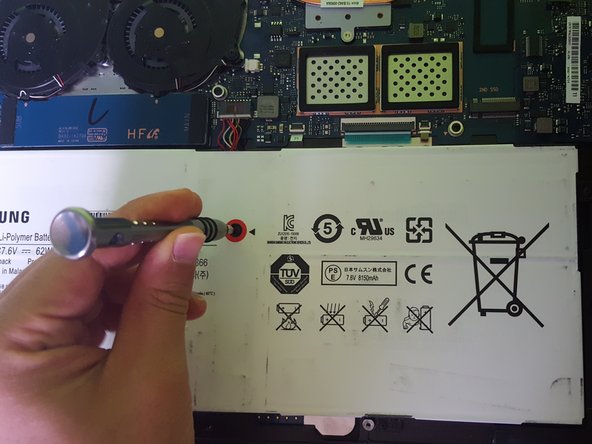
  3. Samsung ATIV Book 9 Plus NP930X5J-S01US Fan Replacement: 手順 3、 2の画像 1 Samsung ATIV Book 9 Plus NP930X5J-S01US Fan Replacement: 手順 3、 2の画像 2
    • Remove the five 4.3mm Phillips #00 screws from the battery.

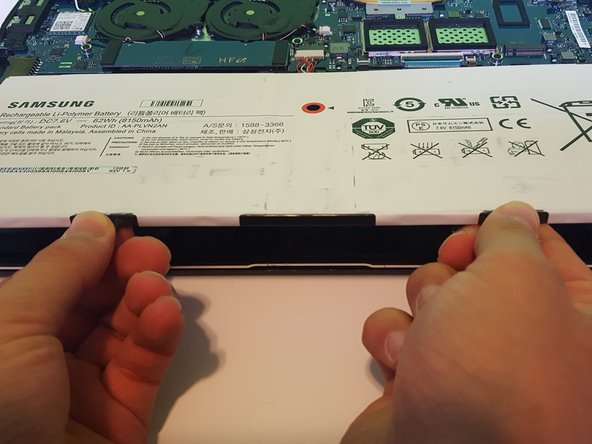
  4. Samsung ATIV Book 9 Plus NP930X5J-S01US Fan Replacement: 手順 4、 2の画像 1 Samsung ATIV Book 9 Plus NP930X5J-S01US Fan Replacement: 手順 4、 2の画像 2
    • Lift the battery with both hands and remove.

  5. Samsung ATIV Book 9 Plus NP930X5J-S01US Fan Replacement, Fan: 手順 5、 2の画像 1 Samsung ATIV Book 9 Plus NP930X5J-S01US Fan Replacement, Fan: 手順 5、 2の画像 2
    • Remove the four 4mm Phillips #00 screws from the fans.

  6. Samsung ATIV Book 9 Plus NP930X5J-S01US Fan Replacement: 手順 6、 3の画像 1 Samsung ATIV Book 9 Plus NP930X5J-S01US Fan Replacement: 手順 6、 3の画像 2 Samsung ATIV Book 9 Plus NP930X5J-S01US Fan Replacement: 手順 6、 3の画像 3
    • Disconnect the fans from the motherboard.

    • Remove the fans.

終わりに

To reassemble your device, follow these instructions in reverse order.

作成者

1人の作成者と共同作成されました。

Sean Kim

メンバー登録日: 04/12/18

640 ポイント

4のガイドは作成済み

チーム

UW Tacoma, Team S1-G2, Liner Spring 2018 UW Tacoma, Team S1-G2, Liner Spring 2018人のメンバー

UWT-LINER-S18S1G2

5 メンバー

4のガイドは作成済み

0 件のコメント

コメントを追加

統計データ:

過去 24時間: 1

過去 7 日: 1

過去 30 日: 2

今までの合計 597