メインコンテンツにスキップ

Samsung ATIV Book 9 Plus Heatsink Assembly Replacement

必要な工具と部品

  1. Samsung ATIV Book 9 Plus Heatsink Assembly Replacement, Back Cover: 手順 1、 3の画像 1 Samsung ATIV Book 9 Plus Heatsink Assembly Replacement, Back Cover: 手順 1、 3の画像 2 Samsung ATIV Book 9 Plus Heatsink Assembly Replacement, Back Cover: 手順 1、 3の画像 3
    • Turn the laptop upside down so that the underside of the laptop is facing you.

    • Use a Phillips #000 screwdriver to unscrew the 4.3 mm screws located on the edges and corners of the laptop.

  2. Samsung ATIV Book 9 Plus Heatsink Assembly Replacement: 手順 2、 1の画像 1
    • Lift the cover to reveal the interior of the laptop.

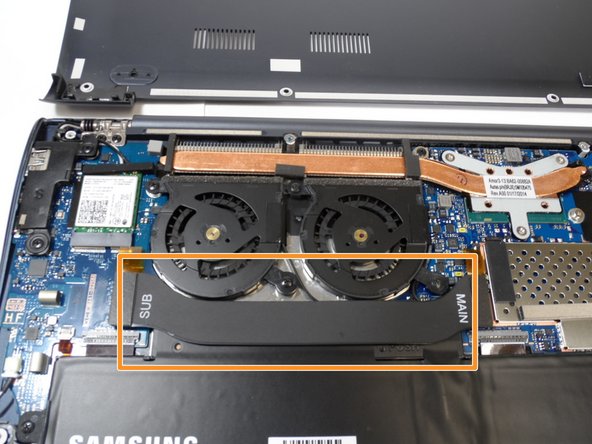
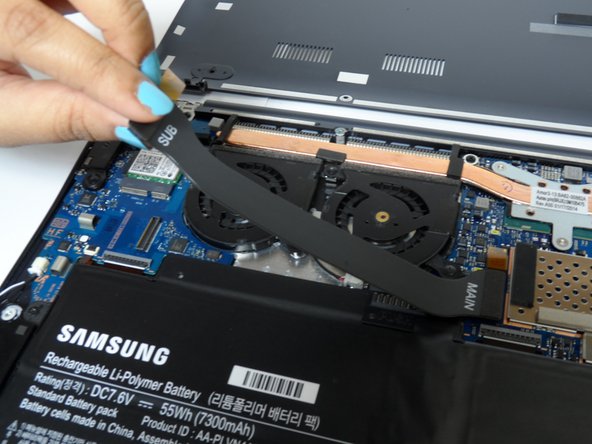
  3. Samsung ATIV Book 9 Plus Heatsink Assembly Replacement, Internal Fans: 手順 3、 3の画像 1 Samsung ATIV Book 9 Plus Heatsink Assembly Replacement, Internal Fans: 手順 3、 3の画像 2 Samsung ATIV Book 9 Plus Heatsink Assembly Replacement, Internal Fans: 手順 3、 3の画像 3
    • The fans should be in the upper left corner of the laptop if the laptop is oriented with the battery in the bottom half.

    • Gently lift the fans' black connector strip out of the way.

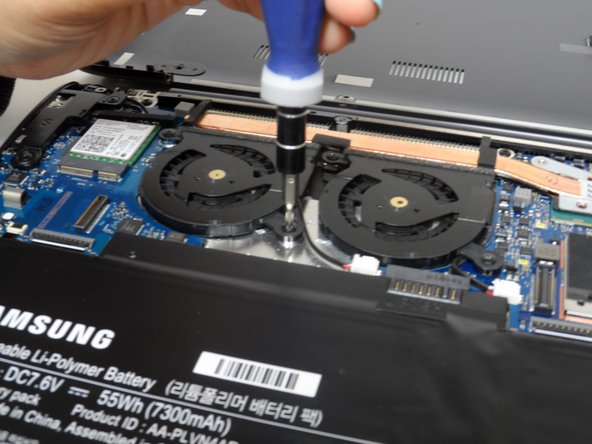
  4. Samsung ATIV Book 9 Plus Heatsink Assembly Replacement: 手順 4、 2の画像 1 Samsung ATIV Book 9 Plus Heatsink Assembly Replacement: 手順 4、 2の画像 2
    • Using a Phillips head screwdriver, unscrew four 4.55 mm Phillips #000 screws that bind the fans.

  5. Samsung ATIV Book 9 Plus Heatsink Assembly Replacement: 手順 5、 1の画像 1
    • Disconnect the white connectors by gently tugging on them.

    • Lift the fans from their positions.

  6. Samsung ATIV Book 9 Plus Heatsink Assembly Replacement, Heatsink Assembly: 手順 6、 1の画像 1
    • Using a Phillips head screwdriver #000 unscrew the motherboard from the rest of the components.

  7. Samsung ATIV Book 9 Plus Heatsink Assembly Replacement: 手順 7、 1の画像 1
    • Disconnect the two cables shown in the picture by gently pulling them off.

  8. Samsung ATIV Book 9 Plus Heatsink Assembly Replacement: 手順 8、 1の画像 1
    • Using a Phillips #000 screwdriver, unscrew the three labeled screws to detach the heatsink assembly.

終わりに

To reassemble your device, follow these instructions in reverse order.

作成者

2人の作成者と共同で作成されました。

Ryan Smith

メンバー登録日: 04/01/19

193 ポイント

2のガイドは作成済み

チーム

IUPUI, Team S7-G7, Wilson Spring 2019 IUPUI, Team S7-G7, Wilson Spring 2019人のメンバー

IUPUI-WILSON-S19S7G7

3 メンバー

2のガイドは作成済み

0 件のコメント

コメントを追加

統計データ:

過去 24時間: 0

過去 7 日: 0

過去 30 日: 6

今までの合計 619