メインコンテンツにスキップ

Samsung ATIV Book 9 Lite Charging Port Replacement

必要な工具と部品

  1. Samsung ATIV Book 9 Lite Charging Port Replacement, Charging Port: 手順 1、 2の画像 1 Samsung ATIV Book 9 Lite Charging Port Replacement, Charging Port: 手順 1、 2の画像 2
    • Put a protective lining such as a piece of cloth in between the screen and the keyboard when closed to protect your screen when performing this replacement.

    • Turn the laptop upside down to show the screws holding the back cover on.

    • Using a Phillips #0, remove the ten 4mm screws located around the edges and one central.

  2. Samsung ATIV Book 9 Lite Charging Port Replacement: 手順 2、 3の画像 1 Samsung ATIV Book 9 Lite Charging Port Replacement: 手順 2、 3の画像 2 Samsung ATIV Book 9 Lite Charging Port Replacement: 手順 2、 3の画像 3
    • Use two plastic opening tools to separate the back cover from the laptop.

    • This may take some force because the back cover is snapped into place before the screws are used to keep it in place.

  3. Samsung ATIV Book 9 Lite Charging Port Replacement: 手順 3、 3の画像 1 Samsung ATIV Book 9 Lite Charging Port Replacement: 手順 3、 3の画像 2 Samsung ATIV Book 9 Lite Charging Port Replacement: 手順 3、 3の画像 3
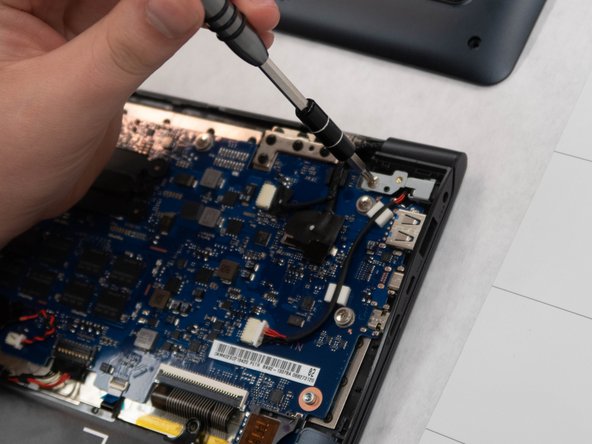
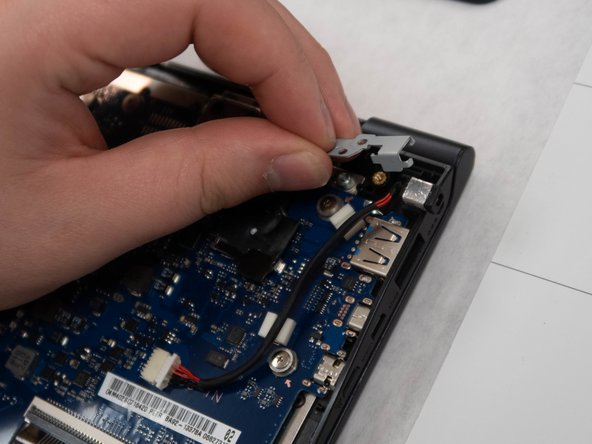
    • Using a Phillips #0, remove the one 3mm screw holding the metal holder/cover in place.

    • Using your hand, remove the metal holder that covers the port. This will take some jostling to remove.

  4. Samsung ATIV Book 9 Lite Charging Port Replacement: 手順 4、 3の画像 1 Samsung ATIV Book 9 Lite Charging Port Replacement: 手順 4、 3の画像 2 Samsung ATIV Book 9 Lite Charging Port Replacement: 手順 4、 3の画像 3
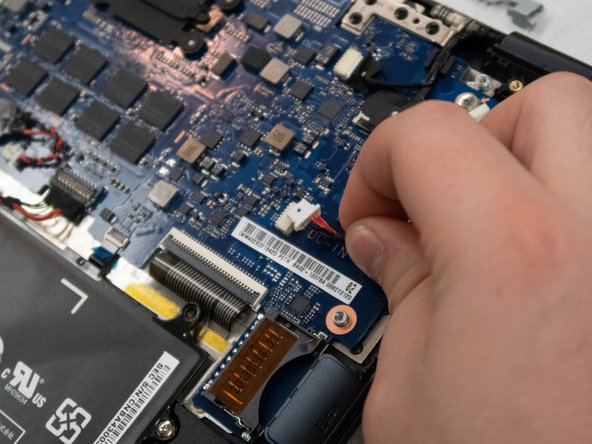
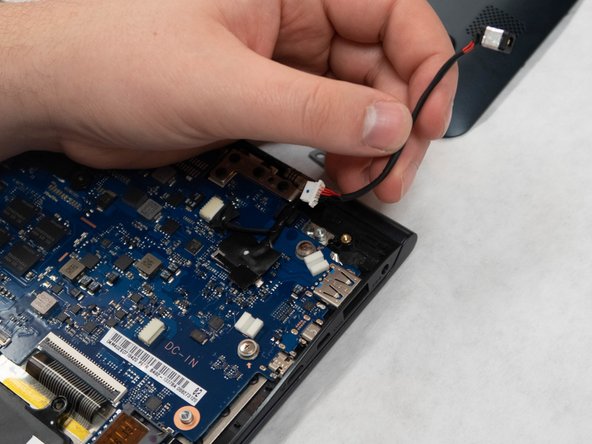
    • Using your hands, remove the cord that connects the charging port to the motherboard.

    • Do not pull on the cord as that might damage it; remove it by pulling on the white wire head.

    • Using your hands, remove the cord from the computer.

終わりに

To reassemble your device, follow these instructions in reverse order.

2 の人々がこのガイドを完成させました。

作成者

3人の作成者と共同で作成されました。

Phat Tran

メンバー登録日: 09/16/18

786 ポイント

5のガイドは作成済み

チーム

Washington State, Team S2-G5, Hope Fall 2018 Washington State, Team S2-G5, Hope Fall 2018人のメンバー

WSU-HOPE-F18S2G5

4 メンバー

5のガイドは作成済み

コメント 1 件

Thanks for the clear guidance on how to locate the charge port. In order to complete the job of replacing the port if it is defective I have two questions. (1) How exactly do you remove the part that inside the notebook that is directly connected to the hole where the adaptor pin is put when charging? (2) Where can a replacement part be found for this piece?

Craig - 返信

コメントを追加

統計データ:

過去 24時間: 1

過去 7 日: 1

過去 30 日: 1

今までの合計 483