はじめに
If the pump becomes weak, you will have to remove it, open it and revise it. It may need to be replaced. This is shown here.
必要な工具と部品
-
-
Remove the water tank.
-
Remove all the coffee beans.
-
Remove the brewing assembly.
-
Remove the drip tray and the coffee grounds drawer.
-
-
-
Pry up with a plastic opening tool at the bottom edge of the chrome-plated cover to lift up the coffee dispensing spout. This cover is often very tight, so you have to pry hard and hope that the part does not break.
-
When the lower edge of the spout is released, you can pry on the side edge until the chrome cover comes off completely.
-
-
-
Lift off the black cover over the coffee dispensing spout. The sliding nozzles will come off at the same time.
Ich habe eine HD8844. Hier lässt sich der Schritt nicht durchführen. Etwaig blockiert das Gelenk des (abmontierten) Espresso/Coffee Hebels. Irgendwelche Ideen wie man weiter vorgehen kann?
Bei mir das selbe Problem. Wie würde es gelöst?
atze0705 -
Wie ich unten schon geschrieben habe, sind hier ein paar Bilder. Man muss die Plastikhülsen der Lagerung rauskriegen, ich hatte allerdings bisher noch kein solches Gerät zur Reparatur.
VauWeh -
Hi, you need to insert a screw driver or a thin tool on the side of the vertical sliding part, between the sliding part and the casing . Inn order to disengage the vertical sliding part from the casing,do it on the each side.
then you need to remove the handle mecanism by unscrewing the 2 for 10 on the axle of the handle. Then rotate the handle on the horizontal position and pull it horizontally.
Remove by pulling out the plastic part from where you unscrewed the axle screw (x2).
Then the entire casing can be slided up and removed
Can you please add a picture of how to remove the handle mechanics because I can not find any additional screws to remove and I I am stuck!
My machine is the same as this but has the lever to change pressure for coffee or espresso, how does this lever come off? Please
-
-
-
Remove both Torx T10 screws on the left and right at the bottom edge of the coffee dispensing spout.
-
Pull off the hot water dispensing spout.
Wie löst man den Heißwasserauslauf (gelb hervorgehoben)?
Ich bin an diesem Punkt gestoppt und kann nicht weitermachen.
Danke
Es gibt möglicherweise verschiedene Versionen. Bei dem hier konnte man ihn einfach (kräftig) abziehen. Schau l, ob noch eine Schraube dran ist, glaube ich aber nicht.
VauWeh -
Zitat:
...Um die Heißwasserdüse herauszuziehen musste ich am Gehäuse einen Kunststoffring lösen, dahinter war noch eine T 10 Schraube verborgen…
Mechatronix
27.10.2020
VauWeh -
Um den Ring zu lösen mit kl Schlitzschraubendreher direkt unter dem Rohr die Kunstoffscheibe nach vorne abhebeln.Dann Schraube lösen und Auslauf abziehen.
-
-
-
Remove the Torx T20 screw on the finger guard of the grinder. Remove the finger guard.
-
Remove three Torx T10 screws in the bean container.
Das gleiche Problem mit der Kappe für die mahlgradeinstellung habe ich auch. Ich traue mich nicht, mit Gewalt daran zu ziehen. Weiß einer eine Lösung?
Ich muss nochmals fragen: da ist doch nur der gelbe Sechskant? Der bleibt einfach stehen, da ist keine Kappe?!
VauWeh -
Meine Maschine ist von 12/2017. Da hat man für die Einstellung auf dem sechskant eine Drehknopf drauf gesteckt. Damit es wohl einfacher ist.
Ich würde gerne ein Foto zu meiner Frage einstellen, es funktioniert leider nicht.
-
-
-
-
Grab the upper cover on the sides and lift it up.
-
Take off the silicone tube.
Anleitung ist super , habe jetzt nur so ein kleines Teil das mir beim Zusammenbau entgegen kam und ich sehe auf dem Foto nicht wo es hingehört. Kann leider kein Foto einstellen
Petra Modi - 返信
Das geht so: https://de.ifixit.com/Anleitung/Bilder+z...
VauWeh -
-
-
-
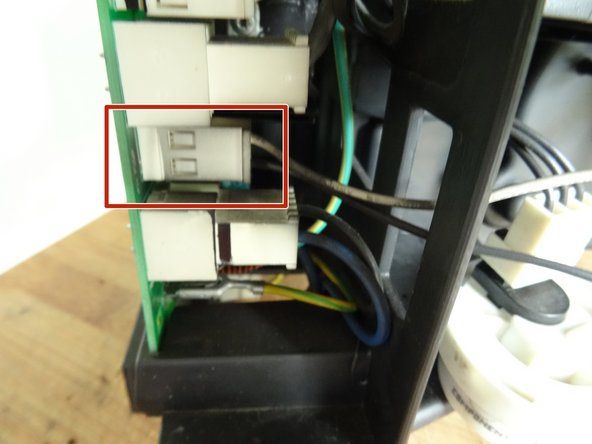
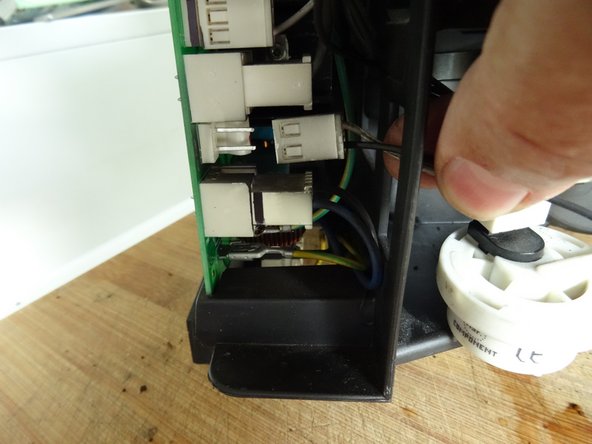
Remove the water level sensor cable from its brackets.
-
Carefully remove the plug from the water level sensor.
-
The cover is now free and can be removed.
How do I set the gears for the brew group . There is an arrow on the big ring gear
For Saeco Magic:
Saeco Royal Zahnrad im Getriebe austauschen Step 22
When installing, insert the big gear so that the zero mark points to the axis of the other gear. I think it´s similar for the Minuto.
Tip top… Super Anleitung. Alles ab und wieder dran bekommen. Jetzt läuft sie wieder. Geld gespart :-)
Super Anleitung. Bei mir musste nur das Displaykabel gereinigt und neu eingesteckt werden. Danach lief das Display wieder.
Vielen Dank
Bonjour, A la suite d'une panne (1)... problème de pompe, j'ai complètement démonté ma Minuto HD8761. Au remontage je ne retrouve pas comment connecter le cable du capteur de niveau d'eau. Il se termine dans un étui. Pouvez-vous m'aider?
Destouches - 返信
Le connecteur blanc est enfiché sur le circuit imprimé, comme indiqué sur la photo à l'étape neuf.
VauWeh -
Je comprends, sur ma machine le seul connecteur blanc déconnecté est celui que j'ai re-enfiché à côté de la tresse sur le board sous le tableau de commande (est-ce que ce pourrait être celui-là?).
Par contre j'ai 3 fils noirs venant de la carte mère. Ils se terminent par un petit connecteur blanc enfiché sur une sorte de mini circuit imprimé dans un cache bakélite; Sur le capteur de niveau d'eau il y a une sorte d'étrier de protection clippé.
Dommage que je ne puisse mettre une photo !
Destouches - 返信
Malheureusement, je ne vois pas bien le problème. Peut-être que cette belle vidéo vous aidera
VauWeh -
Merci, Bien expliqué et en enchainement beaucoup d'autres tutos pour la même machine.
Les vidéos s'arrêtant aux parties mécaniques je n'ai pas encore vu les connexions à cette carte sous le tableau de bord. Elles me permettraient de vérifier si je ne me suis pas trompé et inversé le branchement avec le capteur.
Je crois que je vais repartir de zéro en démontant complètement dans l'espoir de trouver le bon ordonnancement.
Note :
J'ai remplacé le convoyeur de café (cassé) et la petite pompe (bouchée) en commandant chez : mespiecesdetachees.com
Livraison rapide
Destouches - 返信
Suite. Effectivement, les 3 fils se terminant dans un cache sont ceux du capteur du moulin à café - je n'ai plus la clé et erreur 1. Et j'avais mal connecté les 3 fils du capteur de niveau d'eau.
La machine pompe, chauffe, distribue de l'eau chaude par la buse latérale, re-chauffe, se met en attente d'instruction, mout à la commande, envoie une dose dans le breweur mais distribue l'eau chaude par la buse eau chaude.... pas de café malgré le remplacement du solénoïde !!?
Destouches - 返信
Difficile à dire si on ne le voit pas. Peut-être que les tuyaux de l'électrovanne sont inversés ?
VauWeh -
Bonjour,
J'ai remplacé l'électrovalve tel qu'était la précédente avec un repère pour la borne + ! Normalement cela ne devrait pas poser problème.
Par ailleurs, j'ai vu sur une video, que je dois retrouver en les repassant en revue , que s'il y avait une obstruction cela pouvait créer un bypass et faire que l'eau chaude sorte par la buse du creamer au lieu de celle du café. Peut-être là le problème.
Puisque j'y suis je voudrais en profiter pour changer tous les joints toriques.... où les trouver ? Sauf ceux du percolateur qui est neuf.
Destouches - 返信
En Allemagne, il y a quelques revendeurs, (ils expédient certainement aussi), par exemple :
VauWeh -
Bonjour ou bonsoir,
update : Donc j'ai remplacé :
le convoyeur de café cassé,
l'électro-valve,
les joints toriques et la pipette de groupe café (chez mapalga.fr),
et dernièrement la pompe après qu'elle ait fait bcp de bruit et panne avec, en rouge la clé à fourche et 1.
J'ai remonté le tout et, en nettoyage comme en distribution café, l'eau chaude sort par le mousseur.
Si je l'obstrue, l'eau est alors distribuée au percolateur.
j'ai vérifié le circuit entre l'électro-valve et le percolateur. Rien ne me parait obstrué.
En inversant le branchement de l'électro-valve rien ne change.
Alors quid ?
Destouches - 返信
Ouf, c'est difficile. Sans voir la machine, je n'ai aucune idée, je suis désolé.
VauWeh -
@phildest je vous conseille de poser votre question directement sur le Forum pour atteindre le plus de monde possible ! Voici quelques tuyaux pour obtenir les meilleures réponses possibles. Bon diagnostic et bonne réparation !
Problème résolu :
- Voir mon commentaire du 22 juin -
Je me suis assuré que le trajet électro-valve - percolateur n'était pas obstrué. Faisant cela je me suis aperçu que lors du remplacement de l'électro-valve j'avais inversé le rebranchement des tubes en observant la petite flèche du sens de circulation de l'eau sur la pièce en laiton.
Remontage... tout fonctionne à la perfection !
Destouches - 返信
Félicitations pour la réussite de la réparation.
VauWeh -
Kann man dich irgendwie per Mail oder Telegramm erreichen? Ich habe ein Problem mit dem Gerät, was nirgends beschrieben ist und hoffe du könntest mir evtl. helfen.
Grundsätzlich ja, aber stelle doch erst mal die Frage öffentlich auf dieser Seite
[[Topic:Saeco Minuto#Saeco Minuto]]
unter Support, dann haben viele Menschen etwas davon. Dann sehen wir weiter.
VauWeh -
Hi, meine HD8834 zieht zwar Wasser, lässt es aber nicht durch den Kaffeauslauf raus, sondern direkt in die Abtropfschale. Ich hab schon alles gereinigt, entkalkt etc. und bin etwas ratlos. Kann auch nichts auf der Philips-Seite finden. Hast du eine Idee, was das Problem sein könnte? VG
Du musst halt den Wasserlauf beobachten. Der Testmodus hilft dabei. Um reinzuschauen musst du ein bisschen tricksen: vielleicht kannst du von der Tresterschublade die Vorderwand entfernen? Oder die Brühgruppe rausnehmen, die Serviceklappe öffnen und die Sensoren mit Kartonstreifen/Magneten(?) überlisten. Kommt Wasser aus dem Support-Ventil? Kommt Wasser aus dem Dampfrohr?
VauWeh -
-
-
-
Lift the coffee spout distributor up and remove it.
-
The coffee spout distributor tends to be dirty. Open it and clean it thorougly.
-


To reassemble your device, follow the above steps in reverse order.
To reassemble your device, follow the above steps in reverse order.
2 の人々がこのガイドを完成させました。
チーム

コメント 1 件
Sehr gute, leicht verständliche Schritt für Schritt Anleitung! Überhaupt die Dokumentation mit den Fotos ist Top !!!!
Suuuper!
Hat perfekt funktioniert!!
Ich besitze die Saeco/Philips HD 8831 ist anscheinend identisch mit der Minuto :-)
Ich habe alles gemacht was sie gesagt haben nur habe ich jetzt ein Problem ich habe ein Teil das ist eine Sprung Feder und ein Knopf wenn Mann es hinstellt sieht es aus wie ein Leuchtturm wo kommt das hin ?????
tamaraleandrolina - 返信
Kann's mir nicht vorstellen. Müsste ein Foto davon sehen.
VauWeh -
= TOP "BILD" Anleitung - doch leider FEHLT AUCH HIER einleitend - spätestens unter Absatz "Reinigung" - wie leider allzuoft er-googelt die ergänzende Info zur FRAGE :
WELCHE ALTERNATIVE könnte man(n) bei verstopftem Kaffeeauslauf der nur noch tröpfelt, anstelle teurer Entfettungs- Reinigungstabletten nehmen => Alternative Hausmittel = Pfeifenreiniger getränkt mit ... ? Petroleum, Spiritus, etc. etc. .... !? ODER gleich Ki & iT dumm programmiert verblödend getextet [x] "Lösungsmittel" wie Benzin in ... ? rein schütten > [x] "Reinigungsprogramm" KLICK + "Doppel-WUMS" !?
Pisa-KiTa Player - 返信
Naja, wenn er so wie hier gezeigt gereinigt wird, nix davon. Pfeifenreiniger ginge schon, wohl nicht auf Dauer. Sehr empfehlenswert ist der Austausch durch das neuere System.
Saeco Minuto Kaffeeauslauf V2 Umbau Kit 421941309991
Keine Chemie...
VauWeh - 返信
@VW ;-) DANKE => ...hatte grade mal wieder wie allzuoft mit Ki & iT Logik zu kämpfen, nachdem dumm programmierte "Registrierungs-Formular-Vorlage" NICHT REA USABILITY unterscheiden kann zw.
1.) "Name" = ... ? Kto.-Name od. Profilname !? +
2.) "Persönl. Nutzername" = ... ? Kto.-Name od. Profilname !?
Was dazu führte, daß mein "Klarname" im gesendeten "Kommentar" ÖFFENTLICH angezeigt wurde - ergo : [x] Zurück zu LOS - andere [x] "Profil bearbeiten" Monopoly Card gezogen und das ganze umgedreht - was den nächten DaU Fehler verursachte ... dumm, dümmer - KiTa Klötzchen-Architektur 2.0 ;-)
Aber "LOGIK" + Germanistik ist nicht jedem verkifften "Bit & Byt Puzzler's" Ding !?
=>> DIESER "KOM." kann v. KiTa 2,0L Suppenkoch Support [x] Deleted - werden !!!
Greetz from honory "ConstructorsCareCenter" Developers Help
Pisa-KiTa Player - 返信
Remove power cord.
Vincent Verduijn - 返信