メインコンテンツにスキップ

Ryobi RJ1861V Motor Replacement

必要な工具と部品

  1. Ryobi RJ1861V Motor Replacement, Saw Bar Assembly: 手順 1、 1の画像 1
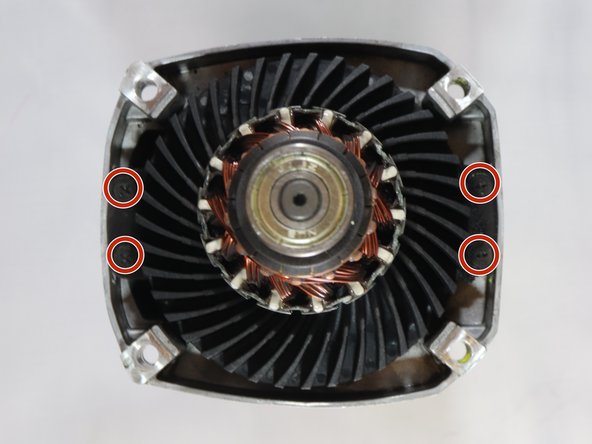
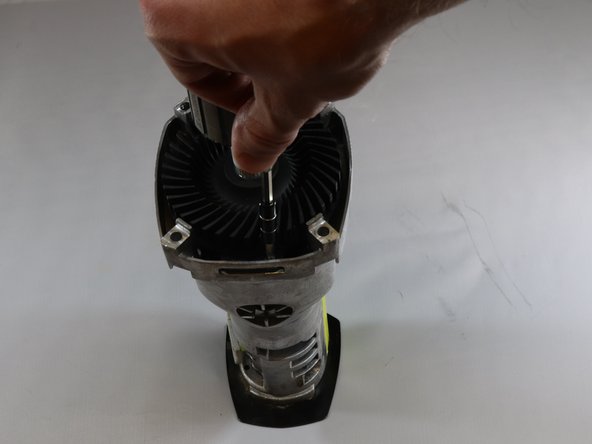
    • Use a Torx T5 screwdriver to remove the single 8 mm screw securing the shoe.

  2. Ryobi RJ1861V Motor Replacement: 手順 2、 2の画像 1 Ryobi RJ1861V Motor Replacement: 手順 2、 2の画像 2
    • Remove the rubber sleeve.

    • You may have to use some force as it has a tight fit.

  3. Ryobi RJ1861V Motor Replacement: 手順 3、 1の画像 1
    • Use a Torx T5 screwdriver to remove the six screws on the underside of the device.

  4. Ryobi RJ1861V Motor Replacement: 手順 4、 1の画像 1
    • Use a Torx T5 screwdriver to remove the four screws on the top of the gear case.

    • There are two screws on each side of the device.

  5. Ryobi RJ1861V Motor Replacement: 手順 5、 1の画像 1
    • Remove the backside panel.

  6. Ryobi RJ1861V Motor Replacement: 手順 6、 1の画像 1
    • Unscrew the four T5 Torx screws that hold the assembly bar in place.

  7. Ryobi RJ1861V Motor Replacement: 手順 7、 1の画像 1
    • Lift the assembly bar up and out of the chassis.

  8. Ryobi RJ1861V Motor Replacement, Assembly Bar Bearing: 手順 8、 1の画像 1
    • Begin with the top of the device facing up.

  9. Ryobi RJ1861V Motor Replacement: 手順 9、 1の画像 1
    • Insert needle nose pliers to remove the retaining pin at the top of the bearing.

  10. Ryobi RJ1861V Motor Replacement: 手順 10、 1の画像 1
    • Once the retaining pin has been removed, pull off the damaged bearing and insert a new one.

  11. Ryobi RJ1861V Motor Replacement, Motor: 手順 11、 1の画像 1
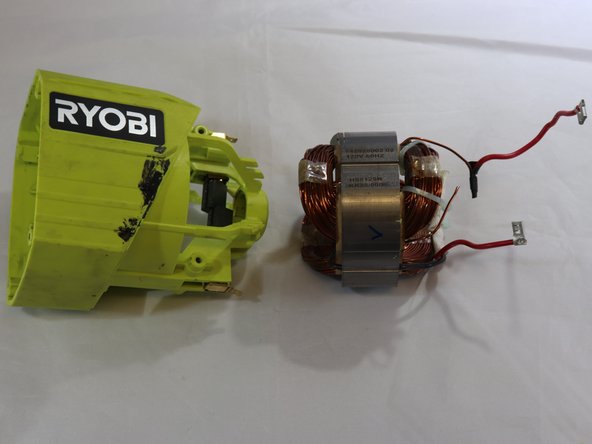
    • The motor is divided into two sections, one attached to the gear case and one attached to the handle.

    • This arrow indicates the section attached to the gear case.

    • This arrow indicates the section attached to the handle.

  12. Ryobi RJ1861V Motor Replacement: 手順 12、 3の画像 1 Ryobi RJ1861V Motor Replacement: 手順 12、 3の画像 2 Ryobi RJ1861V Motor Replacement: 手順 12、 3の画像 3
    • Use a Torx T5 screwdriver to remove the four screws attaching the motor to the gear case.

  13. Ryobi RJ1861V Motor Replacement: 手順 13、 1の画像 1
    • Use a Torx T5 screwdriver to remove the two screws inside the motor housing of the handle.

  14. Ryobi RJ1861V Motor Replacement: 手順 14、 2の画像 1 Ryobi RJ1861V Motor Replacement: 手順 14、 2の画像 2
    • Remove the four screws on the back of the housing with a Torx T5 screwdriver.

    • Flip the housing over and pull the motor up and out of the housing.

終わりに

To reassemble your device, follow these instructions in reverse order.

ある他の人がこのガイドを完成しました。

作成者

6人の作成者と共同で作成されました。

Adrian Williams

メンバー登録日: 04/08/19

183 ポイント

1ガイドが承認済み

チーム

0 件のコメント

コメントを追加

統計データ:

過去 24時間: 0

過去 7 日: 10

過去 30 日: 28

今までの合計 254