メインコンテンツにスキップ

Rocketfish RF-WHTIB-A Sender Speaker Input Terminal Replacement

必要な工具と部品

  1. Rocketfish RF-WHTIB-A Sender Speaker Input Terminal Replacement, How to Open the Rocketfish RF-WHTIB-A Sender: 手順 1、 1の画像 1
    • Remove the four rubber tabs from the bottom of the sender.

    • Pull hard to peel off the rubber tabs, as they are attached with adhesive.

  2. Rocketfish RF-WHTIB-A Sender Speaker Input Terminal Replacement: 手順 2、 1の画像 1
    • Use a Phillips #1 screwdriver to unscrew the four 12 mm screws on the bottom of the device.

  3. Rocketfish RF-WHTIB-A Sender Speaker Input Terminal Replacement: 手順 3、 2の画像 1 Rocketfish RF-WHTIB-A Sender Speaker Input Terminal Replacement: 手順 3、 2の画像 2
    • Flip the device over and remove the top casing from the sender.

  4. Rocketfish RF-WHTIB-A Sender Speaker Input Terminal Replacement, Sender Wireless Audio Module Chip: 手順 4、 1の画像 1
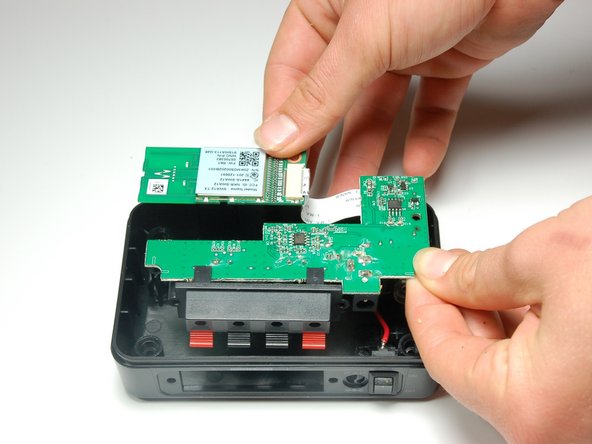
    • Use a Phillips #1 screwdriver to unscrew the 10 mm screw, securing the wireless audio module chip.

  5. Rocketfish RF-WHTIB-A Sender Speaker Input Terminal Replacement: 手順 5、 1の画像 1
    • Use a Phillips #1 screwdriver to unscrew the 10 mm screw, securing the motherboard.

  6. Rocketfish RF-WHTIB-A Sender Speaker Input Terminal Replacement: 手順 6、 1の画像 1
    • Use a Phillips #1 screwdriver to unscrew the two 10 mm screws located on either side of the speakers.

    • Secure the front speaker input terminal to release the motherboard.

  7. Rocketfish RF-WHTIB-A Sender Speaker Input Terminal Replacement: 手順 7、 2の画像 1 Rocketfish RF-WHTIB-A Sender Speaker Input Terminal Replacement: 手順 7、 2の画像 2
    • Using both thumbs, push the front speaker input terminal back towards the inside part of the device.

  8. Rocketfish RF-WHTIB-A Sender Speaker Input Terminal Replacement: 手順 8、 1の画像 1
    • Flip over the motherboard and wireless audio module chip.

  9. Rocketfish RF-WHTIB-A Sender Speaker Input Terminal Replacement: 手順 9、 1の画像 1
    • Gently slide the black retaining flap back, securing the ribbon wire gently away from the white bar.

    • There should only be a small separation between the white bar and the black retaining flap.

    • Tweezers are recommended for this step.

  10. Rocketfish RF-WHTIB-A Sender Speaker Input Terminal Replacement: 手順 10、 1の画像 1
    • Using your fingers, pull the ribbon wire out from the black retaining flap in order to completely disconnect the wireless audio module chip.

  11. Rocketfish RF-WHTIB-A Sender Speaker Input Terminal Replacement, Sender Speaker Input Terminal: 手順 11、 2の画像 1 Rocketfish RF-WHTIB-A Sender Speaker Input Terminal Replacement, Sender Speaker Input Terminal: 手順 11、 2の画像 2
    • Desolder the four metallic clasps that attach the panel to the motherboard.

    • For soldering techniques, follow the step in iFixit's soldering guide.

    • Do not attempt to solder if you are inexperienced.

終わりに

To attach a new speaker input terminal, follow these instructions in reverse order.

2 の人々がこのガイドを完成させました。

作成者

5人の作成者と共同で作成されました。

Caitlin Charlton

メンバー登録日: 03/22/15

756 ポイント

6のガイドは作成済み

チーム

Baylor, Team 4-2, Williams Spring 2015 Baylor, Team 4-2, Williams Spring 2015人のメンバー

BU-WILLIAMS-S15S4G2

3 メンバー

6のガイドは作成済み

コメント 1 件

Where can I get a replacement input terminal?

Greg Surrett (terminal case) - 返信

コメントを追加

統計データ:

過去 24時間: 0

過去 7 日: 1

過去 30 日: 7

今までの合計 2,251