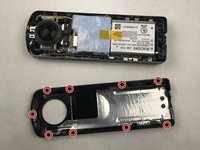
メインコンテンツにスキップ

Ricoh Theta S Outer Case Replacement

必要な工具と部品

  1. Ricoh Theta S Outer Case Replacement, Outer Case: 手順 1、 1の画像 1
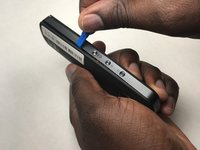
    • Wedge the spudger underneath the small plastic square located on the bottom of the device.

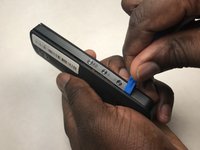
    • Move the spudger to remove the plastic cover.

  2. Ricoh Theta S Outer Case Replacement: 手順 2、 2の画像 1 Ricoh Theta S Outer Case Replacement: 手順 2、 2の画像 2
    • Remove the four 3-mm screws located on the bottom of the device. You will need to use the Phillips 00 screwdriver.

  3. Ricoh Theta S Outer Case Replacement: 手順 3、 3の画像 1 Ricoh Theta S Outer Case Replacement: 手順 3、 3の画像 2 Ricoh Theta S Outer Case Replacement: 手順 3、 3の画像 3
    • Insert the plastic opening tool in between the panels shown.

    • Apply pressure to unlatch the 9 spring clips located around the perimeter of the device.

    • Lift the panel from the device.

終わりに

To reassemble your device, follow these instructions in reverse order.

2 の人々がこのガイドを完成させました。

作成者

2人の作成者と共同で作成されました。

Bradley Sutton

メンバー登録日: 11/07/17

839 ポイント

4のガイドは作成済み

チーム

IUPUI, Team S3-G1, Harley Fall 2017 IUPUI, Team S3-G1, Harley Fall 2017人のメンバー

IUPUI-HARLEY-F17S3G1

3 メンバー

6のガイドは作成済み

1件のガイドコメント

Where can find spare part case?

Thanks

Franco - 返信

コメントを追加

統計データ:

過去 24時間: 0

過去 7 日: 5

過去 30 日: 25

今までの合計 2,488