はじめに
Retina MacBook 2015のUSB-Cポートを交換するための修理ガイドです。
ロジックボードのダメージを防ぐために、MacBookの修理が完了した時、電源を入れす前に、5WのiPhone充電器とUSB-C - USB-Aケーブルを使って、低電圧電源に接続します。これらの付属品はMacBookには含まれていませんので、事前に用意しておいてください。
必要な工具と部品
ビデオの概要
-
-
下部ケースを固定している次の8本のネジを取り外します:
-
2本の1.8 mm P5ペンタローブネジ
-
4本の2.9 mm P5ペンタローブネジ
-
2本の6.1 mm P5ペンタローブネジ
-
-
-
上部ケースとディスプレイを一緒に前端から持ち上げ、約45°の角度まで起こします。
-
-
-
スパッジャーの平面側先端を使って、小さなゴールドの”バッテリーの切断”ボタンを長押しします。
-
電源LEDが点灯している場合、LEDが消えるまでボタンを長押しして離します。 これには最大10秒かかります。
-
LEDが点灯していない場合、5〜10秒後にボタンを離します。 再度、5〜10秒間押し続けてから離します。 最後の3回目も5〜10秒間押し続けてから離します。
Wow okay could someone explain why this is necessary? What happens if you skip this step and simply undo the screw to disconnect the power?
Removing the screw does not disconnect the power—power comes from the battery terminals contacting the underside of the logic board, and they’re tricky to separate reliably at this stage of disassembly. This step is the safest and easiest way to kill power; don’t skip it.
Hi what will happen if i skip this step, coz i did tried to power down the battery by pressing small gold button, but no avail. the LED light still there even after more than 5 times press (5-10secs or more) each press.
Did you learn the answer to your question? I'm having the same issue -- I keep pressing the gold button but the battery light stays on.
R McP -
Mi laptop doesn’t turn it on doing that ):
-
-
-
前端から持ち上げて、下部ケースを約45°の角度で開きます。
Before the IPD flex cable can be removed the battery disconnect button has be held down for up to 10 seconds. If the LED near the battery connector is switched on it shows that there is power going through the logic board from the battery, once the button is pressed and this light goes off the machine is safe to be worked on.
-
-
-
ピンセットを使用して、トラックパッドケーブルのZIFコネクタを覆っているテープをはがします。
Only peel back the first half of the tape covering the trackpad cable ZIF connector—do not completely remove.
Gently - lift tape while wiggling cable side to side. Be sure tape is released, but do not remove completely
-
-
-
スパッジャーを使用して、トラックパッドケーブルのZIFコネクタ上の固定フラップを慎重に持ち上げます。
This is very tricky indeed - at least on my computer. I failed at this point - having skipped to it as sugested above so as not to stress the ribbons on the other side. The ZIF was not as I expected. They had opened when I pulled up the stick cover and I found I was working on the socket itself. The top edge came adrift after almost no pressure being put on it. The ribon did not come free with gentle pulling though. At that point I put the back on again… waited until the battery recharged a bit and found I had not nroken it after all. I doubt I shall try again. It is much harder to replace than the 15 inch - much…
I’ve just found that I have broken it after all. No keyboard. Bluetooth still works so I can use the machine.
All in all, an expensive mistake. BTW - I did NOT get the kit from IFIXIT - not sold here.
I found “Recognizing & Disconnecting Cable Connectors”
useful, esp. for someone who has not used ZIF connectors and retaining flaps before. There are several retaining flaps that need to be opened. The first time is tricky as you need a sense of how much force to apply. I used the flat end of the provided spudger. Apply progressively firmer upward pressure until the retaining flap pops open. The first time is tricky, but straightforward thereafter.
Mouse back and forth between the two right-side thumbnail photos and you will get a little animation feel showing how these ZIF connectors operate—it's very helpful. Apply light but consistent pressure to pop them up. Helps to go side to side if they're a little stubborn.
-
-
-
フレームのスロットから慎重に引き抜いて、トラックパッドからトラックパッドリボンケーブルの接続を外します。
it would be nice to have a specific picture of the cable and contacts and how it is oriented in the ZIF connector. This isn't clear in any of these photos or text.
My trackpad cable snapped so had to replace it and none of the replacement cables have the tape which is on the smaller end to the trackpad. The other end is fairly easy to figure out but the trackpad end isn't as the cable makes a 180 degree turn inside the case (poor design).
-
-
-
下部ケースを水平状態に置くために、MacBookを慎重に裏返します。
-
上部ケース/ディスプレイアセンブリを約90度の角度まで持ち上げ、 手で固定する必要がないように、安定した頑丈な衝立に立てかけます。
-
上部ケースを固定するためトラックパッドの近くにテープを貼り、不用意な動きを防ぎます。
You can open the laptop screen all the way open with it flat in the table (screen facing up) and the keyboard should stay up.
-
-
-
バッテリーコネクタをロジックボードに固定している2.9 mmのT5トルクスネジを1本取り外します。
the moment you opening macbook case and before any tinkering with connections, you MUST press little yellow button on logicboard, located on the right from battery connector - this will disable all power to the board. You can check by looking at the small led on left side of the battery connector - if there is very faint light, it means that power is still there. After pressing button light should go off. Removing screw is not necessary at all, and like I said - you MUST disable power before any touching to connections etc.
Where it says
“2015 models have a silver grounding clip with two foam pads directly under this screw“
I have a 2015 MacBook & the grounding clip is not there!
I’m using this guide to investigate why there are lines on screen or darker screen at certain angles of opening it. Also a background ghosting effect on screen too.
No obvious damage or loose connectors so wondered if the lack of grounding clip can cause these symptoms?
Anybody out there know?
Either buy the clip and check, or replace the screen (or LB), but the macbook would more likely not start if there is a missing grounded connection, depending on what is being grounded.
Sean -
-
-
-
追加の予防策として、ロジックボードとバッテリーコネクタの間にバッテリー絶縁ピックを挿入して、バッテリーを物理的に外すことができます。
I HAD TO DO THIS TWICE. After replacing the battery while following this guide to a 'T', the battery was not being recognized by the logic board. Strangely, with the power unplugged it would still light up the screen and tell me the battery was at a critical level, but it would not boot. Resetting the SMC had no effect. I thought I killed my computer or got a bad battery, so as a last ditch effort I re-opened the case, pressed the battery disconnect button, removed the screw and inserted the battery separation tool again to Physically Disconnect the battery from the mainboard. After about 5 minutes I then removed the tool and reassembled everything, plugged in via 5v iphone charger and USBA-C cable again and LO, the battery is now reporting correctly, charging correctly and allowing me to boot on its power .
-
-
-
-
USB-Cポートケーブルブラケットを固定している2本のネジを取り外します:
-
1.1 mmトライポイントY00ネジ
-
3.5 mm T5トルクスネジ
I should have read the comments before using the provided 1.1 mm Tri-point Y00 bit. I almost stripped the screw but was able to use a small flat head bit to open the screw.
Ifixit: you may want to update this part in the instructions. Not everyone reads the comment section, esp. when it comes to specification of bits which is basic and must be accurate. This is one of the more critical ones in the procedure that can easily go south. The rest of the instructions are excellent.
early 2015 model here. I’ve used a Y1.5 with cautiously applied down force.
My 2015 had a 2.5mm Y screw not a Y000.
Adding to the helpful comments above, on replacing the 1.1mm tripoint screw, I found the the magnetism of the nearby speaker coil overcame that of the driver and would draw the screw away or the combo of forces would fling it out of the work area! After fiddling with it for too long, I used some of the battery adhesive removed earlier to attached the screw to the driver. Wax would probably work better if I’d had some.
I used the PH00 head to unscrew what they call the “1.1 mm Tri-point Y00 screw”, NOT the Y00 head, and it unscrewed perfectly fine.
Agreed, my screw was a PH00.
I have an early 2015 MacBook and it was a PH00 head I needed to use.
Sean Stein - 返信
-
-
-
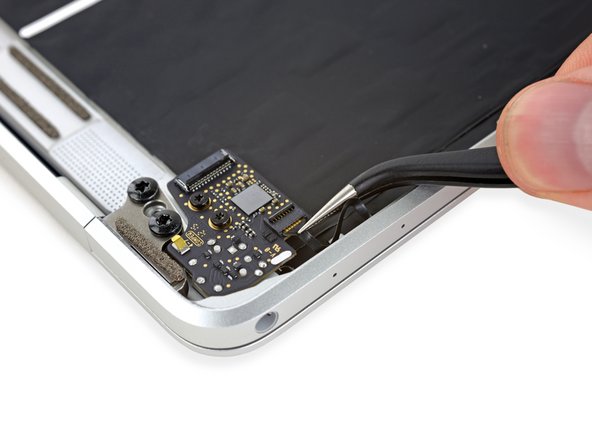
スパッジャーの平らな端を使って、USB-Cポートケーブルブラケットをロジックボードからまっすぐ持ち上げて外します。
Emphasis on aligning the bracket correctly. What the pictures do not show is that underneath the flat part of the metal bracket (the area between the two screw holes) is a connector that needs to be accurately aligned. Aligning the two screw holes does not imply that the connector is seated correctly.
After I re-assembled my 2015 MacBook power would not come on. I thought I had damaged the logic board despite being careful and following instructions. Diagnosing the problem took a while. Retracing the steps and focusing on power supply I was able to determine that the metal flap which hides the connector underneath had not made proper contact.
What I did was to use a finger to get a tactile feel for the connector underneath the metal bracket aligning properly and then press down vertically when it seemed to be aligned. It’s a subtle tactile feel. After re-doing this step, I got power back. Be careful not to damage the connector as noted in the instructions.
Good tip. It’s so easy to damage these fragile connectors by forcing the plug in and reattaching the mounting plate screws
-
-
-
オーディオジャックボードのリボンケーブルを、ZIFコネクタからまっすぐ引き抜いて取り外します。
The audio jack cable is a bit of a pain to reinsert. I found if I turned the screen and the bottom on its side, like an open book, I had much better orientation and it was much easier to insert.
Excellent guide and all works like a sharm, but was one issue. After full assemble there wasn't sound. Then I open Macbook again and disconnect and connect audio cable. You must insert cable so, that white stripe will not visible. And sound reveal!
This helped me, thanks!
-
-
-
その場合は、ピンセットでテープを剥がしながら、スパッジャーの平らな端を使用して保持フラップを押し込みます。
-
-
-
ディスプレイケーブルをコネクタからまっすぐゆっくりと引き出して取り外します。
A step was skipped. You have to flip up the metal locking tab on the socket before the cable can be removed. See the photo.
And be careful when re-inserting the connector. One end of the two indentations got a little bent (I did not notice) which resulted in a black screen when powering up. I used a heat gun (low setting) to separate the cable from the labtop housing. When re-assembling, first insert the connector (after closing the metal flap as instructed), verify that it’s properly seated, then re-attach the rest of the cable to the laptop housing. In the first try, I first re-attached the cable to the housing, then tried to insert the cable connected into the metal socket. Because of a lack of slack, the cable connector at one end got bent slightly. After identifying the problem, I had to straighten it/unbend out using my fingers. Hence it is easier to insert the connector first, then attach the rest of the cable to the laptop housing.
Black screen upon reboot:
Inserting the display ribbon cable into it’s contact without closing the metal flap before reassembly will result in a black screen.
I live in a colder climate (and it's winter now) - a hair dryer was absolutely necessary to get this cable loose.
The flap must remain closed when the cable is reinserted during reassembly. Carefully line up the cable with the gold contacts facing down, and gently slide it into the connector.
OK, when I read those directions, I did it wrong. I followed the instructions and kept the flap closed when the cable was reinserted during reassembly. Of course I got a blank screen. It should read the flap must be closed AFTER the cable is reinserted during reassembly.
-
-
-
スパッジャーを使用して、デュアルマイクアセンブリリボンケーブルのZIFコネクタ保持フラップを開きます。
Does unplugging the "dual microphone assembly ribbon cable" affect anything other than the microphones? The headphone jack is separate, for example, right?
Right. We haven't tested it, but unplugging that cable shouldn't affect anything other than the microphones. You can see the microphone assembly in this guide.
-
-
-
ピンセットを使用して、マイクアセンブリのリボンケーブルをコネクタから引き抜きます。
I broke the microphone assembly ribbon cable, from step twenty five. Is there anyway to fix this, soldering kit, or can I order a new cable online?
-
-
-
USB-Cポートリボンケーブルを平らになるまで広げ、下のブラケットにアクセスできるようにします。
my a1534 had slightly different connector 821-00828-A an it had two torx screws attaching it
-
-
-
ディスプレイヒンジを固定している4.8mm T8トルクスネジを4本外します。
On an early 2015 model, I found the T9 Torx bit to be too tight a fit in the hinge screw heads. Almost to the point where one screw head got slightly damaged as the bit slipped when turning as it hadn’t gone in far enough. This is the T9 bit that came with the iFixIt 64 bit driver kit.
So I used the T8 bit instead and managed to loosen the other screws much more easily. It’s a slightly looser fit but it goes in further and didn’t slip even though the screws on this particular machine were very very tightly screwed in.
@cool_breeze I think you’re right and this is probably a mistake in the guide. Apple commonly uses T8 screws, T9 not so much. But it can be hard to tell for sure depending on which toolkit you happen to be using. I’ll update the text to say T8! Thanks for the heads-up.
-
-
-
ディスプレイアセンブリを片手で持ち、上部ケースをもう一方の手で持ち、ヒンジを上部ケースのくぼみから移動させるために、それらを少し押し合わせます。
-
ディスプレイをゆっくりと引き戻しながら、大文字を前方に押します。
-
2つのディスプレイヒンジが大文字をクリアしたら、ディスプレイを取り外して脇に置きます。
How long does it take usually before you should hear the chime? Any way to test that the USB-C has been properly plugged backed in before reassembling everything?
-


このデバイスを再組み立てするには、インストラクションを逆の順番に従って作業を進めてください。
ロジックボードのダメージを防ぐために、MacBookの修理が完了した時、電源を入れす前に、5WのiPhone充電器とUSB-C - USB-Aケーブルを使って、低電圧電源に接続します。
このデバイスを再組み立てするには、インストラクションを逆の順番に従って作業を進めてください。
ロジックボードのダメージを防ぐために、MacBookの修理が完了した時、電源を入れす前に、5WのiPhone充電器とUSB-C - USB-Aケーブルを使って、低電圧電源に接続します。
16 の人々がこのガイドを完成させました。
以下の翻訳者の皆さんにお礼を申し上げます:
100%

これらの翻訳者の方々は世界を修理する私たちのサポートをしてくれています。 あなたも貢献してみませんか?
翻訳を始める ›

5 件のコメント
Can I just pay you to do it lol.
Only if you were here, I would pay you 400 to fix it. #NEVER BUYING
Is there a guide for the early 2015 MacBook pro?
Did it and worked perfectly! Only issue was that at about step 25 - 30 I noticed a small extra bracket on the tray. I can’t figure out what it is..
Check out here:
If, like me, you didn’t have a P5 Pentalope screwdriver but did have one that fits an iPhone.
You can sand down the tip until it’s the right size.
Stuart - 返信
Thank you Stuart! I would never have thought of this and it worked perfectly.
R McP -
Hello,
where do I plug the USB-C to USB-A cable on MacBook MacBook Pro (Retina, 15-inch, Mid 2015)
I can’t any port suitable for USB-c !??
sissi - 返信
My MacBook had P4 pentalobe screws, notP5
Greg Lavardera - 返信
Big thanks to Jeff for such thorough and detailed instructions. This is definitely a more advanced repair so if you're not comfortable with making such repairs, like having experience working on iPhones, computers, etc., you might think twice before attempting. It's very helpful to read all the instructions thoroughly before starting. Plan on 3 to 4 hours—the battery removal along with its adhesive is a real $@$*-show, but totally doable if you followed Jeff's recommendations.
I'll post a few tips in the comments on each step that I think is worth noting but I will mention here one of the trickier steps. ZIF connectors on the flat cables can be a little tricky, especially if you have never done these. Before attempting to do the first one (step 8) review the others in steps 16, 20, and 25. You'll get a better sense of how these little retaining flaps flip up and what they actually look like when you study each photo in each step—they are very tiny and fragile.
Steven Gibson - 返信
Just finished replacing the battery. I followed the directions that came with the battery instead of this guide. In short, Steps 15 to 35 are not necessary. You don't have to completely disassemble the laptop to replace the battery.
Andrew Mohan - 返信
Thanks. I skipped it too and it worked.. It was a painstaking to remove the two side batteries as the cables were connected. But a little patience gets the job done. I did however remove the audio jack connector but from the audio board. Removed the display connector and the usb-c bracket to get the bottom case free.
Paras Tolani -
READ EVERY STEP, AND EVERY COMMENT FOR THAT STEP BEFORE ATTEMPTING! Go slow. Think first. Be organized. No probs.
David Nagle - 返信